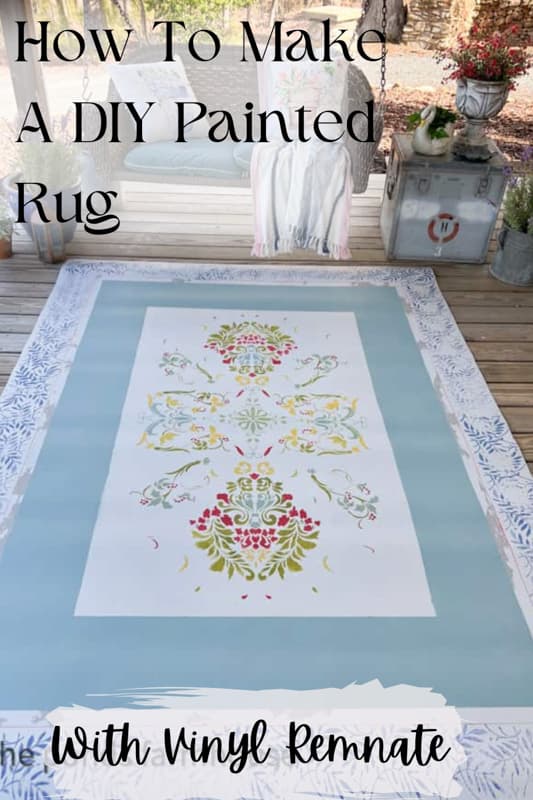
How To Make A DIY Painted Rug
Want to learn how to make a unique painted rug? This easy DIY Rug tutorial will teach you how to make budget-friendly, one-of-a-kind rugs with inexpensive vinyl flooring for unique home decor.
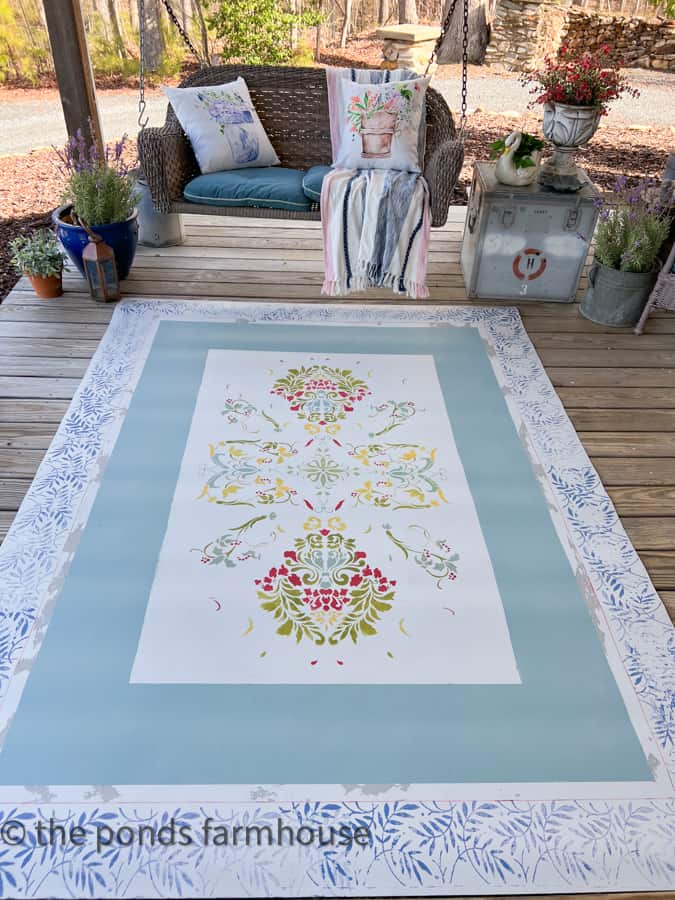
Our front porch’s seating area needs a new rug, but I can’t find exactly what I want. So, I decided to paint my own rug to create the fun, colorful space I envisioned. These rugs are fun to make, and I’ll show you how to make your own.
(Posts on The Ponds Farmhouse may contain affiliate links. As an Amazon Associate, I earn from qualifying purchases. See the full disclosure details here.)
How To Make Rugs?
First, when using vinyl flooring to make your custom rug, you have complete control over the size and shape of the rug.
This rug tutorial is intended for indoor rugs. However, they can be used outdoors when under cover and protected from direct rain or snow.
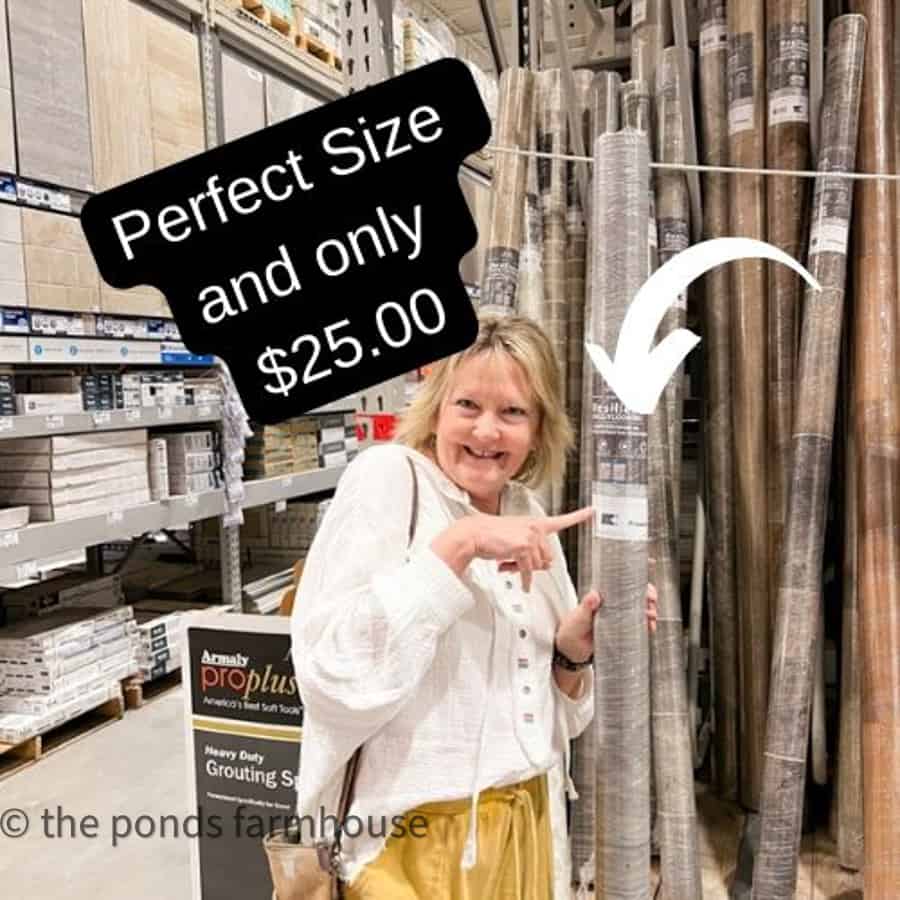
Where Can I Find Linoleum Vinyl Flooring To Paint?
You can work with scrap flooring or check out inexpensive small pieces at your local home improvement store.
If you only need a small rug, it would be worth checking with a flooring company and asking for free scraps.
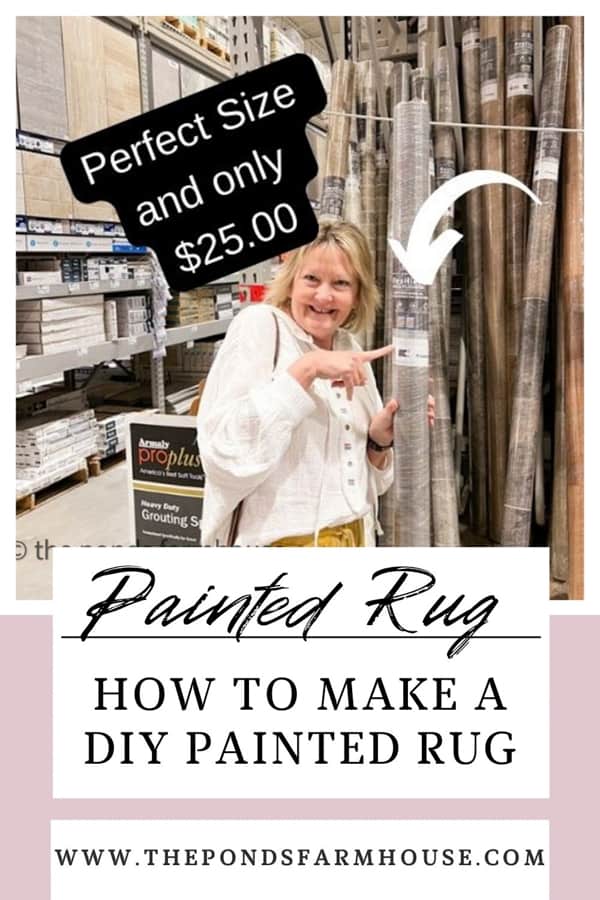
I purchased a 6′ x 8′ piece of vinyl, and the size was perfect for my project. It was only $25.00, and I didn’t have to cut it, although it is easy to cut to the size you need.
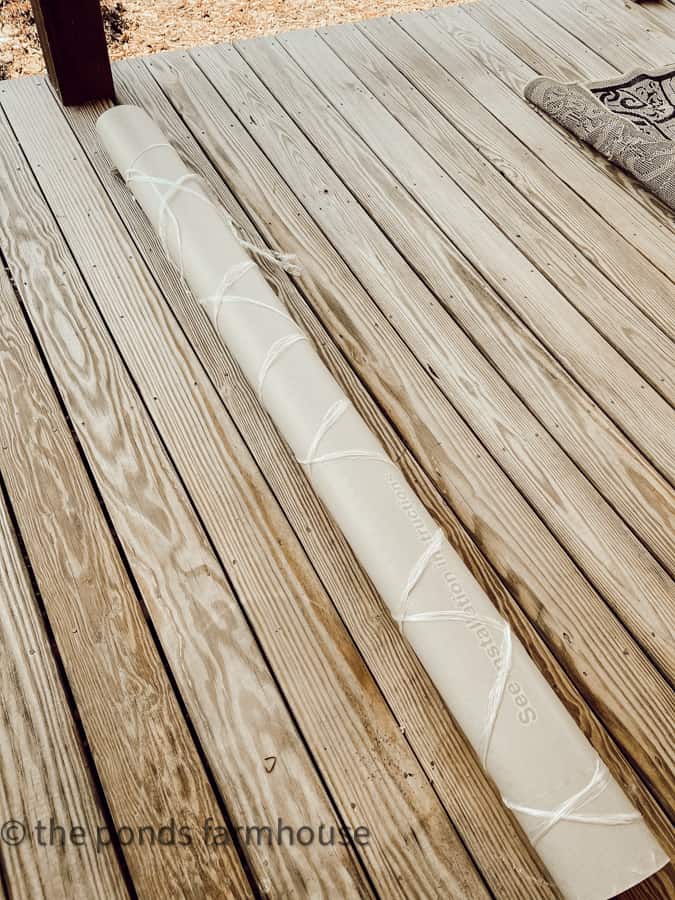
If your vinyl has been rolled, you can begin by rolling it inside out and leave it for at least 24 hours before you start your project.
How To Make Your Own Rug Tutorial
Finding a spot to work in is the only thing complicated about making your own rug.
I originally planned to paint the rug on my front porch since that’s where I plan to use it. However, we are in the midst of pollen season and high winds.
So on to plan B. The only other area large enough is the floor between the kitchen and dining area.
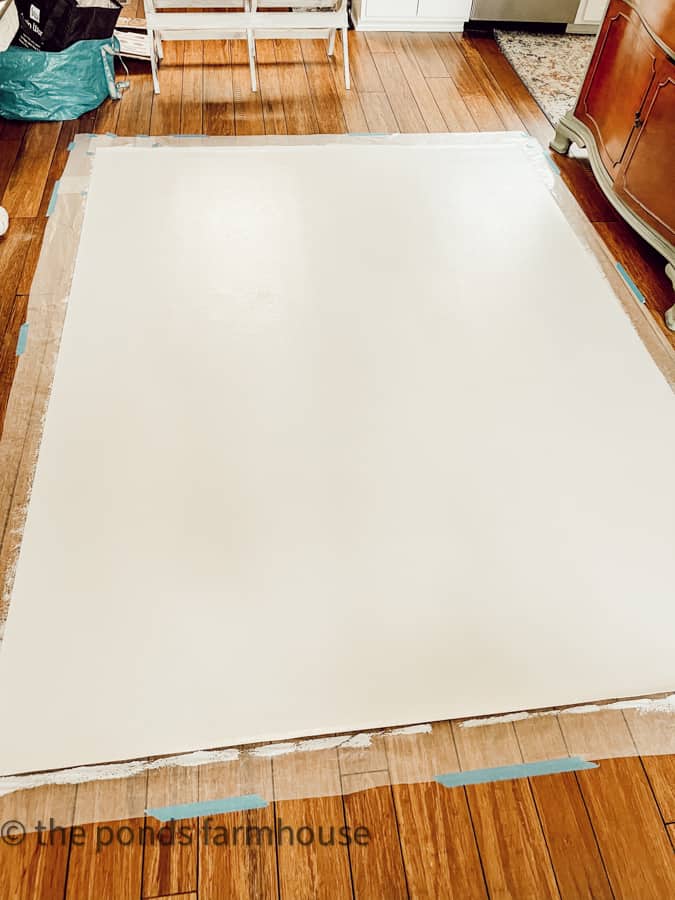
If you paint inside, you must protect your floors.
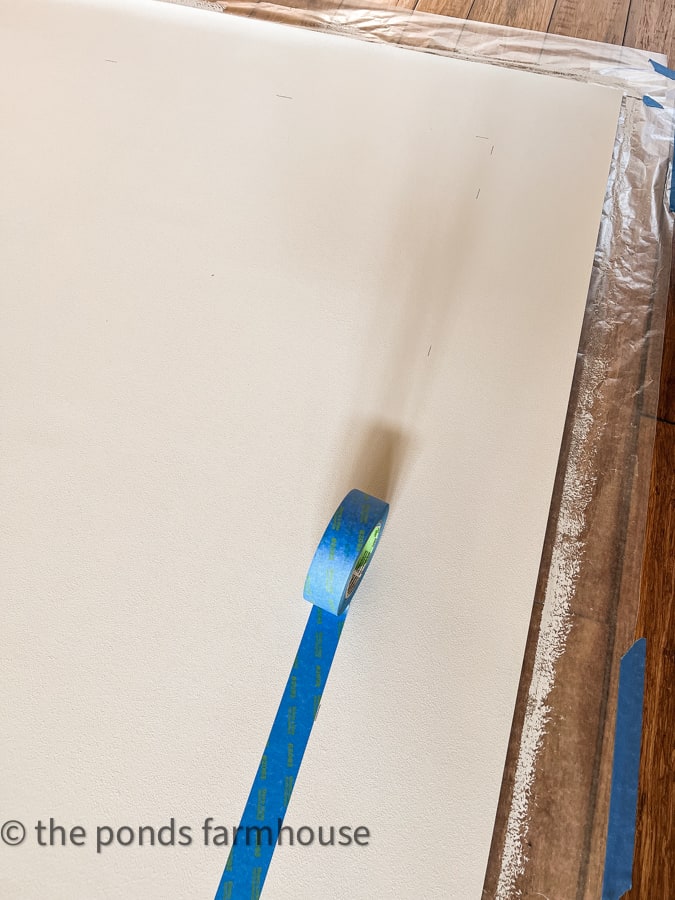
I used wax paper and taped it to the floor around all edges of the vinyl rug.
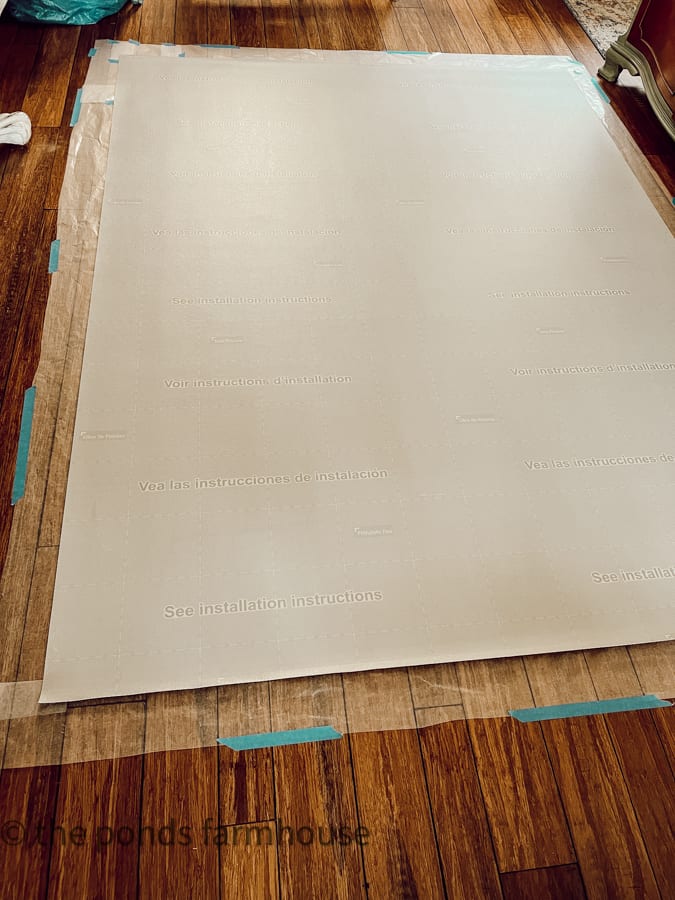
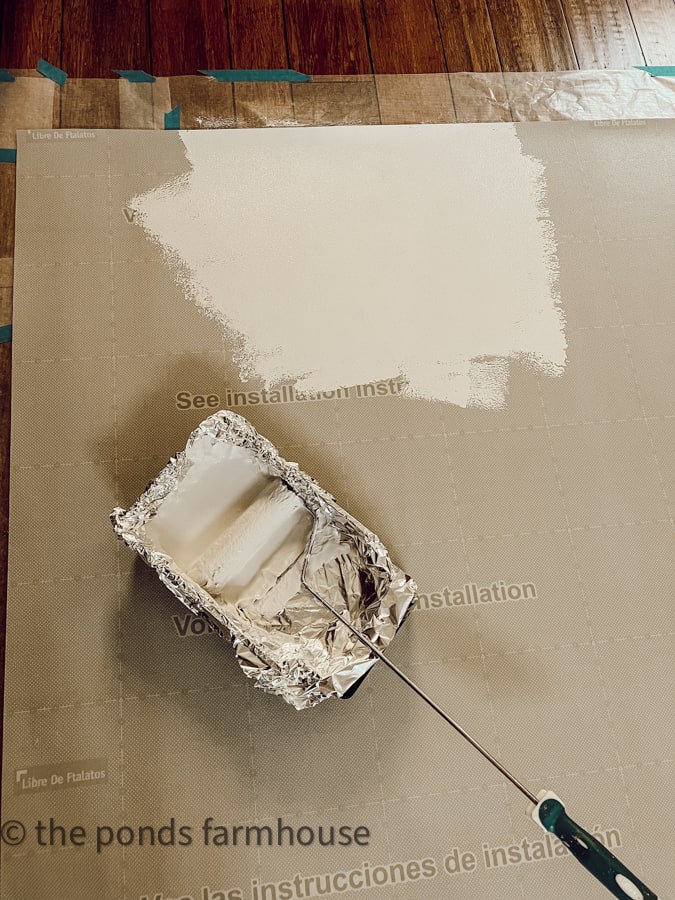
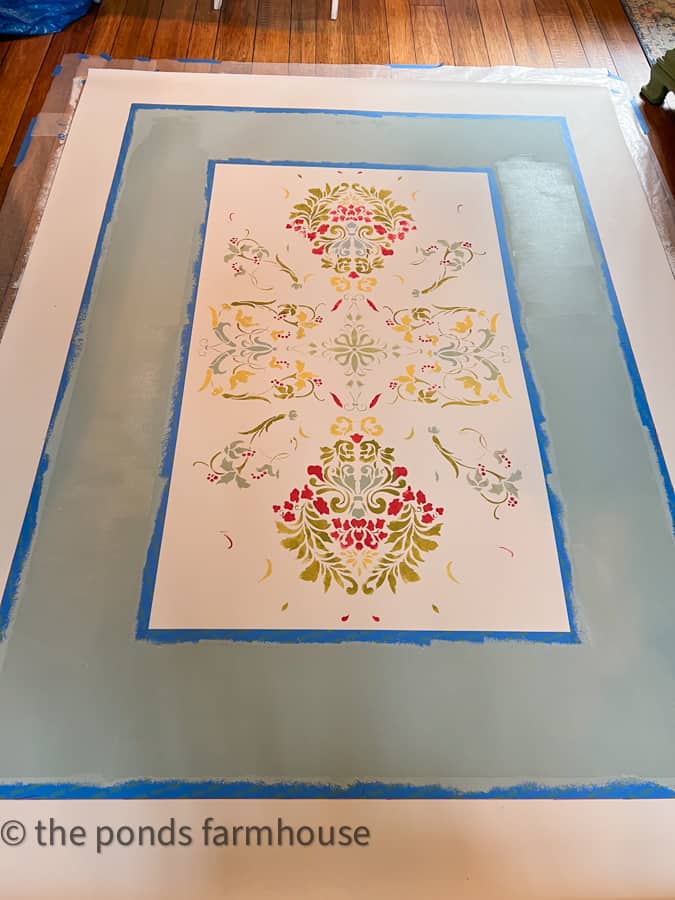
Begin by painting the base color over the entire surface of the rug. For this step, I used Linen White Chalk Paint. I have also used exterior paint for this step with success.
With the chalk paint, I only needed one coat for good coverage. Allow the paint to dry for at least 24 hours before moving to the next step.
Note: I began to add the painters tape as soon as the paint was dry to the touch. You’ll see why that was a mistake later.
Determine Your Design
If you haven’t done so, you should decide what design you want. My design combines a decorative paint roller and stencils. I had some stencils on hand to make work for my DIY rug. However, I found several others that I knew would be beautiful.
Additional decorative rollers to consider.
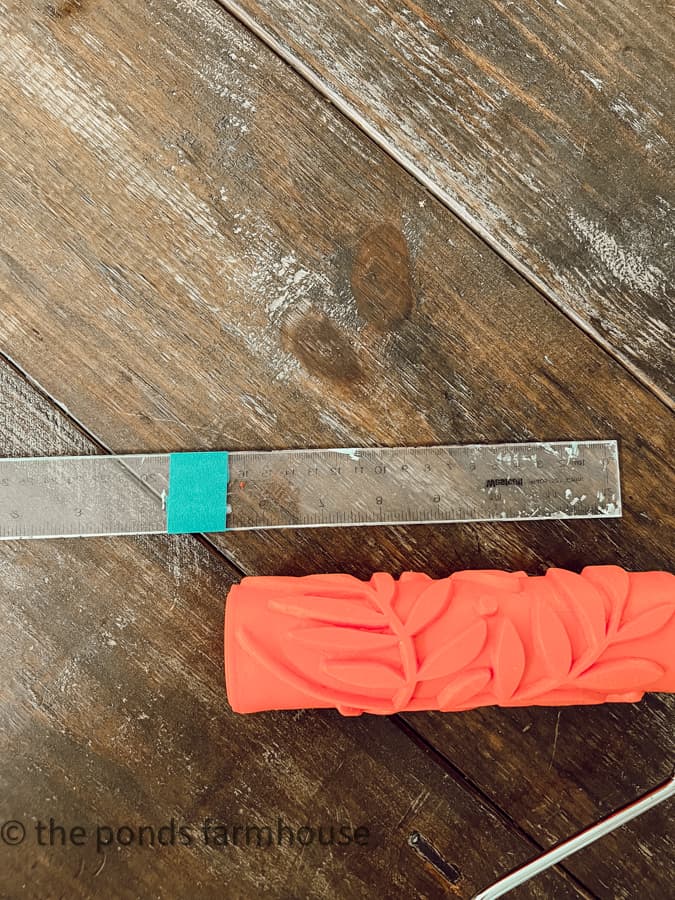
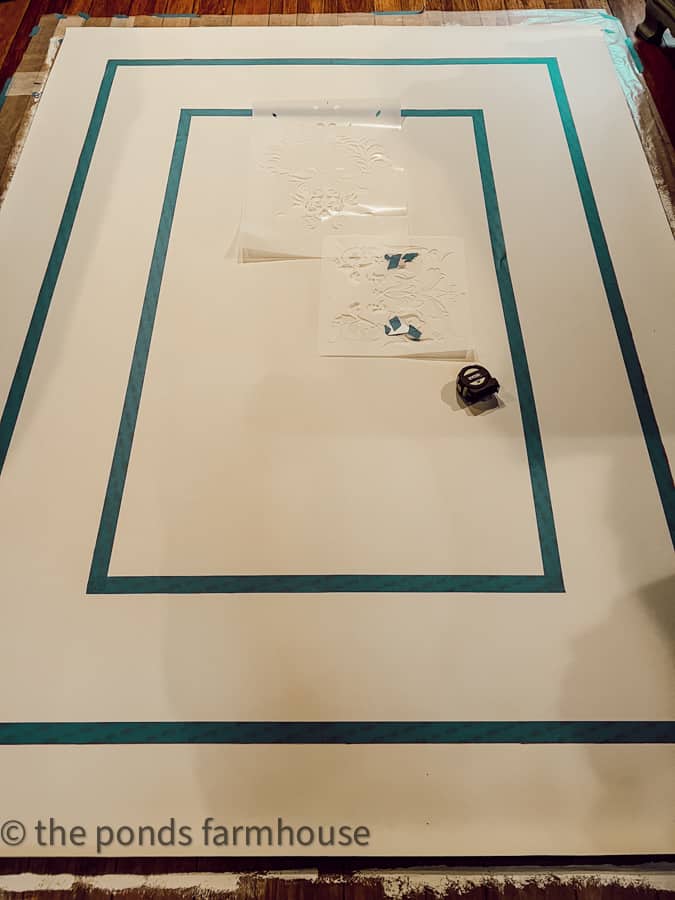
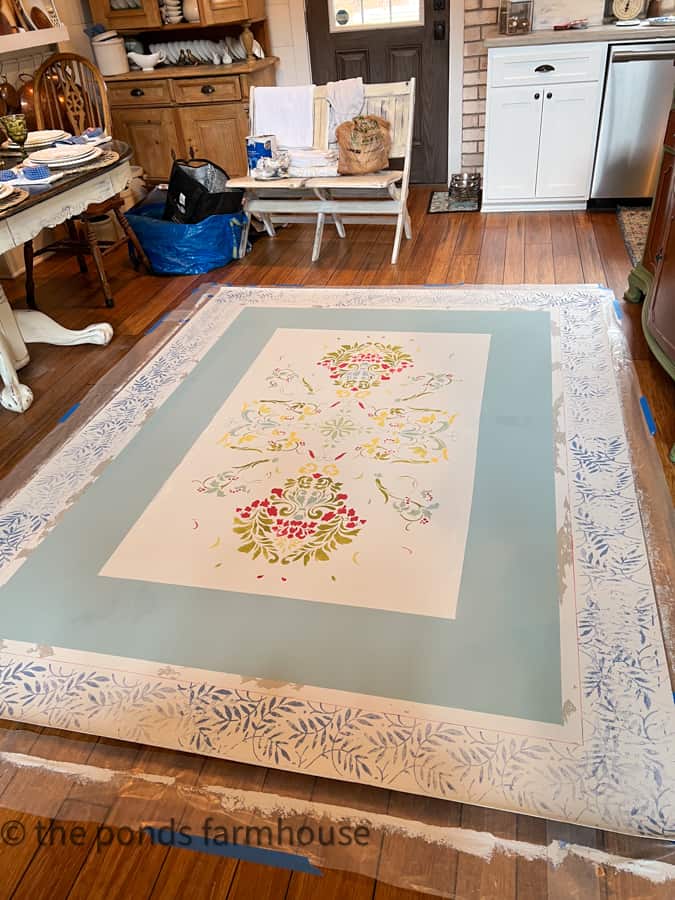
I plan to add the decorative roller to the edge of the rug, so I want to tape off that area by measuring the width of the roller.
Next, measure from the outside edge of the rug to determine where the tape will be placed.
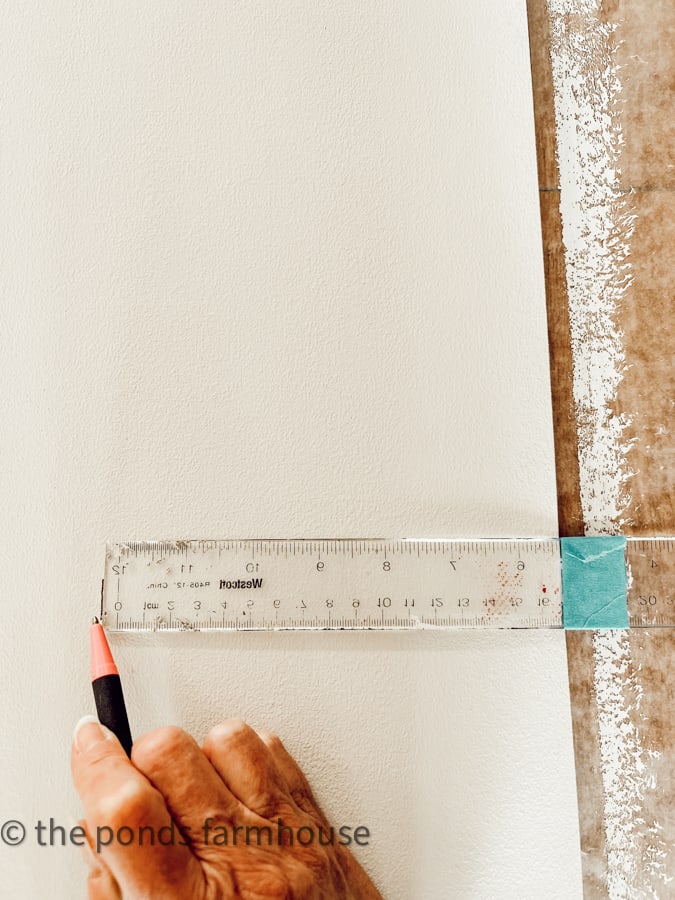
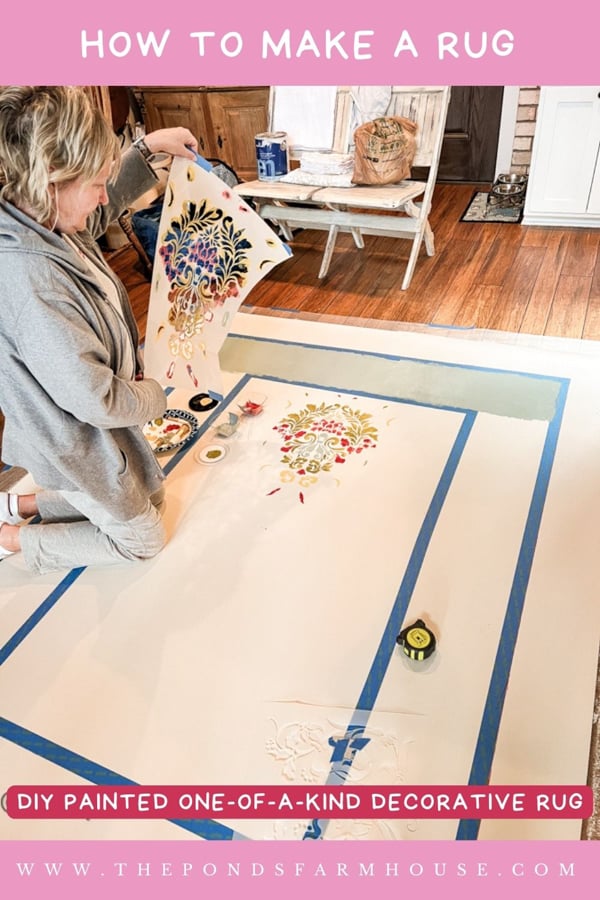
Begin Adding Design to Rug with Painter Tape
Use your measurements as a guide to add the painter’s tape to the rug.
Once your tape is in place, determine where your stencils will be placed. Careful measurements are recommended to ensure that the stencils are even.
How To Paint DIY Rug
Now you are ready to begin painting your DIY rug.
Be sure the stencil is taped firmly. You don’t want to risk it slipping while applying the paint.
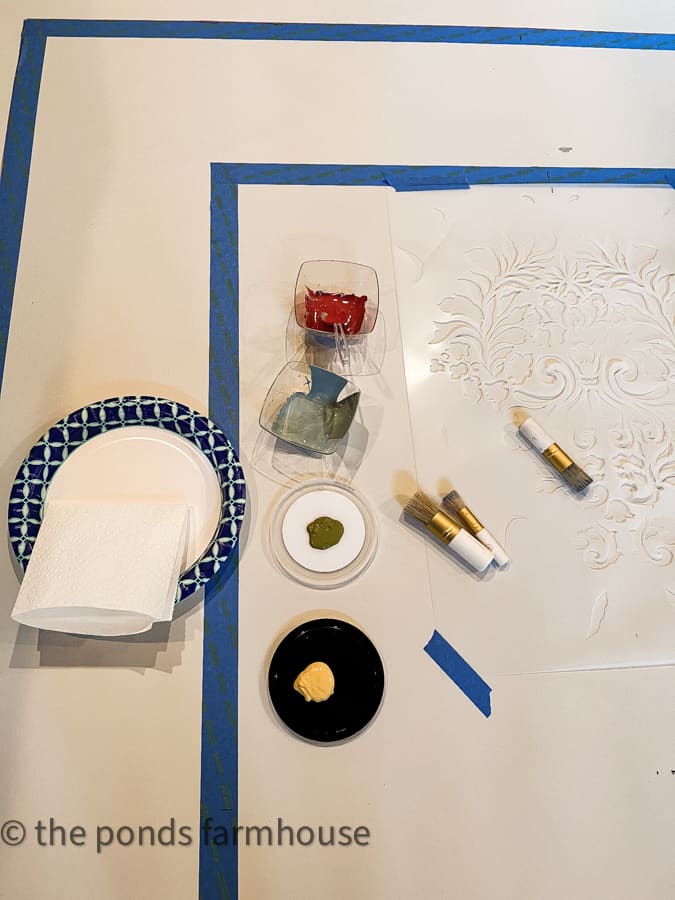
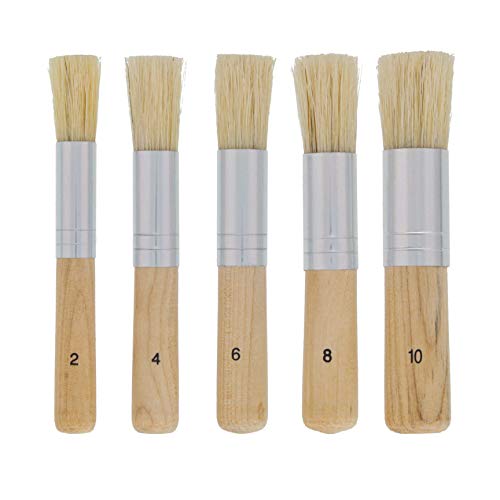
Gather your chosen paint colors, stencil brushes, and paper towel to blot paint.
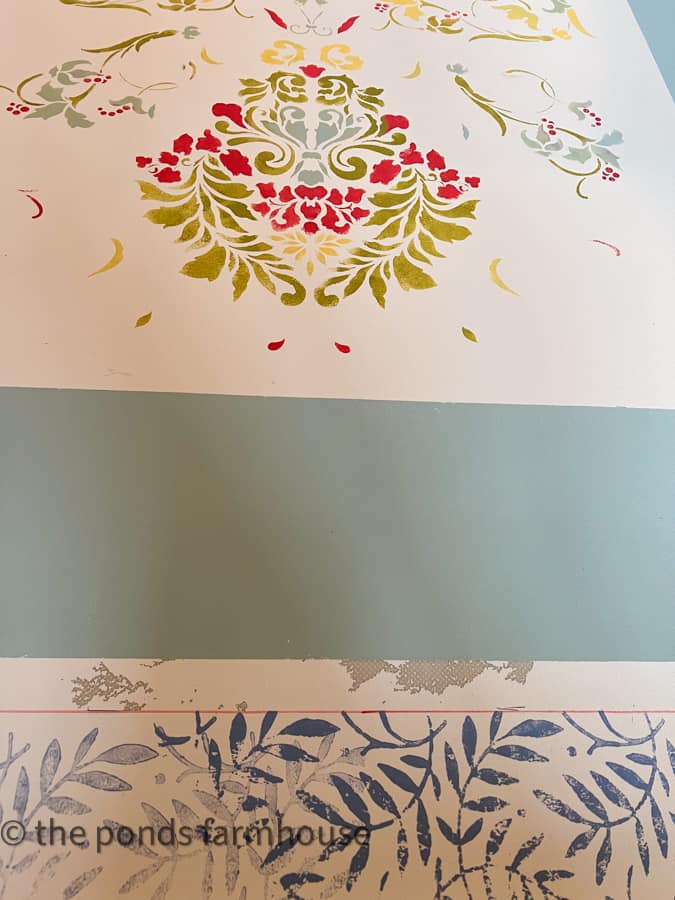
Stencil In The Center
Next, begin in the center and apply the paint with the stencil brushes. I used various colors to create the desired pattern for my rug.
You want to dip your brush into the paint and then blot it onto a paper towel. A heavy application will bleed under the stencil and create an undesirable design. The stencil brush is flat, and you should press straight down onto the stencil with the paint. Do not brush from side to side.
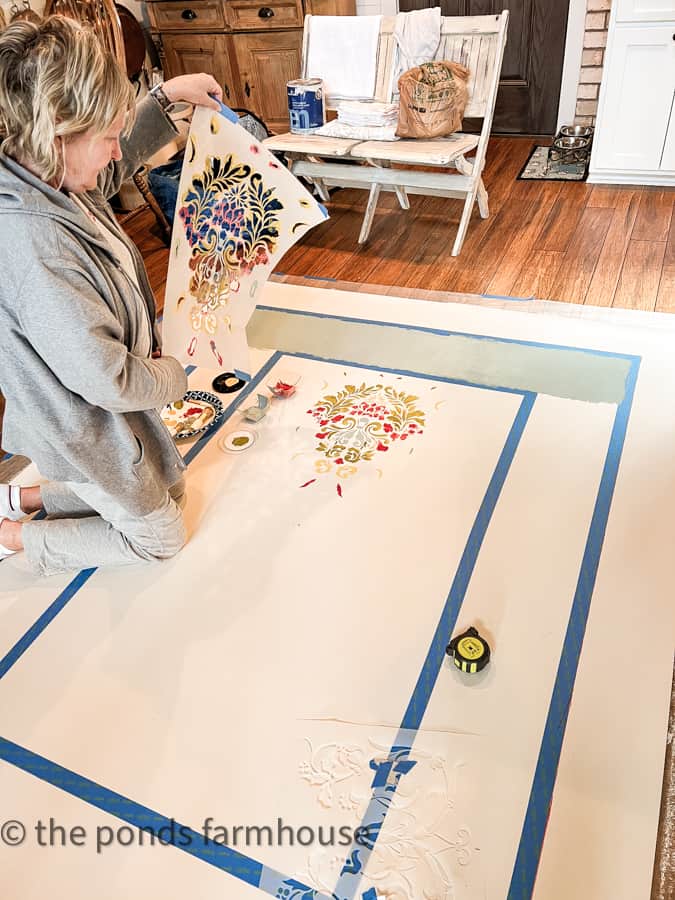
You may need to move your stencil on larger rugs to repeat the pattern. If you prefer, you can purchase multiple stencils. I created my design using two different stencils. They had to be moved several times to achieve the desired effect.
Note: You must allow the stencil to dry before moving to a new location. Otherwise, you may risk transferring paint from the stencil to undesirable areas of the rug.
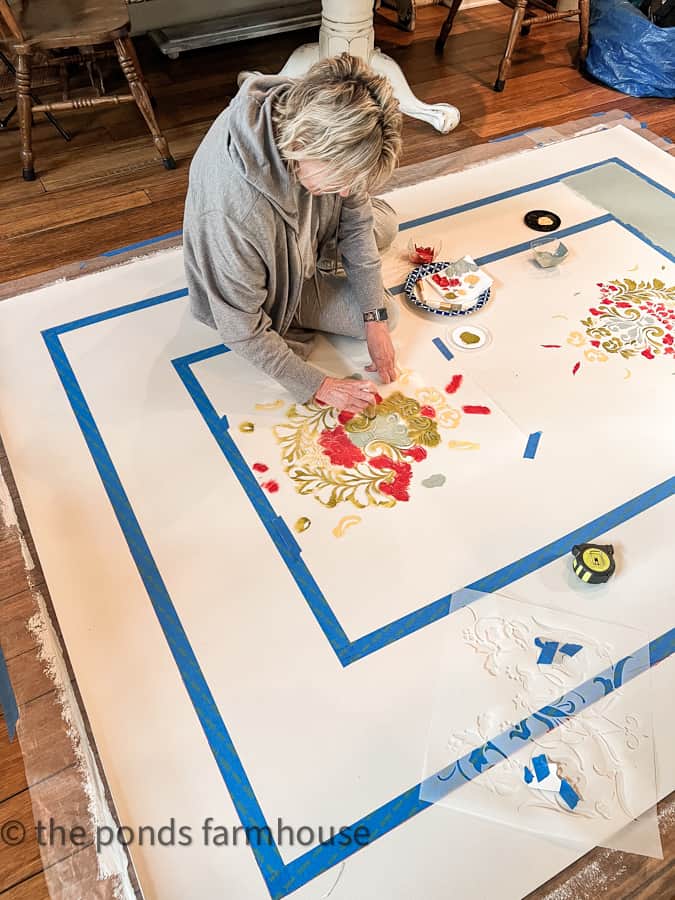
Once the center is complete, you can add paint to the other edges. I began with light blue to fill in between the taped areas.
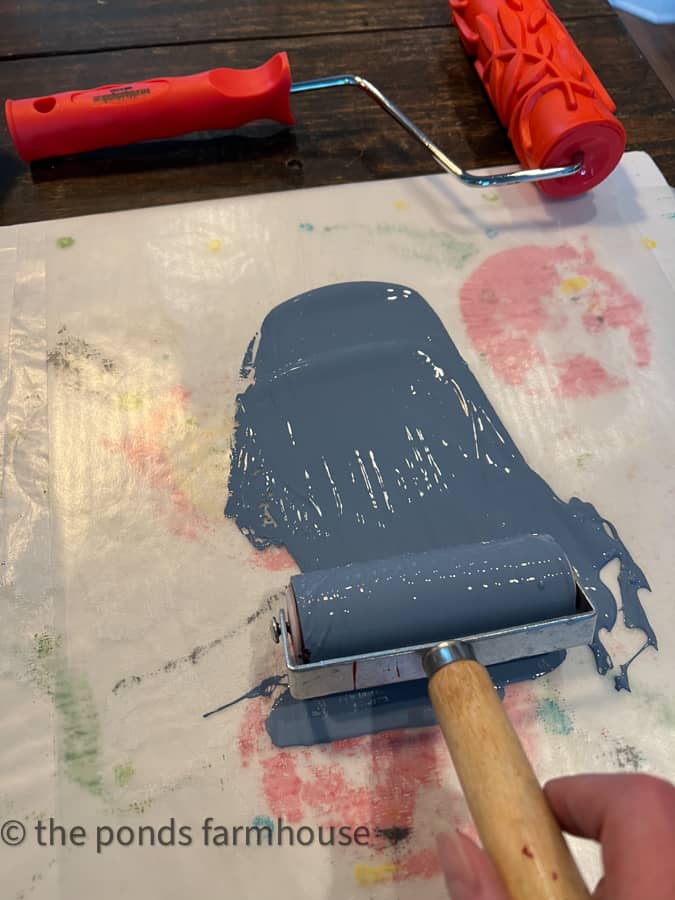
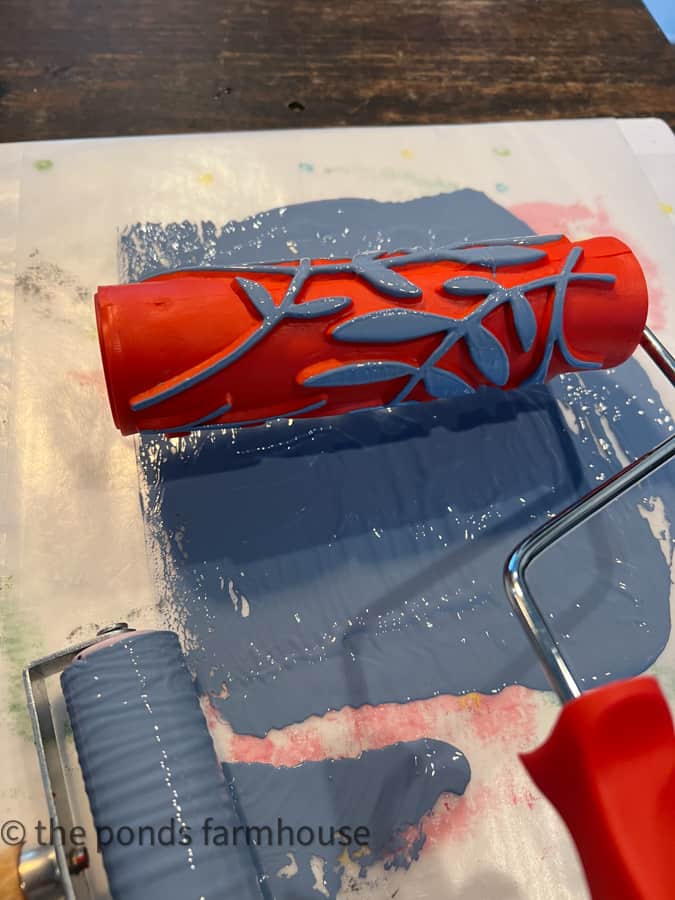
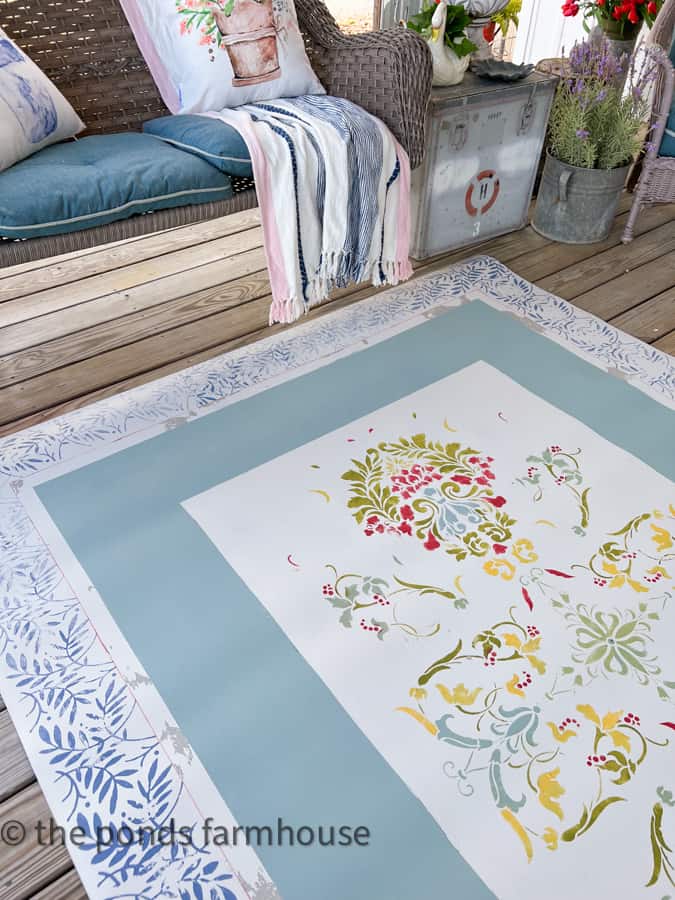
Finish Painted DIY Rug with Decorative Roller
Finally, you can finish the edge of your painted rug with the decorative roller.
- Begin by applying a small portion of the darker paint to a flat pallet covered with wax paper.
- You can use a brayer roller to flatten the paint.
- Then, apply paint to the decorative roller, carefully covering only the raised pattern.
- Use the roller to paint the pattern around the edge of the rug.
Remove Tape from the Rug
Once everything is dry, you can remove the tape to reveal your new rug.
Oops!
Remember when I said to wait 24 hours before applying the tape to your base coat? Well, this is the result of not waiting. I applied the first tape as soon as the paint was dry to the touch. Then, I waited until the following day to add the second inside round of tape.
As you can see, the second round came off clean, while the first round pulled paint.
How Correct Mistakes?
At this point, I had two choices. First, I could touch up the mistake by repainting the area. Or… I could embrace the mistake and consider the rug distressed.
Can you guess which I choose?
Seal The Painted Rug To Protect
Finally, once you are happy with your design, you must seal with a quality protective sealer such as General Finishes High-Performance Top Coat Sealer.
I recommend applying at least two coats with a sponge roller for a smooth finish.
This rug will be on my front porch in Spring and Summer, so a good-quality sealer is imperative.
Pro Tips:
Although I’ve made several of these rugs, it’s easy to forget and rush a project.
Here are a few tips that will help you when planning your project.
- Take your time, and allow plenty of drying time.
- Find a work surface other than the floor (if possible)! Working on the floor isn’t optimal at my age.
- Be sure you have several stencil brushes to avoid cleaning between color choices.
- A Sponge Paint Roller is best for a smooth finish.
- Use a quality sealer and apply two coats to protect your finish.
- If the rug is in high traffic or outdoors, apply sealer again after a few months.
- I’ve had a couple of rugs for years. Applying a fresh coat of sealer regularly will prolong their life.
Resources
Here are links to the supplies I used or something similar. Some items are optional.
See Storefront Supplies and similar items.
How To Make Painted Rug
Make your own rug with this painted rug tutorial. Use scrap or new vinyl flooring to create a one-of-a-kind unique rug for any area of your home.
Materials
- 6x8 vinyl flooring
- Linen White Chalk Paint -
- General Finishes Sealer -
- Serenity Blue Chalk Paint -
- Coastal Blue -
Tools
- Decorative Leaf Roller
- Brayer Roller
- Sponge Roller Kit
- Stencils
Instructions
- Roll the rug inside out for several hours
- Protect areas around the rug with wax paper taped to the floor or table.
- Paint the Base Coat on the entire backside of the rug
- Allow drying for 24 hours.
- Use painter's tape to section off the pattern and apply stencils to the design area.
- Begin at the center of the rug and use stencil brushes to apply paint.
- If moving the stencil, be sure it is dry before applying it to another area of the rug.
- Paint the area between the tape with a sponge roller and desired paint color.
- use a brayer roller to flatten the paint for the decorative roller design.
- Use the decorative roller to apply the dark blue design around the edge of the rug.
- Remove the tape and touch up any errors.
- Apply two coats of high-performance polyethylene sealer with a sponge roller. Allow drying between coats.
Notes
Be sure to allow drying time before applying tape to prevent damage to the paint surface.
Recommended Products
As an Amazon Associate and member of other affiliate programs, I earn from qualifying purchases.
-
 FolkArt Multi Surface Acrylic Paint Set 16 piece Pastel Colors, Count
 -
 Rust-Oleum, Serenity Blue 285139 Ultra Matte Interior Chalked Watercolor Paint 30 oz, 30 Fl Oz (Pack of 1)
 -
 3M - Scotch-Blue 2090 Multi-Surface Painter's Tape - 2inches x 60yards 051115-03683
 -
 U.S. Art Supply 5 Piece Wood Handle Stencil Brush Set - Natural Bristle Wooden Template Paint Brushes - Watercolor, Acrylic, Oil Painting - Craft, DIY Projects, Card Making, Chalk and Wax Furniture
 -
 General Finishes High Performance Water Based Topcoat, 1 Quart, Satin
 -
 GSS Designs Large Flower Wall Stencils for Painting Repeatable Pattern Wallpaper Large Allover Flower Leaf Wall Stencils 16x24 Inch Large Floral Wall Stencil
 -
 GSS Designs DIY Decorative Large Mandala Stencils 16 x 16 Inch - Mandala Stencils for Painting on Wood Wall Floor Canvas Fabric - Resuable Furniture Wall Stencils for Painting Large Template
 -
 Damask Stencils (3 Designs), Large Fleur De Lis Templates for Painting Floor/Wall/Tile/Furniture/Fabric/Wood, Each 11.75” x 11.75”, Strong & Reusable, DIY Crafts, Made in America by Small Business
 -
 Rust-Oleum 329207 Ultra Matte Interior Chalked Paint 30 oz, 30 Fl Oz (Pack of 1), Coastal Blue
 -
 Rust-Oleum 285140 Ultra Matte Interior Chalked Acrylic Paint 30 oz, 30 Fl Oz (Pack of 1), Linen White
 -
 3 Pack Printmaking Brayers - Premium Brayer Rollers for Crafting, Hard Rubber Roller Brayers, Vinyl Roller Ink Paint Brush for Wallpapers Stamping Gluing Application (2.4’’, 4’’, 7.9’’) (Black)
 -
 Mister Rui-Foam Paint Roller, 4 Inch-8 Pack Paint Roller Kit, Complete 4" Mini Paint Roller Kit with Small Foam Paint Roller Covers, Frame, Tray, and Liner for Professional Painting Results
 -
 Artsy Leaf Pattern - Decorative Art Roller - 7" Texture Roller
I love how the new painted rug brightens the porch. See 10 Ideas for Ideal Porch Sitting for additional inspiration.
Here are a few other projects you may enjoy.
- DIY Custom Tablecloth and Napkins
- Painted Table Runner from Drop Cloth
- How To Paint Flour Sack Napkins
- Hand-painted Tablecloth Runner
- How to Make a Craft Paper Tablecloth
- How To Make A DIY Painted Rug
Thanks so much for stopping by today. I hope you enjoyed today’s DIY Rug tutorial.

Pin It To Remember It
Did you find some great ideas you’d like to save for future reference? Hover over the images you’d like to save and pin to your favorite Pinterest Boards when you see the PIN button.
The rug turned out beautiful! Thank you for sharing this idea.
Margie
Thank you! I’m so glad you like it.
This looks amazing, wow, what a gorgeous rug, beautiful design, I just LOVE it….xx
Janette,
I’m so glad you like this. It was fun to create.
Hi, very attractive. Diane Henckler of “In My Own Style” did something similar but attached fabric to the back of the vinyl piece, then stenciled that…another approach to a great project!
Linda,
Thank you! I’ve not seen that done before but I will check it out. Thank you for stopping by.
You always amaze me with all your ideas and creativity Rachel! I love the rug! I just may try to make one for my Michigan porch….if I can find the time! Hubby and I are currently transforming our garage into a “Bunk House” for all our grandchildren when they come to visit.
Cindy,
A bunk house sounds like such fun, and I know your grandchildren will love it. I hope you get the time to make a rug. These rugs would be great for the bunk house also. Easy to clean.
Wow Rachel this is beautiful! Love the stencil and the colors you chose and $20 is a great deal.
I hear you about working on the floor. As we get older it’s tough getting back up, ha, ha
Cindy,
Thank you, I’m glad you like this. I don’t even like to bend at the waist anymore. LOL
Wow, that turned out great! pinned
Cindy,
I really appreciate this.
Rachel, I love your painted rug! And, the distressing only makes it more unique! You did such a great job and made it look so easy to do this! I don’t know where you get all your ideas, but I know I really like what you show us! That’s a cute picture of you in the store! Have a great day!
Mary-Ann,
I am so glad you like this project. Thank you for your sweet comments.
Rachel, how beautiful that rug turned out!! Such a great and individual rug for a Summer porch!! Love this idea!! Thanks so much for sharing!
Karolyn,
Thank you for stopping by. I appreciate your comments.
Hi Rachel! Your rug turned out so beautiful!! I love the pretty Spring colors! Thank you for taking the time to share! Definitely saving this diy!!

Cindy,
I am so glad you like this one. Thanks for sharing.
Gorgeous! Such a great idea. I love it.
Renae,
Thank you.
Simply stunning!
Alexandra,
Thank you! I’m glad you like it.
This is so much fun Rachel and so pretty! What a great tutorial! I’m sharing with my followers in my round up today!
Kristin,
I really appreciate this. Thank you for stopping by.
Rachel, I’ve always wanted to do this and thank you for such a detailed tutorial. It looks really great! Good job!
Mary,
It is really easy to do and I hope you let me know when your project is complete.
I just love this Rachel, I will be featuring you on my post this Saturday.
Wendy,
I appreciate this so much.
This is just the cutest idea, Rachel. I love how it turned out!
Kim,
Thank you so much.
Thank Rachel for sharing this fun creative post! (So glad I found your blog from a link over at the Crowned Goat!)… Anyway I’d love to try this fun diy- wondering do you think any acrylic paints can be used? Is the chalk paint more adhesive to the vinyl? I paint abstract sunsets and thinking a rug is in my future as soon as June rolls in. My only worry is how it will hold up to foot traffic… how’s yours doing so far???
Melanie,
Welcome! I’m so glad you found me. Either chalk paint or exterior paint is recommended for the base coat. You can use acrylic craft paints for the details. The key is a good quality polyurethane sealer. I linked the one I used. Apply two light coats to begin and then another a few weeks later if you have a lot of foot traffic. I have one that was under my dining table for several years and I now have it in my pool house, and it still looks good.
How do you keep your corners from curling.
Nicole
I roll the rug with the painted side out and when I put it on the floor, the corners are flat. This is true with any rug but especially important with a vinyl rug. I hope this helps. Thank you for stopping by.