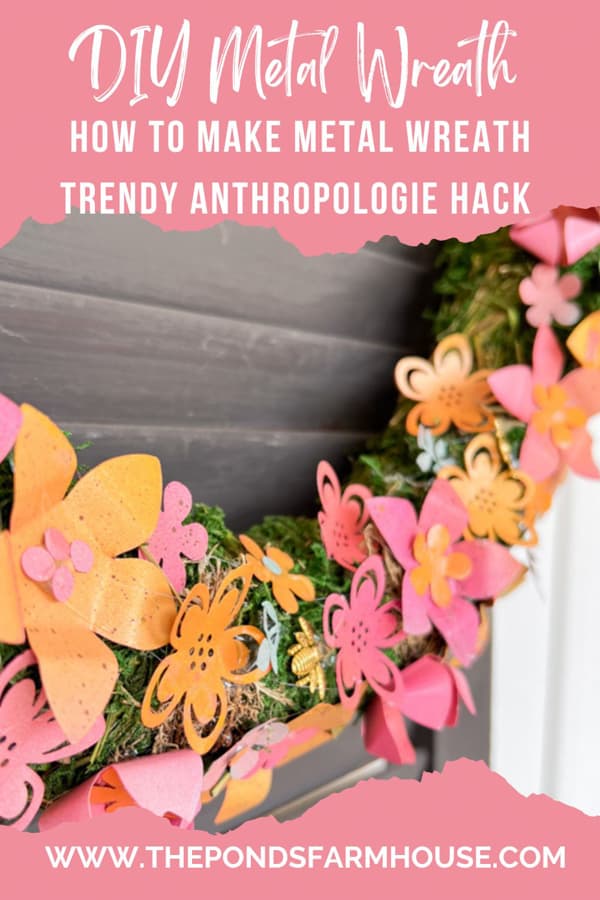
How To Make A DIY Metal Wreath: A Trendy Anthropologie Hack
If you’re looking for a way to get the Anthropologie look without breaking the bank, you can make a similar DIY metal wreath with this tutorial. Their Pollinator Iron Wreath inspires this simple project with a few changes.
Anthropologie is known for its trendy and unique home decor, and its metal wreaths are no exception. But at $168 each, they can be a bit pricey, so here’s what I did.
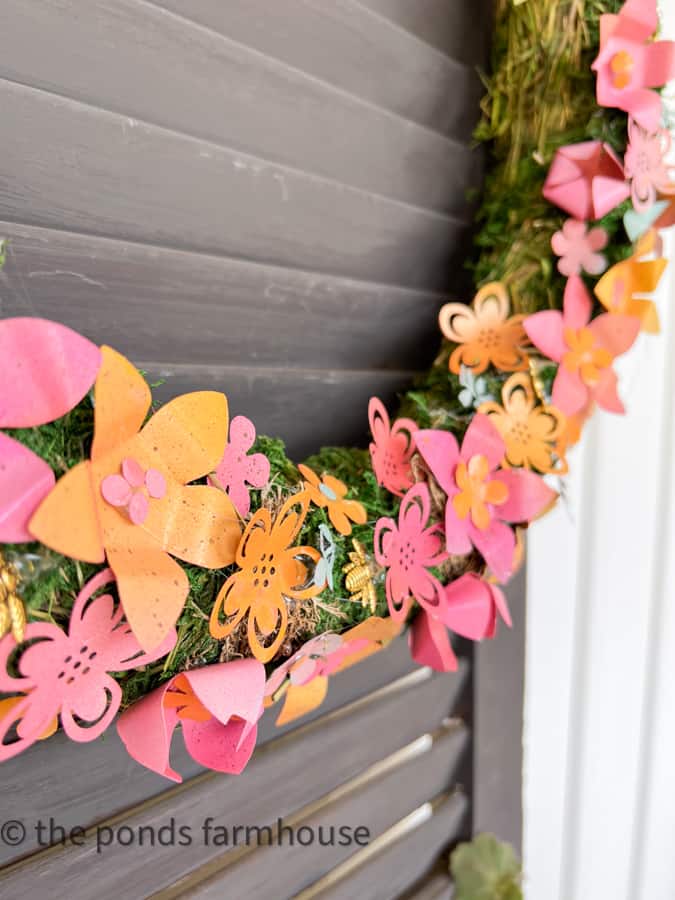
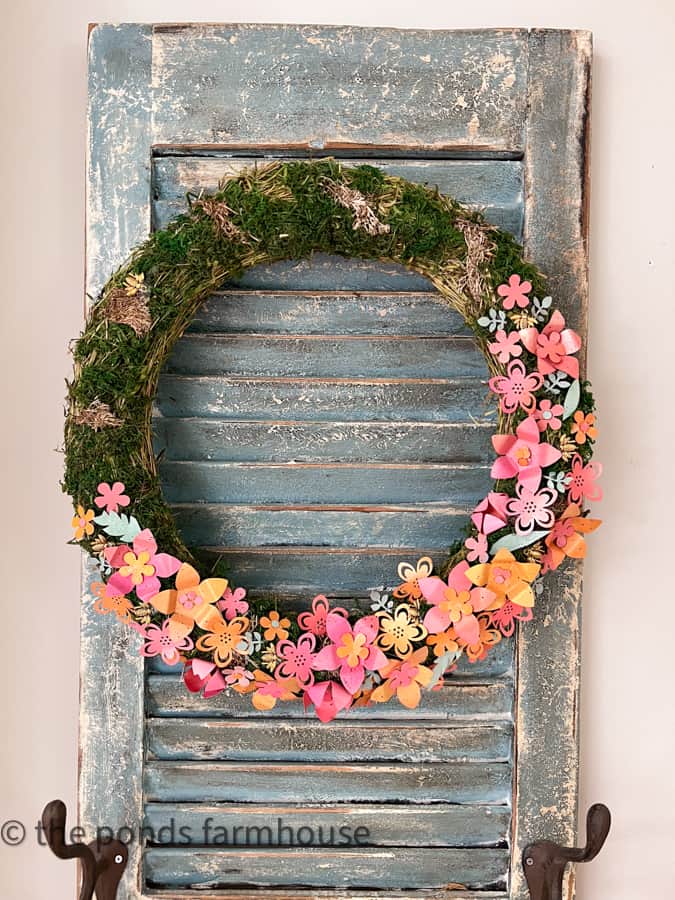
First, I used a moss wreath as the base and recycled aluminum cans for the flowers and leaves. In addition, I used brighter colors to work with my summer porch decor.
I know you’ll agree it’s a great way to add a touch of style to your home or porch for Summer.
(Posts on The Ponds Farmhouse may contain affiliate links. As an Amazon Associate, I earn from qualifying purchases. See the full disclosure details here.)
The Cozy Creative Collaborative Blog Hop
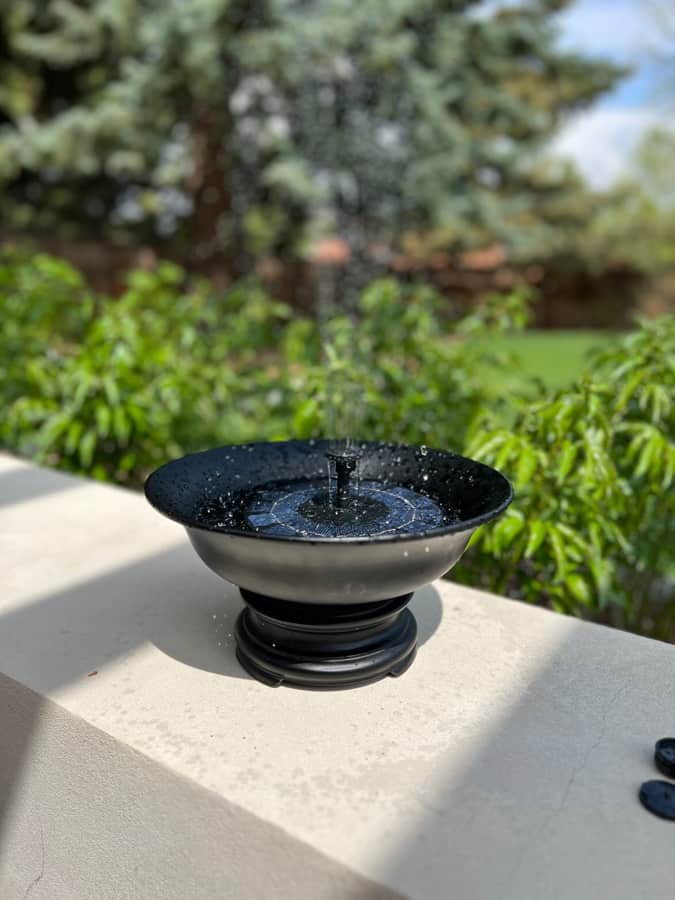
Today I’m excited to join the ladies of The Cozy Creative Collaborative for their monthly blog hop. These talented ladies share a new creative DIY project each month. I’m honored to be invited to join them in May, and if you are joining me from Kelly at The Tatter Pew, welcome! Kelly’s DIY Solar Fountain ideas are unique.
If you are new to my blog, I love helping you create the home of your dreams with budget-friendly decorating & DIY ideas. This is where I share my love for curated vintage decorating, sustainable projects, thrifting, & entertaining. I hope you’ll follow my adventures by subscribing to my mailing list.
Check out all the wonderful projects listed at the end of my tutorial.
Anthropologie Version $168.00
If you are wondering what a $168.00 Metal Wreath looks like, here is the Anthropologie version.
I think it is a very fun wreath. However, I would need two of these for my porch, and my budget doesn’t allow one.

You may remember the DIY Recycled Flower Pots I made earlier this spring. I used several aluminum flowers for that project and knew the same technique could be used to make a similar budget-friendly wreath for much less than the Anthropologie version.
How To Make A DIY Metal Wreath
First, you need a wreath base to attach the recycled metal flowers. I had these adorable moss-covered wreaths and decided they would be perfect.
However, a metal wreath form would also work if you plan to completely cover the form with metal flowers like the Anthropologie version.
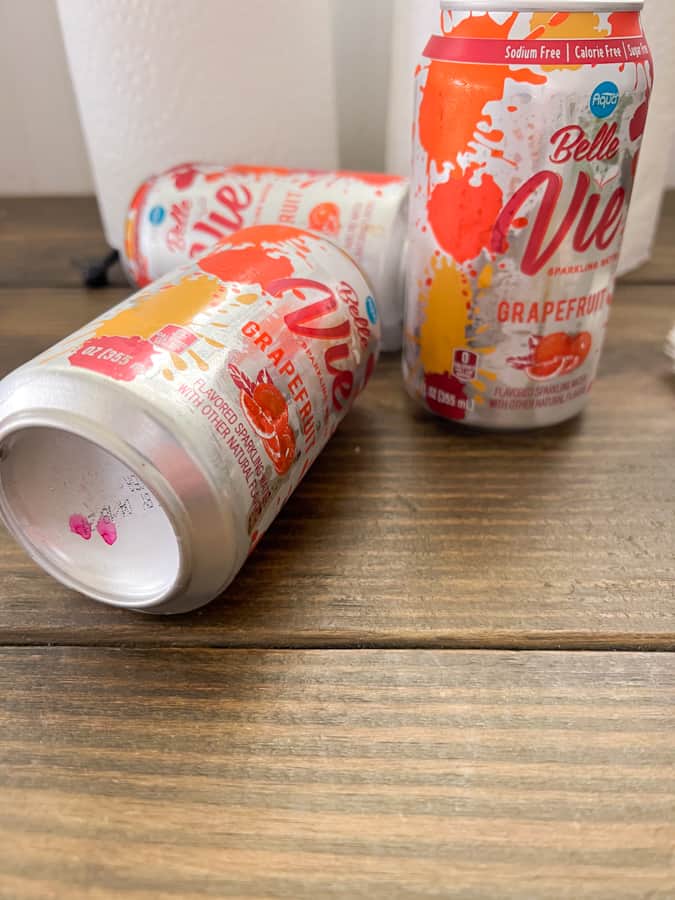
You will also want to collect aluminum cans to recycle into the flowers and leaves for the metal wreath.
I save all my sparkling water cans. You will need approx. 10-12 cans per wreath.
Once you have your cans collected, begin to gather your other supplies.
How To Make Metal Flowers
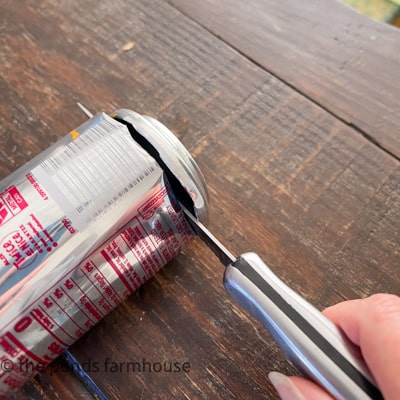
First, wash and dry the collected aluminum cans. Then cut the tops and bottom off with a sharp knife or scissors. Finally, cut the can vertically to open it. Roll the outside of the can along a table edge or box edge to flatten and remove any ragged edges.
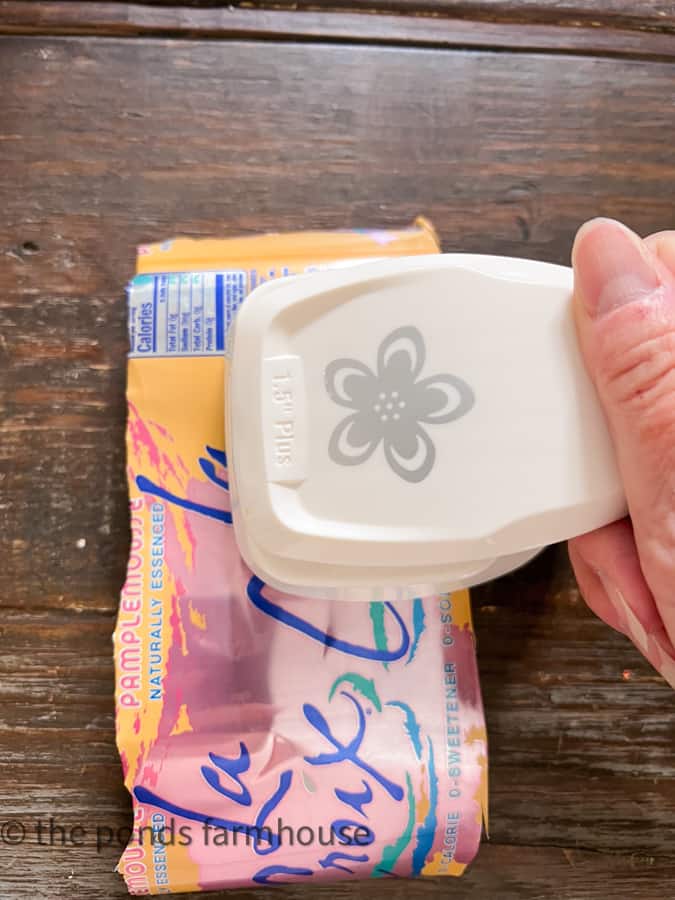
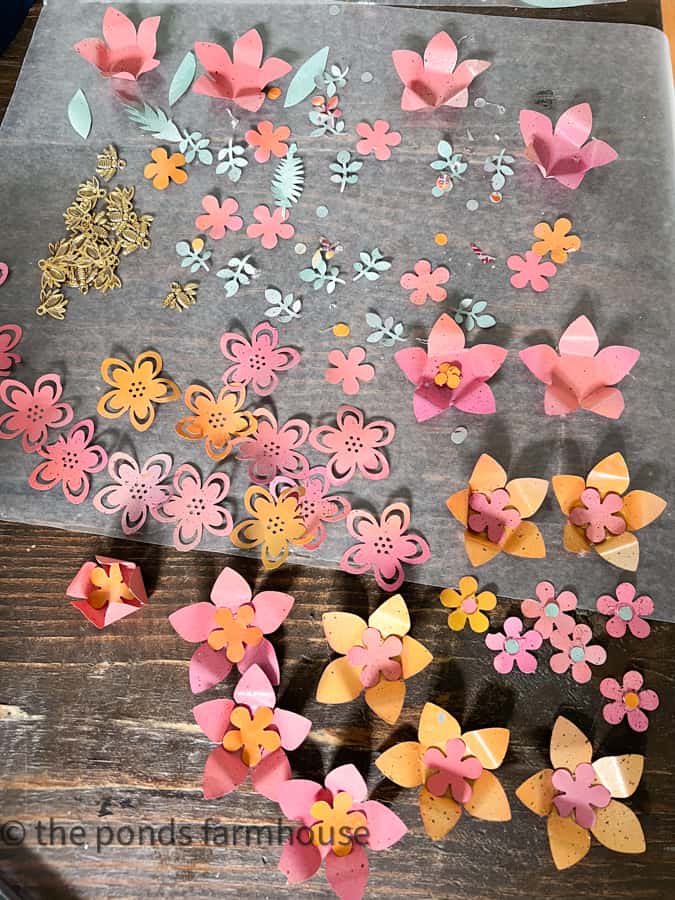
Finally, you can punch the aluminum flowers using various flower punch styles.
I used a variety of flower punches to create different sizes and shapes. You can see the resources for details.
Supplies for Metal Wreath Tutorial
- Aluminum cans (10-12 per wreath)
- Flower Punch – See Resources for All Links
- Hot Glue Gun
- Moss Wreath
- Spray Paint ( Two Shades of Pink, 2 Shades of Green, Orange, and Yellow)
- Metal Bee charms
- Painters Tape
- Hot Glue Finger Protectors
Paint Flowers with Spray Paint
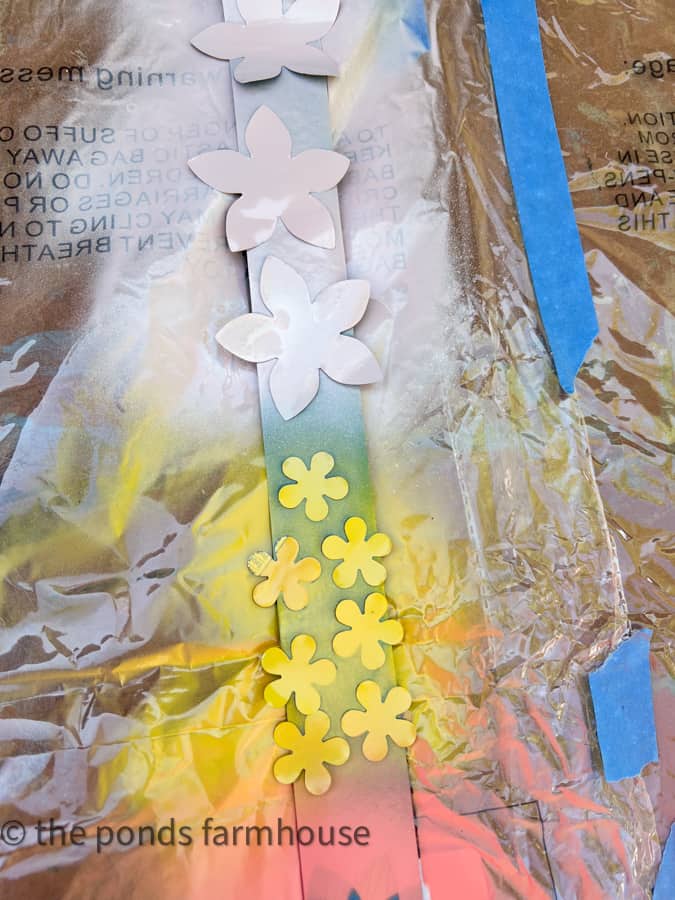
To paint the aluminum flowers with spray paint, you need to secure them so they don’t blow away.
Add painter’s tape to a large cardboard box with the sticky side up. Attach the flowers to the tape and separate the flowers to paint the different colors you desire. Once the paint is dry, turn the petals over and paint the backside.
I also added a splatter of brown paint while the flowers were drying.
How To Prepare The Flowers
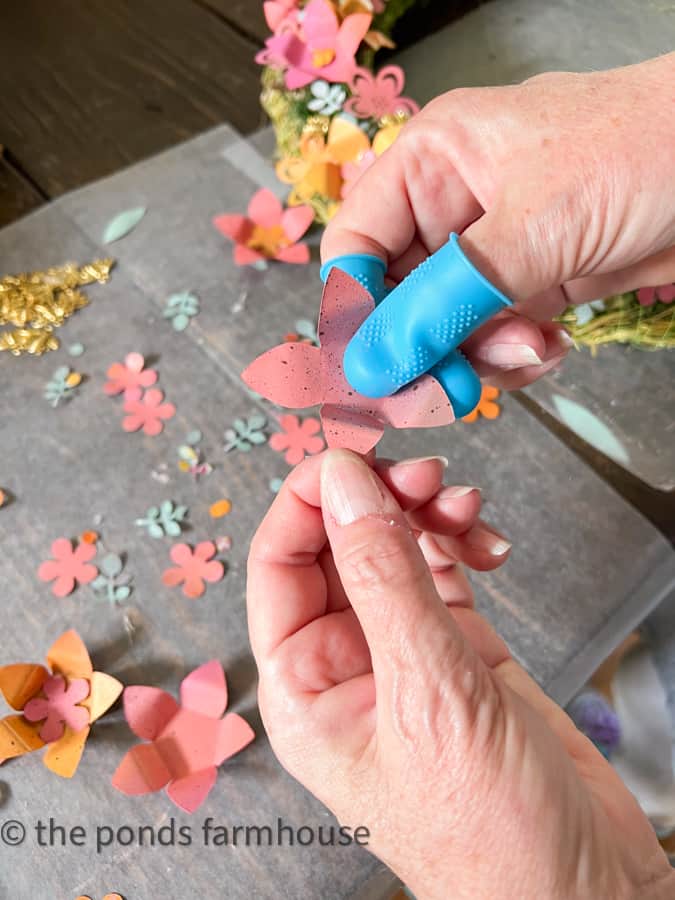
After the aluminum flowers are dry, you can embellish them by bending the petals and leaves to give them more dimension.
Next, use your hot glue to attach centers to the flowers. I used some of the smaller flowers as centers and some of the round aluminum punches.
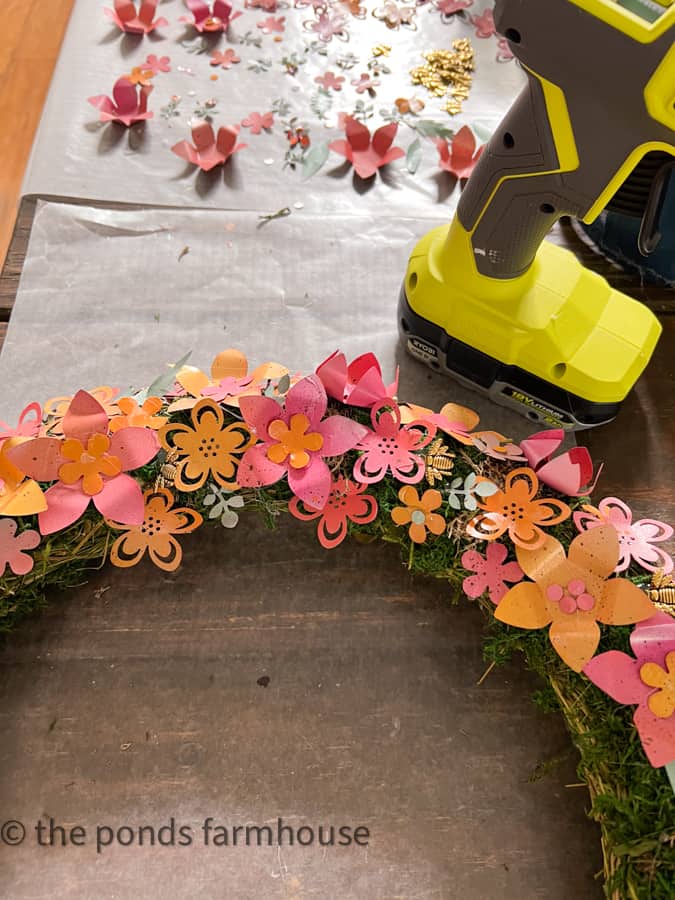
Assemble the Metal Wreath
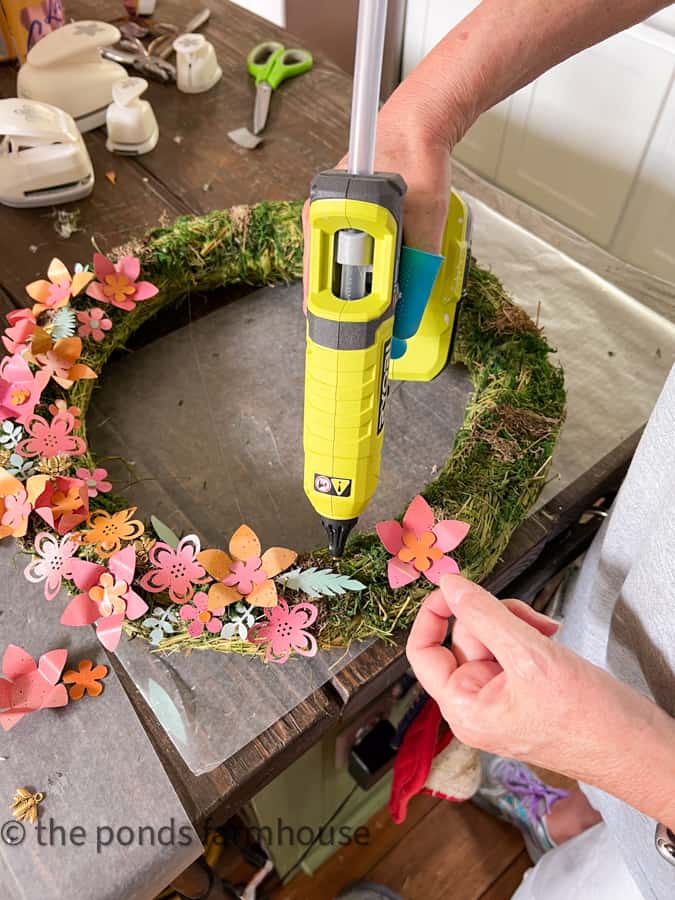
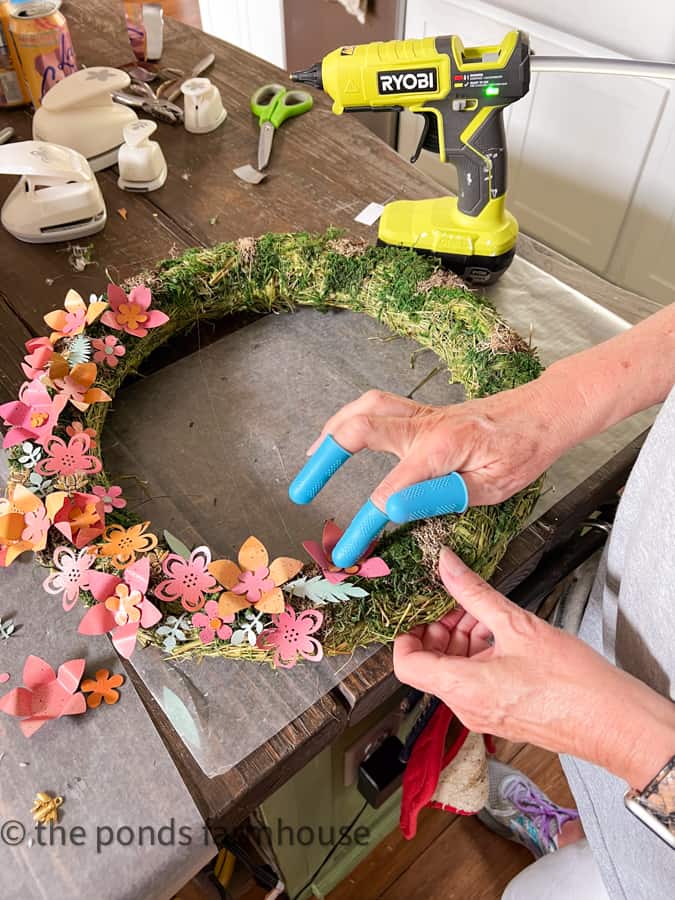
After all the flowers are formed, you can add them to the moss wreath. Use the cordless hot glue gun to attach the flowers and leaves to the wreath.
I tried to mix various colors and shapes to cover the wreath.
It’s essential to use finger protectors to avoid painful burns.
Add Bees To Metal Wreath
In addition, I added several metal bees and mixed them in between and around the flowers.
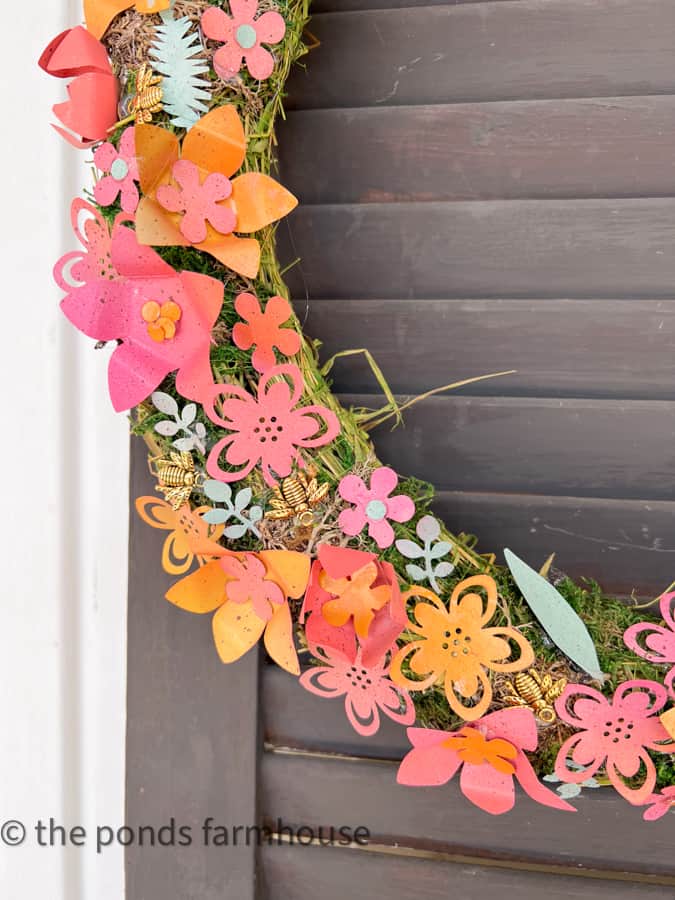
Although my inspiration wreath is completely covered with metal flowers, I only cover 1/2 of the moss wreath.
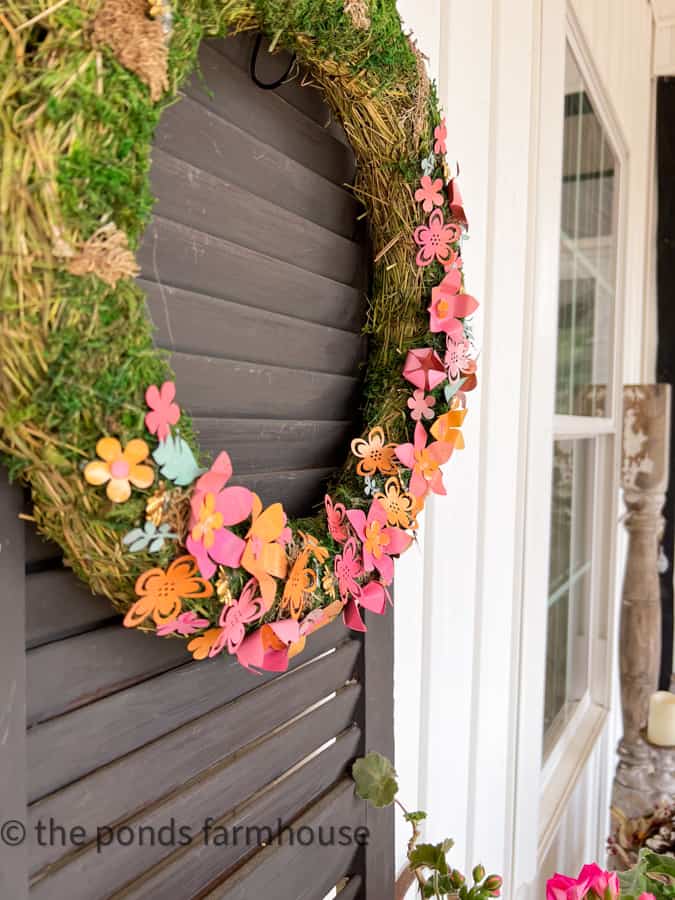
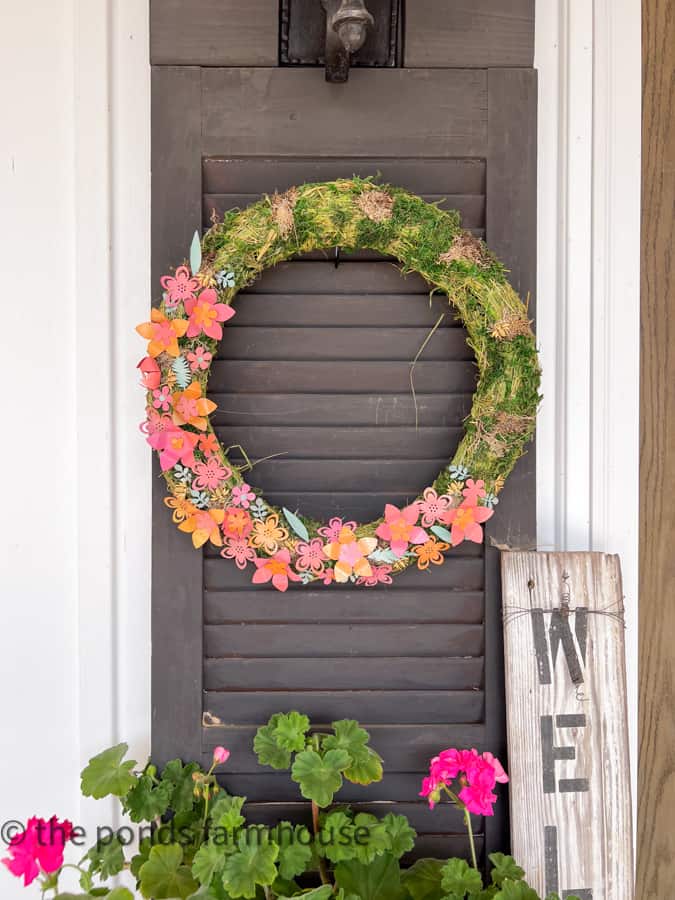
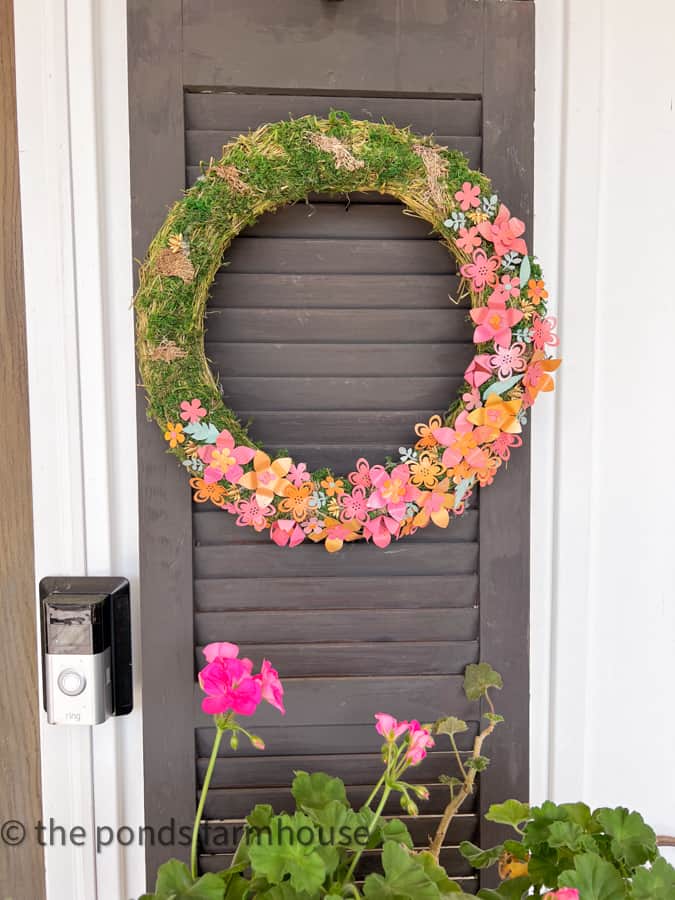
This would be a cute wreath for either inside or outside your home. I styled the wreath inside on the shutter in our bedroom until I was ready to update the front porch for Summer.
Once both wreaths are completed, they will be added to the shutters beside our front doors.
I can’t wait to share the full summer porch update next week. The new metal wreaths enhance the other decor for this year’s porch, and I know you’ll love it. So stay tuned.
Resources
With a little creativity, you can easily make a DIY metal wreath that looks just as good as the ones from Anthropologie. So get started today and add a touch of style to your home!
Now it’s time to check out all the creative ideas from The Cozy Creative Collaborative. First up is Nicole at Our Tiny Nest with her Lemon Zucchini Bread Recipe.


Pin It To Remember It
Did you find some great ideas you’d like to save for future reference? Hover over the images you’d like to save and pin to your favorite Pinterest Boards when you see the PIN button.


Wow! What a great project. So creative. I love it. Hugs to you.
Renae,
I appreciate this. So glad you like it.
I love how your wreaths came out!! Great dupe idea…I live for a good dupe!!
Jennifer,
I’m so glad you like this one. It was fun to make.
This wreath is adorable Rachel!!! I actually like yours better than Anthro’s! Those little flowers are just the cutest.
Heidi,
I’m so glad you like it. Thank you so much and its an honor to join you talented ladies today.
Your wreath is beautiful. I admiree your tenacity and perseverance in making those metallic flowers from cans. I love upcycling and repurposing older items/disposables. While my family recycles everything possible, it is good to see crafters using can for flowers, wall pocket planters, etc. Keep on inspiring us!
Barbara,
I have had so much fun with aluminum cans this spring. Thank you for your encouraging words.
Oh this is so fun Rachel! I love it even more than the Anthropologie one. Thanks for joining us this month. You always inspire me!
Kelly,
You are so kind. I needed a brighter version and Love how it turned out.
What a great project Rachel! funny, I had this dupe on my list.. :)))) you did a great job
Wendy,
Great minds think alike. Can’t wait to see your version.
I’m loving this wreath. I don’t drink anything out of a can. I may have to start.
Pinned
Cindy,
Thanks for stopping by. You can always ask a friend to save cans for you.
Your wreath is delightful! Thank you for the tutorial for making it.
Angie
I’m so glad you like it. Thank you for stopping by.
Rachel this is so creative! I love all of the colors that you used! Thank you so much for joining us this month!
Nicole,
Thank you for having me along. I appreciate your comments.
I love this wreath idea! It turned out so fabulous! And who doesn’t love a good Anthropologie hack?!
Charity,
I’m so glad you liked this one. I’m really happy with it.
I love this wreath, Rachel! What a great project! Sharing this weekend!
Kim,
I appreciate this so much. Thank you.
I love aluminum can upcycles! I have yet to do any myself though. I have a booth locally that I would sell whatever I make in, but I am so worried about how sharp the edges of anything cut from aluminum would be, and I wouldn’t want anyone to cut themselves. Do you find after painting that it dulls the edges?
Alexandra,
I aluminum is very soft and I don’t feel there is much risk of being cut. I wouldn’t advise letting children play with them but I’ve handled them before and after paint without being cut.
Girl, I wish I had one pinkies worth of your creativity! I adore this wreath and thought it was made with paper. Thank you for linking up on Farmhouse Friday. I’m featuring it tomorrow. Happy weekend! pinned (again)
Cindy,
You are so sweet and I appreciate the feature.
Holy cow!!! I’ve never seen anything like this!! It’s SO neat! How creative to use old cans and punch them out. Such a fun wreath to use for the Summer season. Pinned!
Oh, I”m so glad you like this idea. Thanks for stopping by.