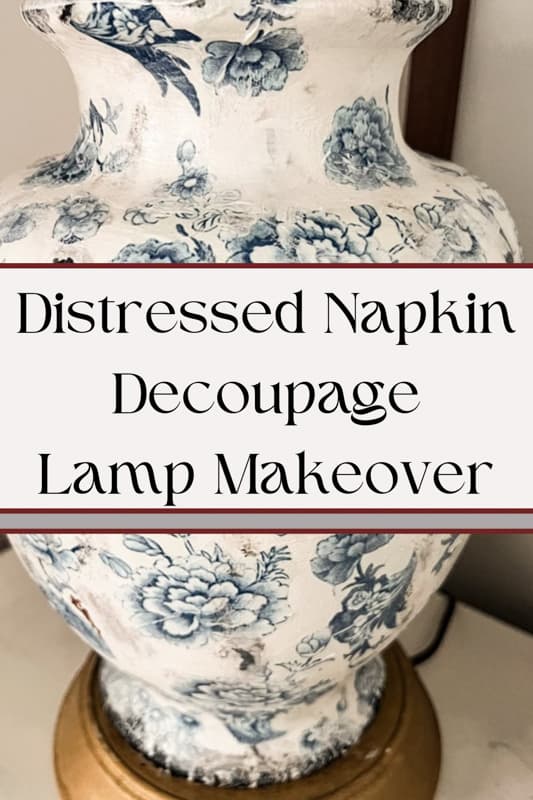
How To Make A Distressed Napkin Decoupage Lamp
If you love the distressed blue and white vase trends this spring, I can’t wait for you to see how I made a napkin decoupage lamp that has a distressed look. Today’s tutorial will take you step-by-step through adding napkins to a $1.00 thrift store lamp and transforming it into trending and stylish decor. Whether you have an old lamp begging for a makeover or want to transform a thrifted find, I’ve got you covered. Just grab your supplies and let’s get started.
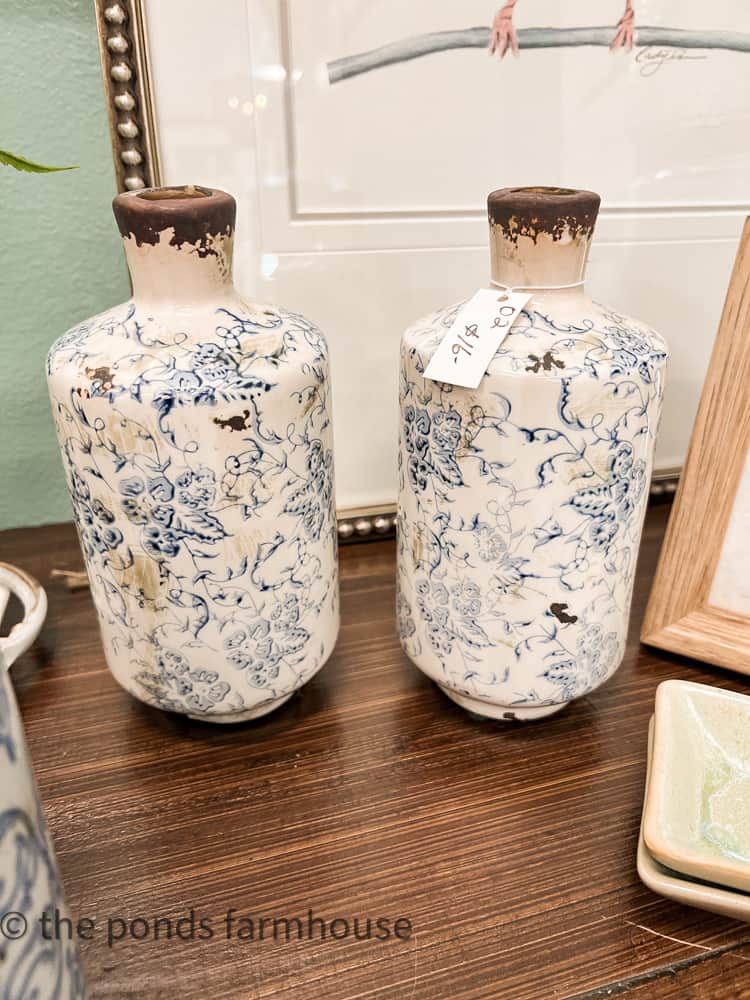
Napkin Decoupage Inspiration
I’ve been seeing these vases everywhere, including online at Magnolia. Since I love the look, I ordered some of these napkins to make my own version of these vases.
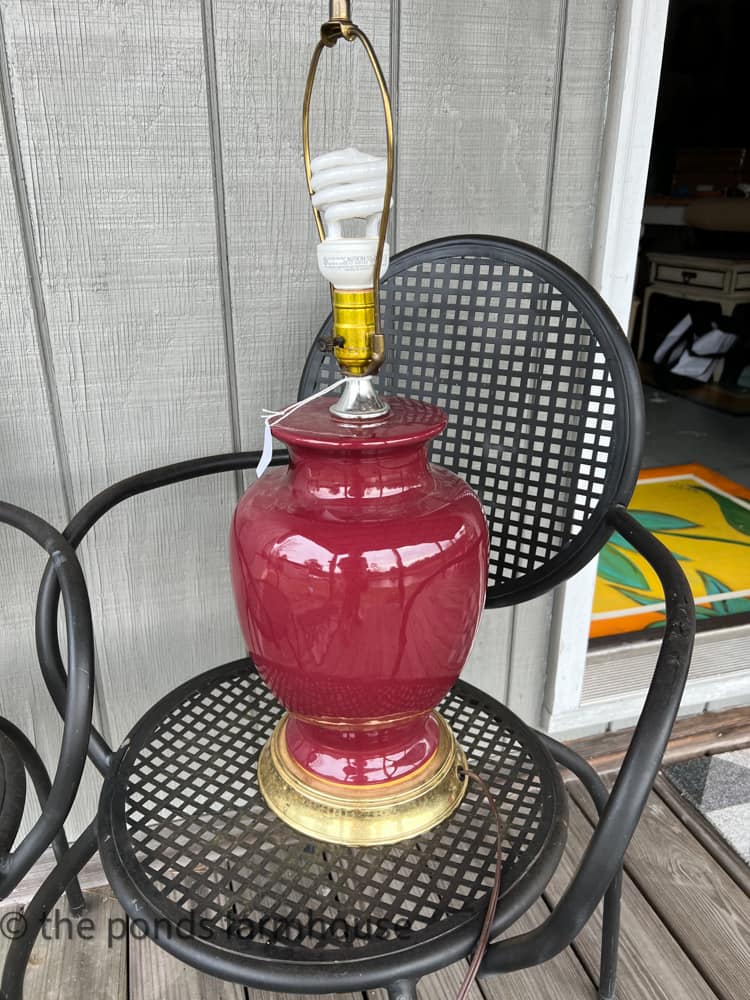
However, before I could find the vases I wanted, I found this lamp at the Habitat ReStore for only $1.00.
I liked the shape and decided it would make a great napkin decoupage lamp.
(Posts on The Ponds Farmhouse may contain affiliate links. As an Amazon Associate, I earn from qualifying purchases. See the full disclosure details here.)
Supply List
- Old Lamp
- Textured Spray Paint
- Old White Chalk Paint
- Blue and White napkins
- Scissors
- Mod Podge
- Black or brown craft paint
- Brass Paint For base and hardware.
Distressed Napkin Decoupage Lamp
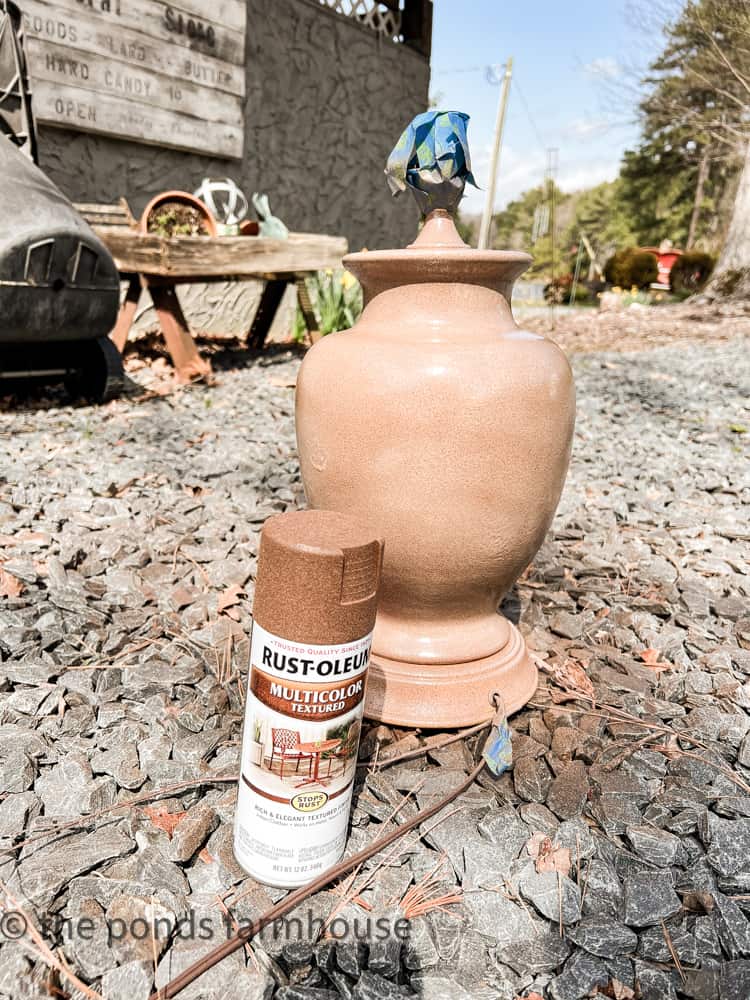
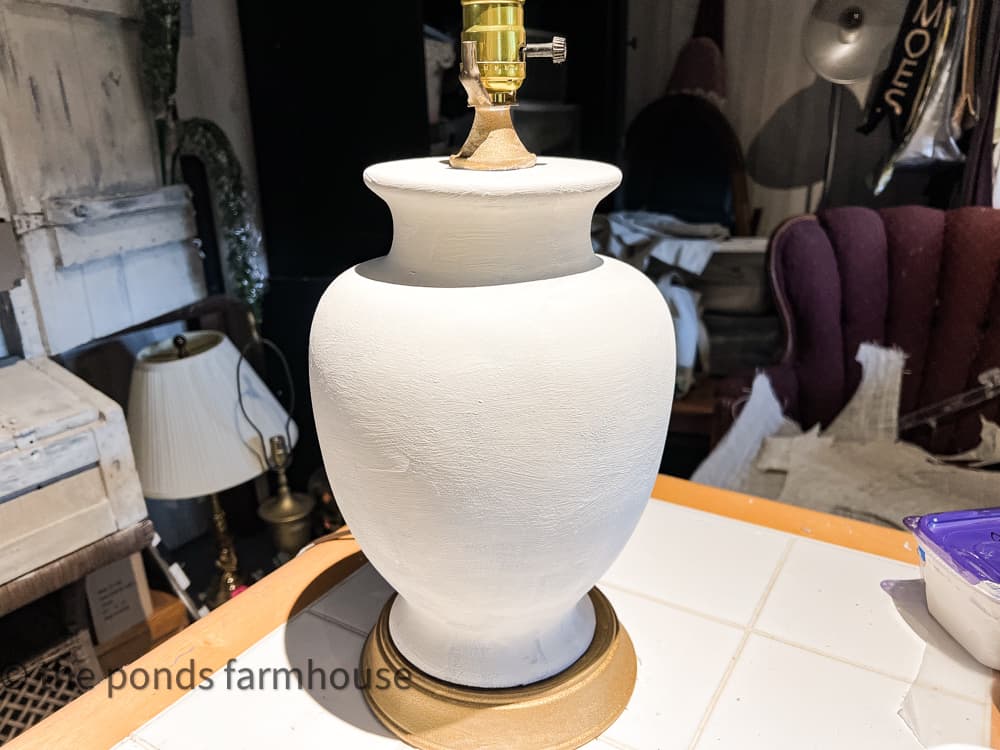
The first thing is to prepare the lamp to assure the napkins would adhere to the lamp base. Begin by taping the metal parts of the lamp that you don’t want to paint. I recommend using a this textured spray paint to paint the entire ceramic base of the lamp. It gives the base a slightly gritty feel and helps the paint and napkin to adhere to the base.
Once the textured paint is dry, I painted the ceramic part of the lamp with Old White Chalk paint. In addition, I painted the metal trim areas with an antique brass paint.
How To Add Napkin to Lamp
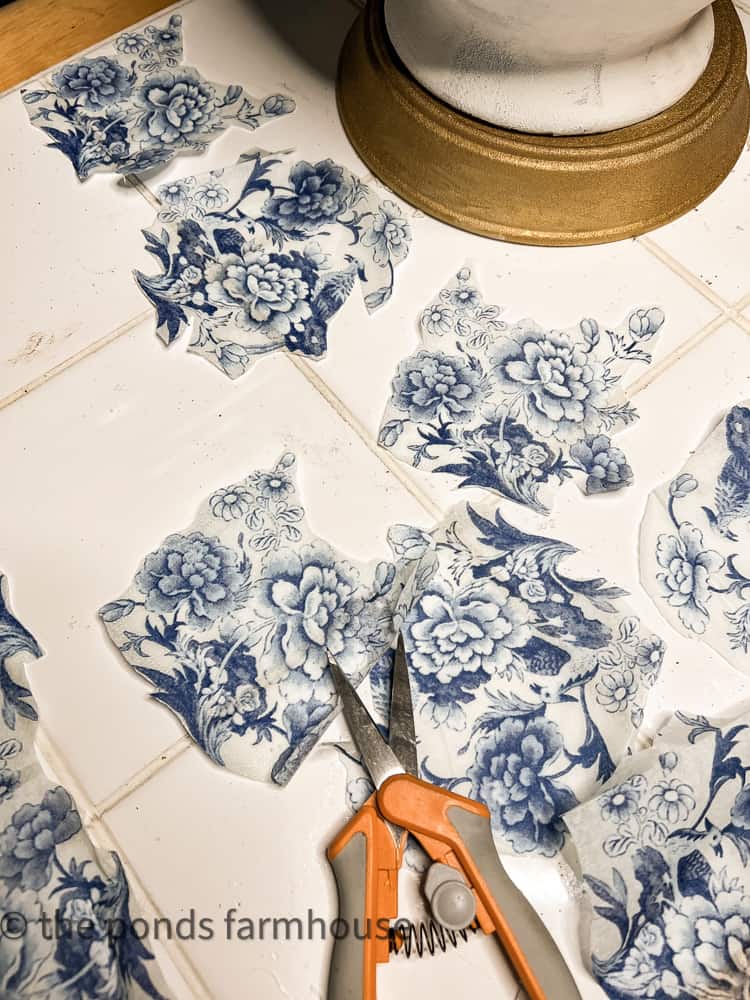
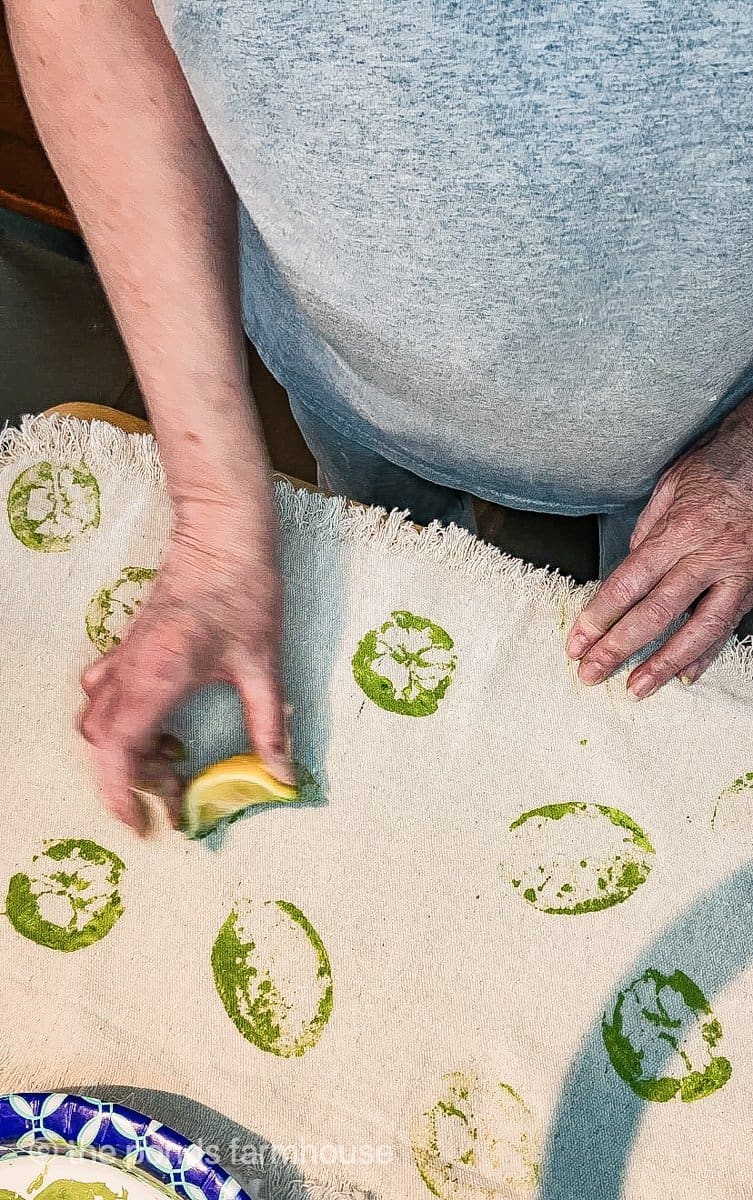
Next, you are ready to add the napkin to the lamp. Begin by separating the layers of the napkin. This napkin is three ply and you only want the top layer. Then, cut the napkin into smaller sections using razor edge scissors.
This will allow the pieces to wrap around the curved edges of the lamp without folding.
Next begin adding napkin pieces randomly to the lamp base using Gloss Mod Podge.
Brush the Mod Podge onto the lamp with a paintbrush in the areas you want the napkin to be applied.
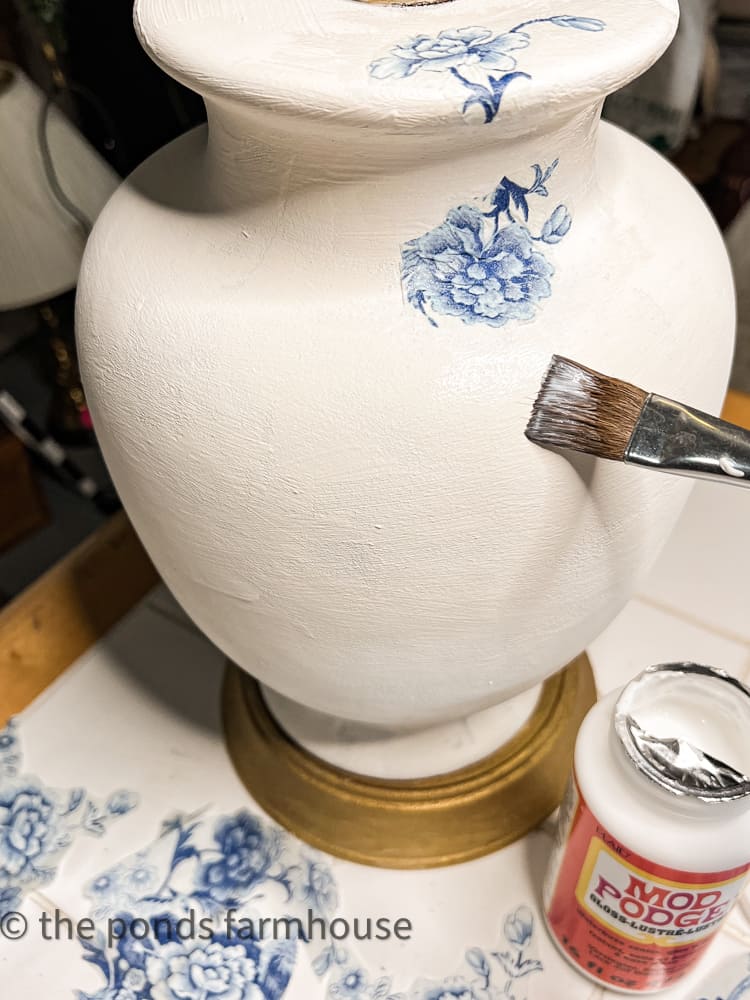
Add the napkin to the top of the mod podge and then brush an additional layer over the top to adhere.
Continue until the lamp base is sufficiently covered.
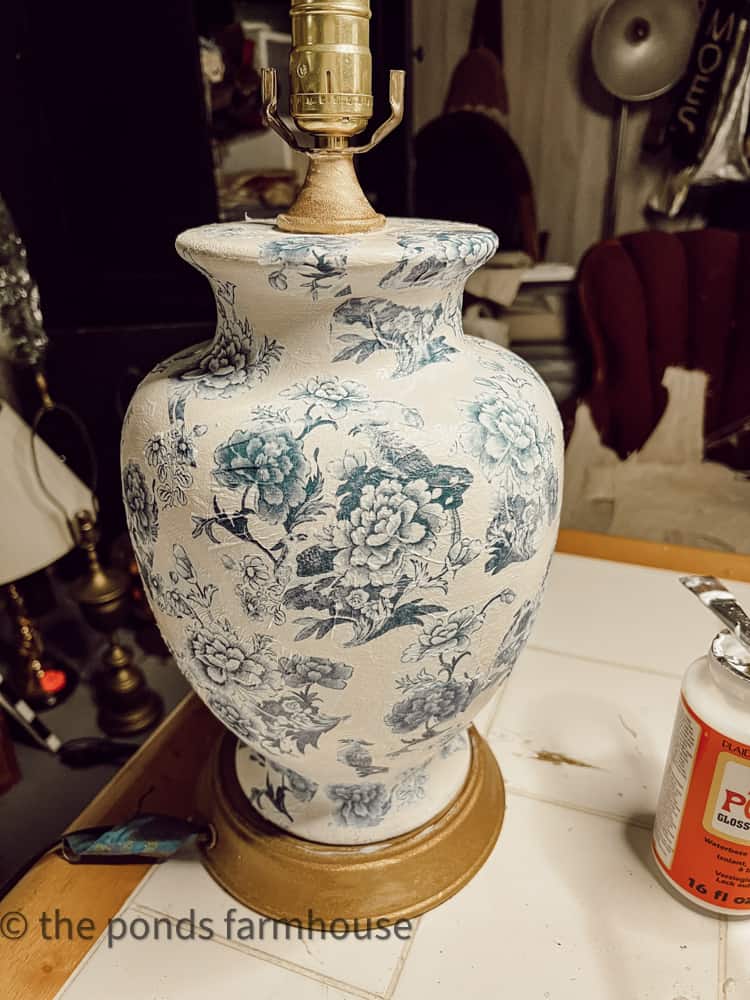
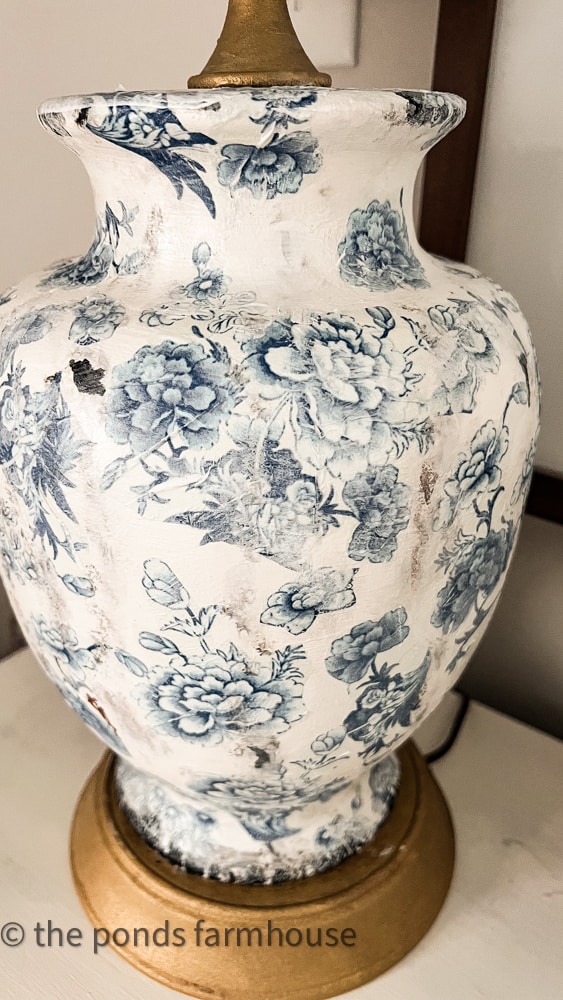
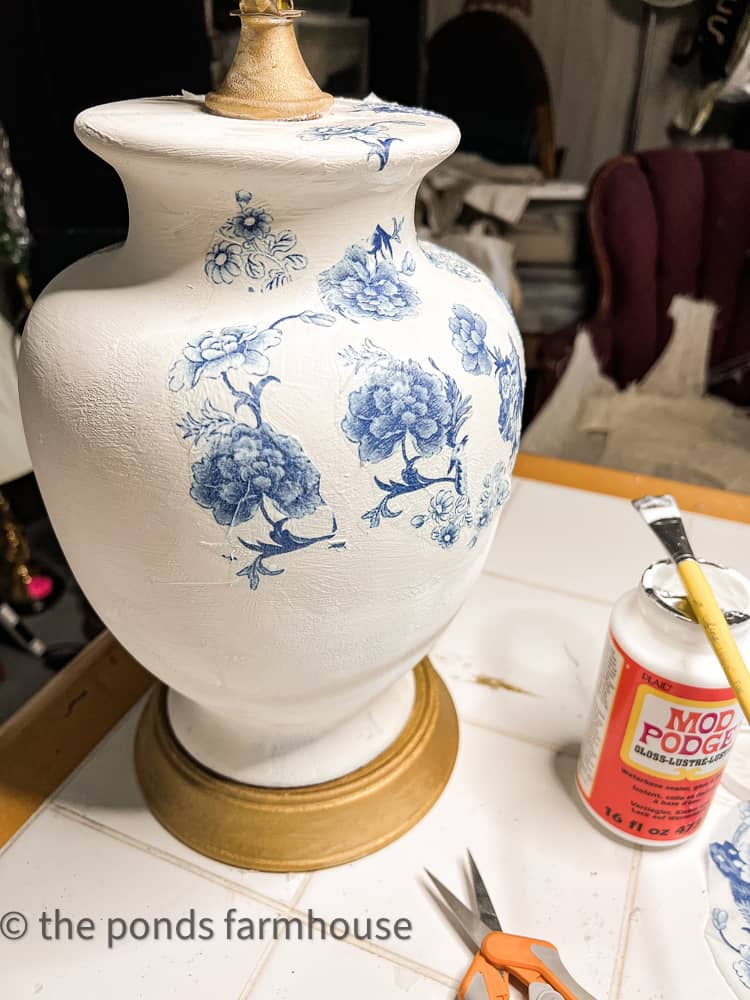
Finally, apply a mixture of 3 parts mod podge and to 1 part chalk paint over the entire surface of the napkin decoupage lamp base.
Note: Test a small are before covering completely to assure that the mixture isn’t too heavy. You are wanting a milky coverage not completely white.
Allow the mixture to cover heavier in some areas to lighten the pattern which will add to the distressed appearance.
How To Make A Distressed Napkin Decoupage Lamp

Easy way to transform a cheap thrifted lamp into a trending decor accessory.
Materials
Instructions
- Use painters tape to cover any areas you don't wish to paint.
- Spray the lamp base with textured spray paint to add a ruff surface.
- Paint over the textured paint with white chalk paint
- Then paint the metal areas with Antique Gold Paint
- Separate layers of the napkins
- Cut top layer of napkin into smaller pieces with razor edge scissors
- Apply gloss mod podge to small sections of the lamp base.
- Press the napkin sections onto the mod podge.
- Then apply another layer of mod podge over the napkin to adhere.
- After the entire lamp base is sufficiently covered, use the brown and black paint to add distress areas. Paint some cracked spots and add some smudged areas randomly on the napkins.
- Finally, mix 1 part white chalk paint with 3 parts gloss mod podge and brush over the entire lamp base. Allow a heavier coverage in some areas to enhance the distressed look.
- Note: Test a small are before covering completely to assure that the mixture isn't to heavy. You are wanting a milky coverage not completely white.
- Add new lamp shade and ta da!
Notes
You can apply this same technique for vases or bowls
Choice of napkins and paint colors are optional
Recommended Products
As an Amazon Associate and member of other affiliate programs, I earn from qualifying purchases.


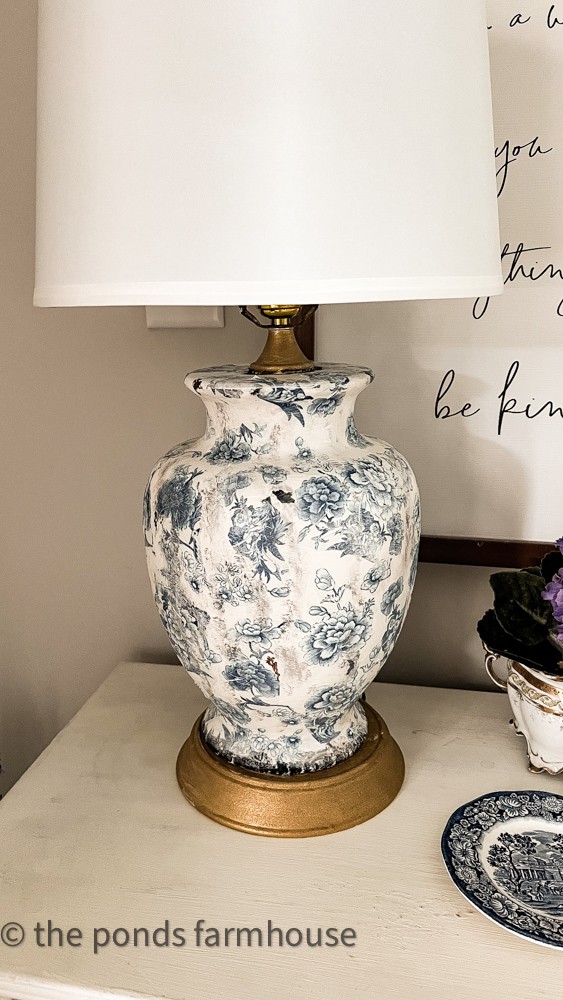
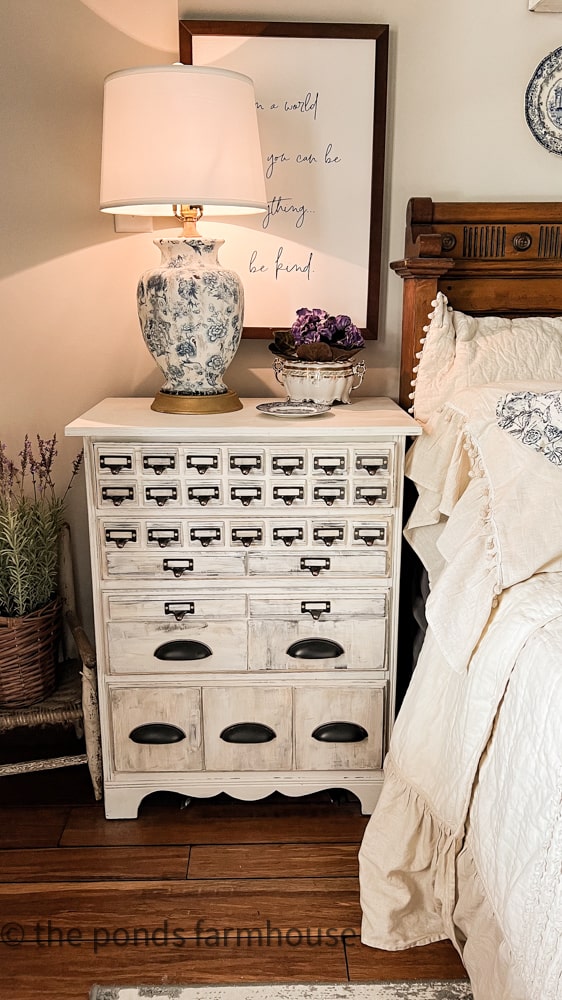
Finished Napkin Decoupaged Lamp
To finish the lamp, a new shade was added.
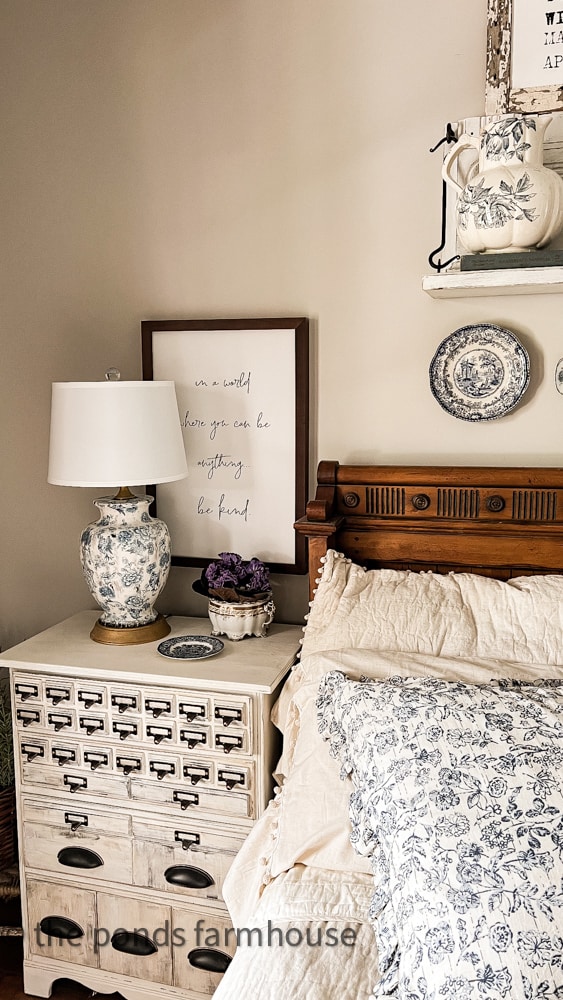
The lamp works perfectly with the other blue and white accessories added to the master bedroom last Spring. Click here to see the updated the bedroom.
Since I have napkins left over, I’m collecting some thrift store vases in similar shapes as the Magnolia versions. I can’t wait to use this technique to add napkins to them as well.
Did you know that this bedside table is a thrift store transformation? You can see how to transform a cheap chest into this industrial style version tutorial.
Be Sure To Watch The Full Video Tutorial Here.
Thanks so much for stopping by today. I look forward to sharing my next adventure with you.


This is one heck of a fantastic idea!!! I’ve got the lamp in the attic, and I’m ordering the napkin right after posting this comment. Love this! Thank you and Happy Easter!
Gail,
I can’t wait to see your lamp. So happy this was helpful.
Oh my goodness! I love the lamps! Thanks for sharing this project!
Happy Easter
Margie,
I’m so glad you like this. Thanks for commenting.
That turned out SO good! I love it!
I’m so glad you liked this project.
Omg…this has to be one of my favorite DIYs that you’ve done. I’m a blue and white fan and will be looking for a base or lamp to do this. You are so good at all you do snd I love your blog.
I must say, too that you have one great husband who seems to be up for all your projects. He’s a keeper! Kuddos to Brad!
Bonnie,
I’m so glad you like this project. It’s so easy and I can’t wait to hear how yours turns out. My husband always rolls his eyes at my projects but once it’s over, he’s the one showing them off. LOL
This is really an amazing makeover. Well done!
Teddee,
I’m so glad you like this. Happy Easter
Oohh, how I love this project! What a score and so beautiful! I’m a blue accessory gal and have a ginger lamp in the attic waiting to be transformed. This will be my next project! You did a wonderful job!
Pam,
I am so glad you found this helpful. Happy Easter.
Rachel that is beautiful, I am definitely going to be looking for pretty napkins now.
Corine,
I appreciate your sweet comments.
Absolutely gorgeous, what a difference it makes and what a bargain.x
Janette,
I’m so glad you stopped by and thanks for commenting.
Gorgeous!! I think we’ve all had at least one of these ginger jar lamps at one time. Great save! Have a wonderful Easter Weekend!
Debra,
I really appreciate your comments. Its a fun project.
Your lamp turned out so cute. It looks great on your darling sidetable.
Pat,
I’m so glad you like this project. Have a wonderful Easter
You are blowing my mind right now, Rachel, this is SO COOL! I can’t believe how much it looks like a real chinoiserie lamp. You are definitely one talented lady. I can’t wait to look for all kinds of vases to try this technique on now. Loving and pinning as always, CoCo
CoCo,
Your encouragement means so much to me. Have a wonderful Easter.
Rachel, this is gorgeous and fantastic tutorial.
I have napkins for a cement finial!
The aging tips are excellent for this project.
Pinned
Cindy,
I’m so glad you liked this project. Thanks and have a wonderful Easter.
Wow Rachel! You’ve done it again! I can’t wait to find a ginger jar lamp to transform. Love the way you distressed it, thank you for the inspiration! Jan in MA
Jan,
I’m so glad you liked this project. Can’t wait to see what you make.
Your lamp looks beautiful. Such a great idea.
Renae,
I appreciate your comments.
Wow! This lamp looks so good and it looks like something even I could do. Lol! Thanks for sharing this. Happy Easter!
Lynda,
It’s so easy. Thanks for your sweet compliments.
Now this is inspirational Rachel… I found some old material at the thrift store in blue and white ! Can’t wait to do this …
Sharon
Sharon,
I really am glad you liked this project.
Thanks for sharing.
Stacy,
Thanks for sharing.
Girl, that may have been my grandmothers lamp you found! LOL! Not kidding. Wish she could see it now. Love what you did to it! Featuring it this week on Farmhouse Friday. Thanks for linking up and always supporting me. You are the best. Pinned
Cindy,
You are always so kind and supportive. I appreciate this so much.
CoCo,
Thanks so much for sharing.
I’m so honored to be featured.
This is the best idea Rachel. I can’t wait to try this on one of my older lamps.
Glad you like this Kim.
The lamp was beautiful until you distressed it. I thought it ended up looking dirty. Great idea, though.
Debra,
My inspiration was the distressed vases that are so popular this spring from Magnolia. Thanks for your input.
The lamp is fabulous! I’m hoping to do a similar treatment to the tops of a pair of side tables… would you have any tips on how/what to use as a topcoat for that kind of surface?
Patti,
I could use a clear polyurethane to protect the design. Thanks for stopping by.
Lovely, I have an ugly old lamp like that I was going to give away. I have changed my mind and am going to give it a new life with this technique. Thank for the shar
Thanks Sandra, I’m sure it will turn out great!
This lamp is gorgeous! You described the process precisely & eloquently. I am going to the thrift store and hunting down lamps and napkins to do this project for my guest bedroom.. Thank you so much!
Gina,
I’m so glad you found this post helpful.
Rachel this is SO clever! I love the pretty blue and white print napkin you chose. Your “new” lamp looks so beautiful styled on your nightstand. And you would never guess what it looked like before. Such a gorgeous transformation!
I always see lamps like this in the thrift store and think to myself, “what would I do with it?” Now I know! I can’t wait to give this a try. Pinned!
Jen,
I’m so glad you like this. Can’t wait to see what you do.
One of my favorite crafts! I am going to do this!
Stacy,
It’s so easy and fun.
This is one craft I haven’t done really, my grandmother used to make all kinds of intricate decoupage trinkets when I was little I don’t know why I haven’t tried before! Love how that lamp came out…and for a buck!!!
Jennifer,
Yes! Can you believe it.
Wow! I’ve seen those jars at Vintage Market Days and always love them. You NAILED it with this lamp!
Anne,
Thank you so much. I appreciate you for stopping by.
Such a fabulous idea Rachel. I just need to find some lamps now. You know when you use blue and white you are totally speaking my language.
Wendy,
I’m so glad you like this idea. I love blue and white also.
Rachel – I love this so much. No one would ever guess what it looked like before. Your skills at distressing are amazing. I’ll be on the look out to make one of these.
Regina,
I really appreciate this.
thanks for sharing.
Thank you for posting….love all your projects. Keeping post to try a few.
Blessings.
I’m so glad you like this. Thank you.
Enjoyed the lamp base make over. Ann
Ann,
I’m so glad you like this one. Thanks for stopping by.