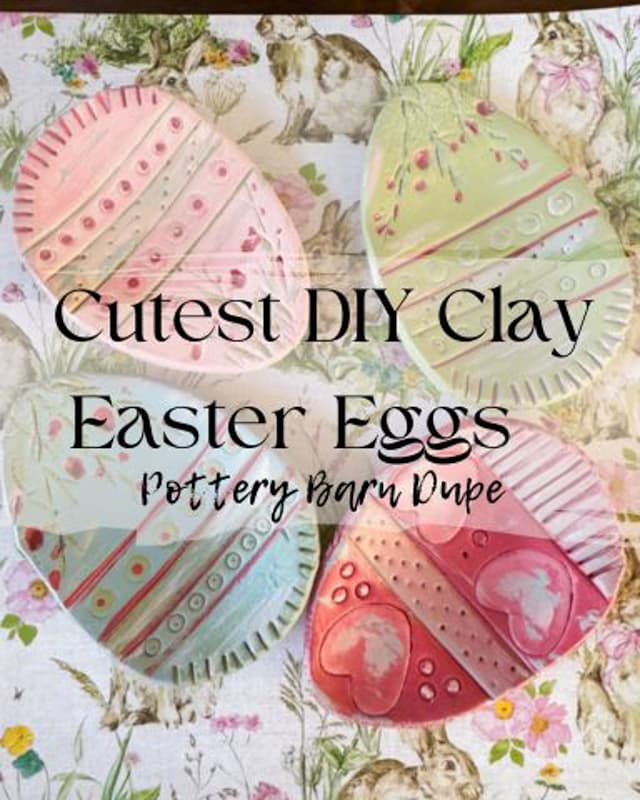
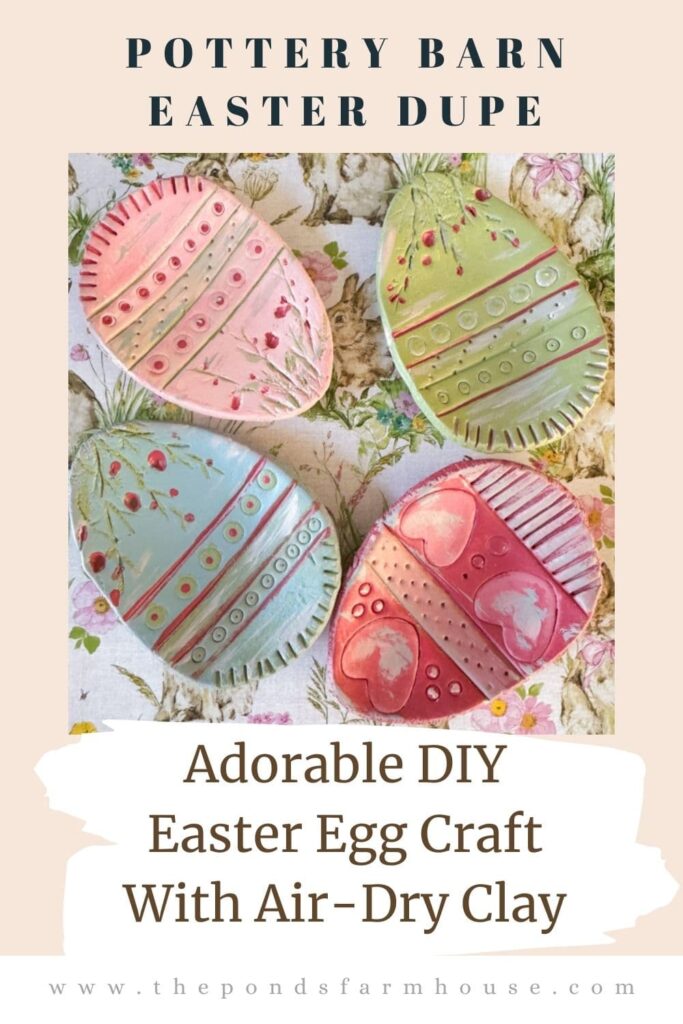
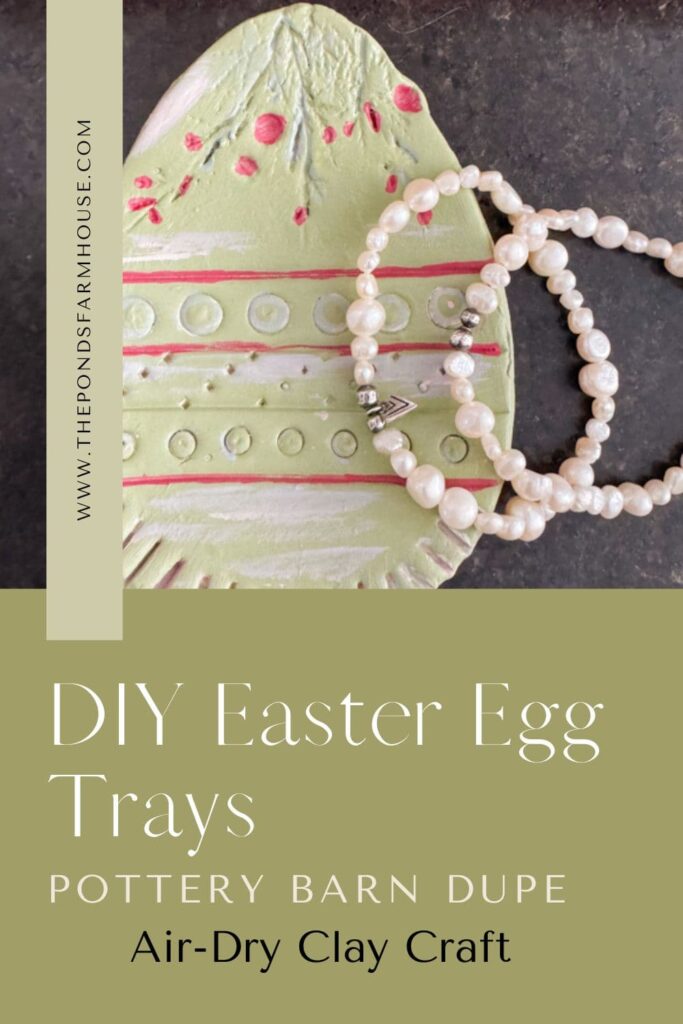
Craft Fun DIY Clay Easter Eggs: Budget Pottery Barn Dupe
Want the latest from Pottery Barn Easter Decorations but don’t want to pay the price? You can easily make your own Pottery Barn Dupe Easter Eggs. This fun Air-Dry Clay Craft is a quick and easy way to duplicate the look of these cute Easter Table Accessories. They can be used as a decoration on your Easter dining table as creative Easter plate decorations, guest gifts, or trinket trays for yourself. You can customize this Easter Egg Craft to match your table decor or home decor.
Warning – Not Food Safe
Warning: This Pottery Barn Dupe is for Decorative purposes only.
Air-dry Clay and Acrylic Paints are not food-safe and, therefore, should not be used to serve food.
Purchase the Pottery Barn version if you plan to serve food on the dishes.
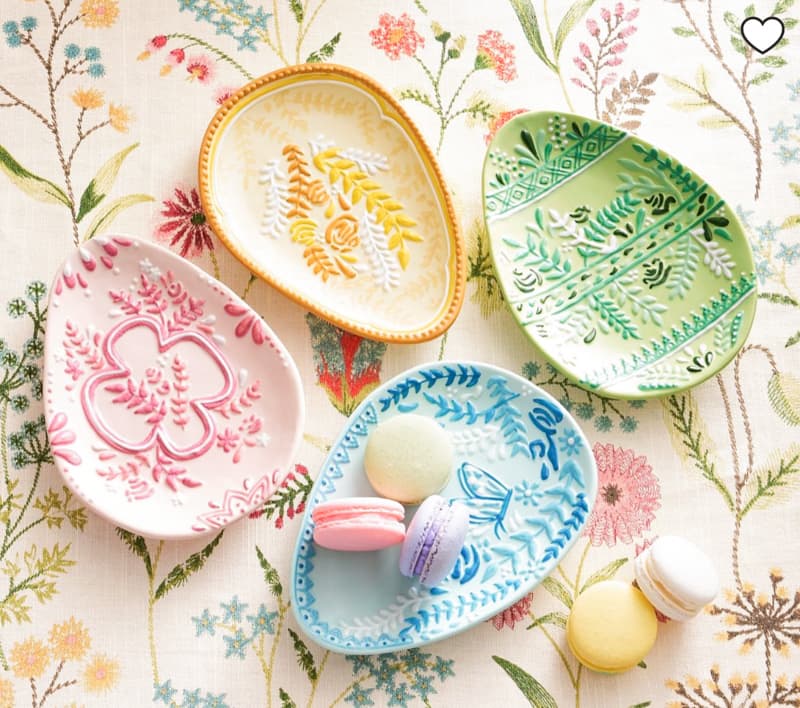
Here are the Pottery Barn Easter Decorations that inspired this inexpensive DIY Craft. You can see Easter Egg Plate Details here.
(Posts on The Ponds Farmhouse may contain affiliate links. As an Amazon Associate, I earn from qualifying purchases. See the full disclosure details here.)
How To Make Air-Dry Clay Crafts: Pros and Cons
Air-Dry Clay is a fun and quick way to create home decor accessories. It’s easy to work with and dries quickly without the need for a kiln. However, you can only use the clay for decorative purposes.
If you make cups, bowls, or plates with air-dry clay, they are not food-safe and are not water-tight. However, if you want decorative plates, bowls, trinket dishes, etc., you can make some really cute accessories.
Air-dry clay isn’t toxic, so it’s safe for crafting with children. Before you use this form of clay, just be sure you know the purpose of your DIY project.
What Can I Use The Pottery Barn Easter Egg Dupe For?
If you purchase the Pottery Barn Easter Decorations, they are completely food-safe and make great small serving plates. So you may be asking, “What’s the point of making this Easter Egg Dish if I can’t serve food on it?”
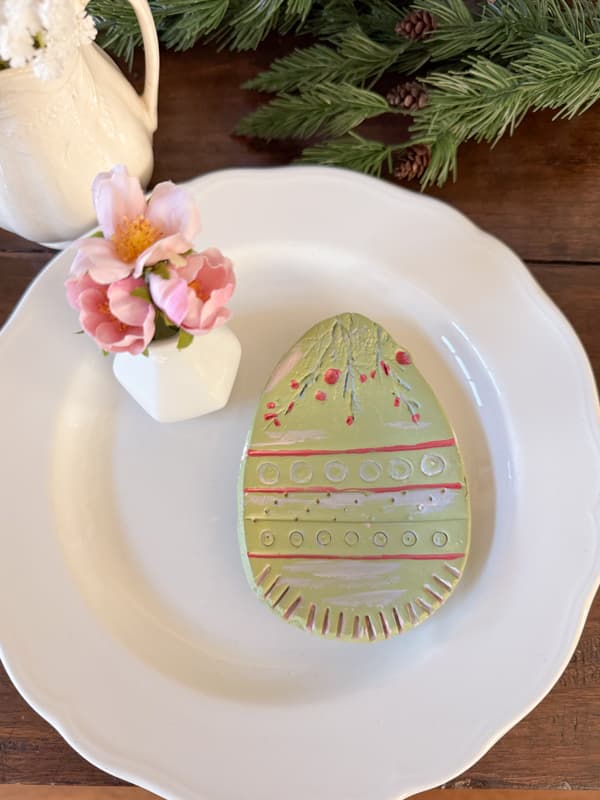
When I first saw the Easter Egg Plates, I immediately thought about styling an Easter tablescape with colorful dishes. I love to add a cute seasonal accessory to the center of my dining plates. These adorable Easter eggs will make a precious take-home gift for your guests.
In addition, they will make the cutest trinket dish. So I wasn’t concerned with serving food on them so much as duplicating the look for fun Easter Egg Decorations.
The bowls will also look good on a side table or part of an Easter vignette anywhere in your home this Spring.
How To Make Easter Egg Craft?
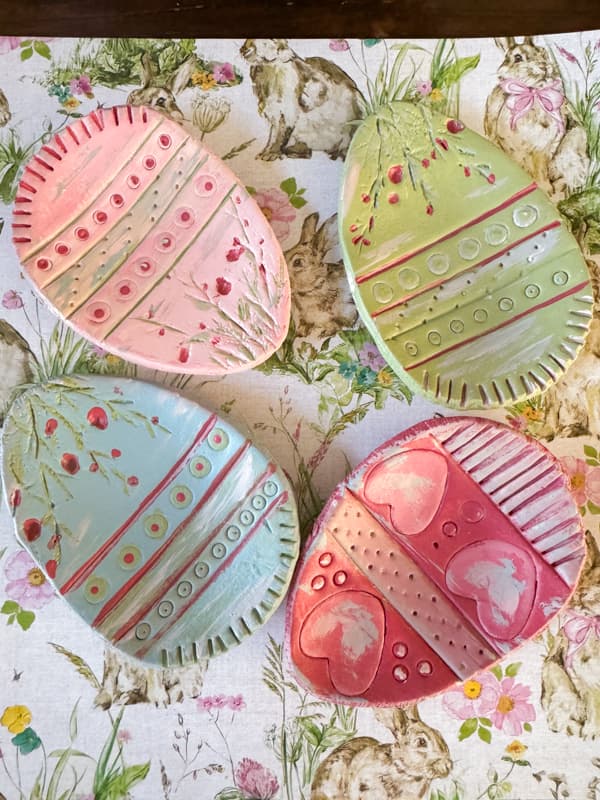
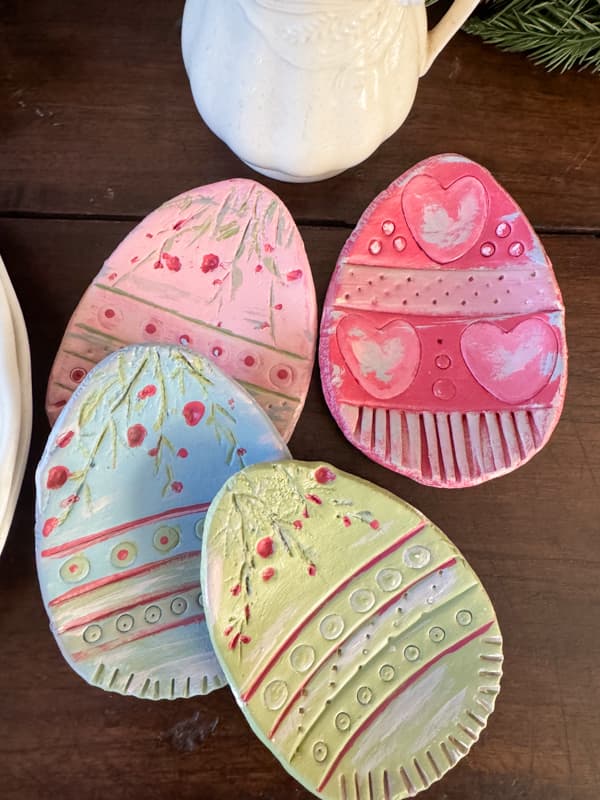
This Easter Egg Craft is so easy to make, and the possibilities of colors and designs are unlimited. I chose to use pastel colors similar to the Pottery Barn Easter decorations. However, you may choose to create designs that complement your home decor aesthetic.
Supplies for Easter Egg Bowls
Here are the supplies I used to create these decorative Easter Egg Bowls.
- Air-Dry Clay
- Large Egg Cookie Cutter
- Rolling pin
- Straws
- Fork
- Tooth Pick
- Small heart cookie cutter
- Chop Stick or flat knife
- Folk Art Acrylic Paint
- Small Artist Brushes
- Matte Spray Sealer
Design Your Easter Egg Craft
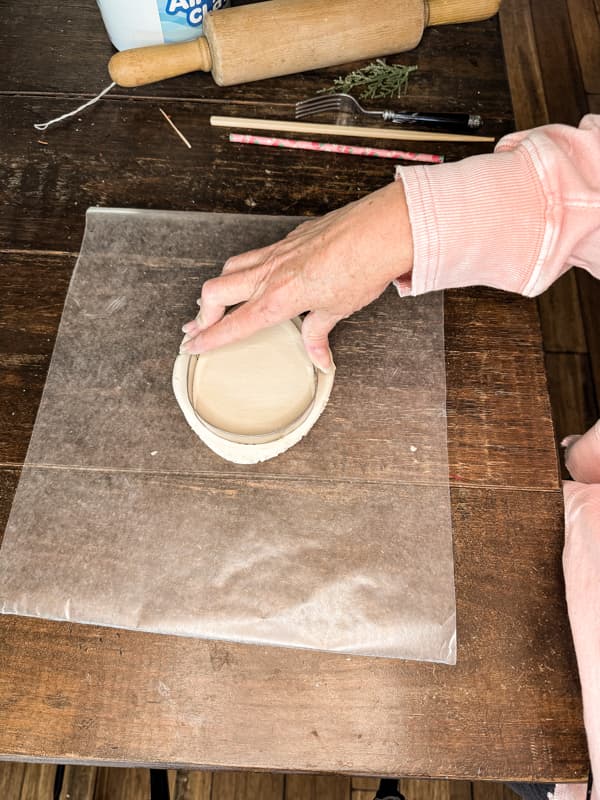
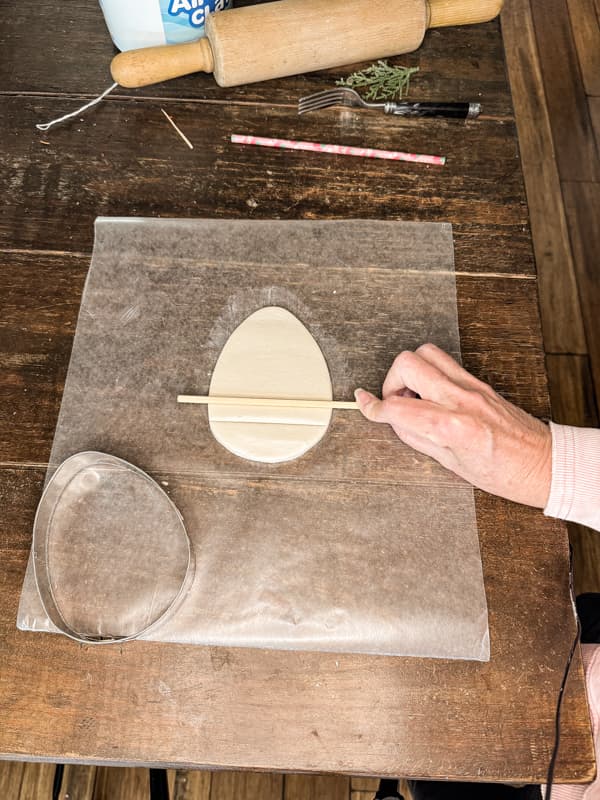
Begin by rolling the air-dry clay onto a sheet of wax paper. Roll until the clay is approximately 1/4 inch thick.
Use the large egg-shaped cookie cutter to cut your design. Repeat until you have the desired number of Easter Eggs.
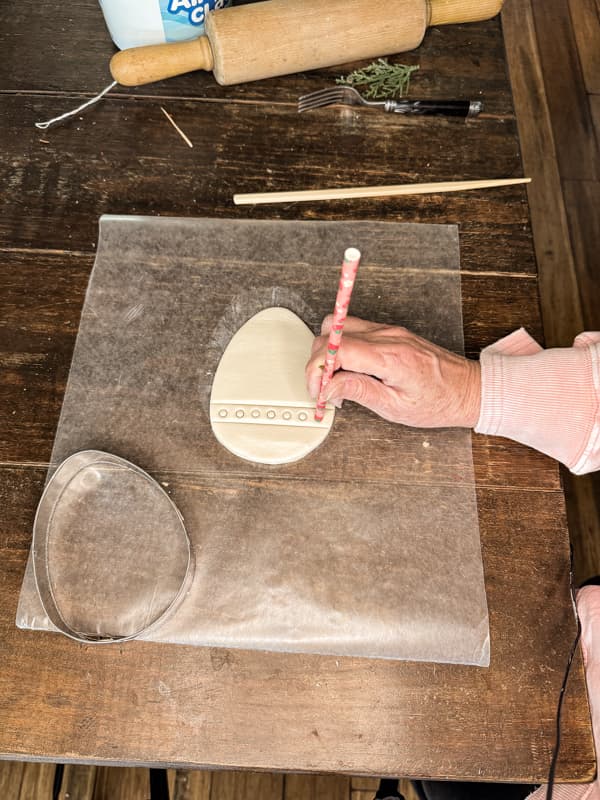
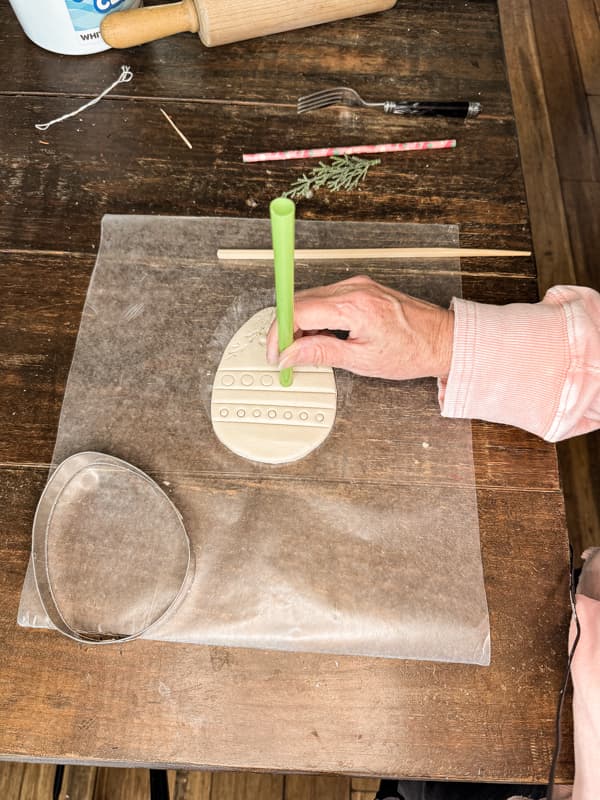
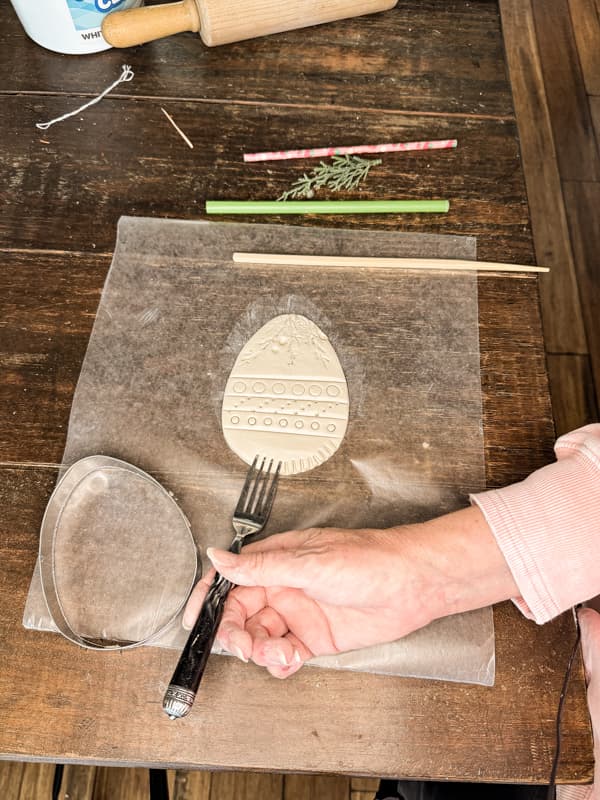
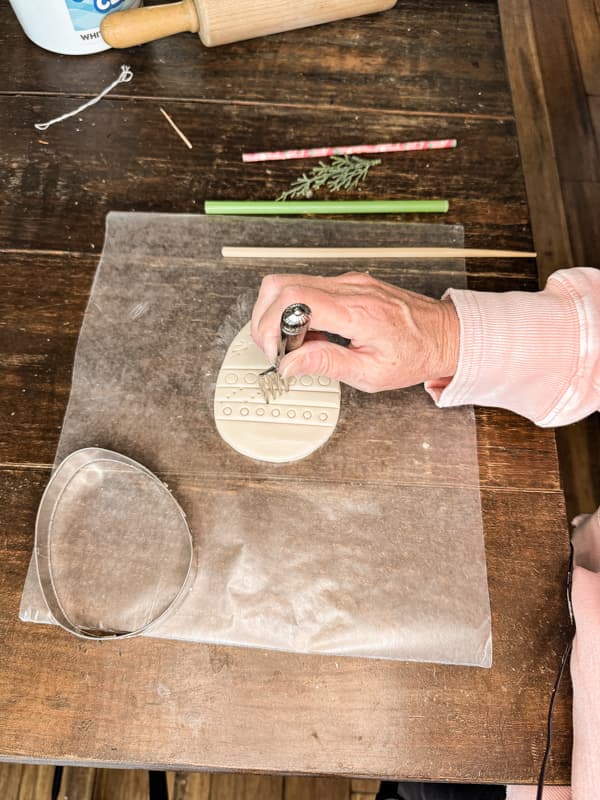
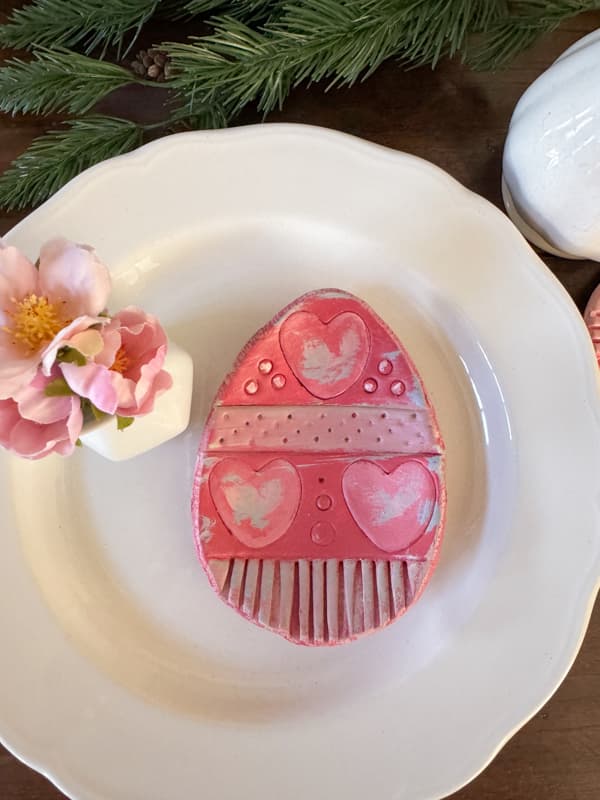
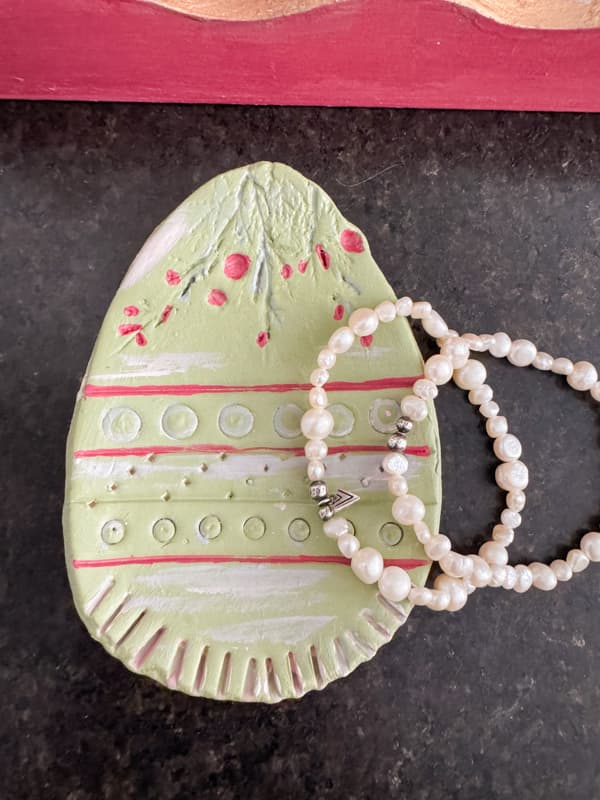
Next, press designs into the soft clay eggs. For this step, I used several items, including a fork, chopstick, two sizes of straws, a small heart cookie cutter, a piece of faux greenery, and toothpicks.
You can be creative with this step and use items that you have on hand.
Press the objects lightly into the soft clay until they make an indention. Don’t press through the clay.
I began with horizontal lines using a chopstick.
Then, add circles with straws. I used two sizes to create the design I wanted.
The fork can be used flat or upright to create designs on the air-dry clay craft egg.
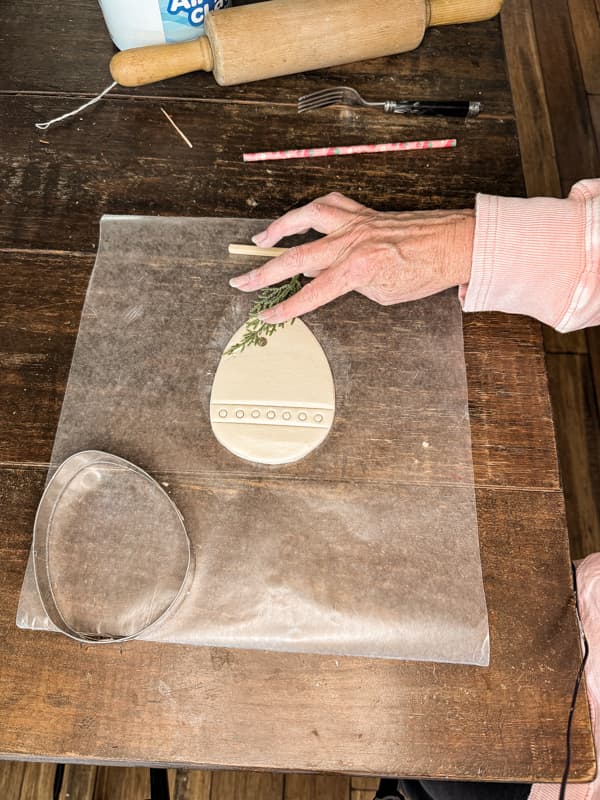
Gently press the faux greenery into the clay to create more design details.
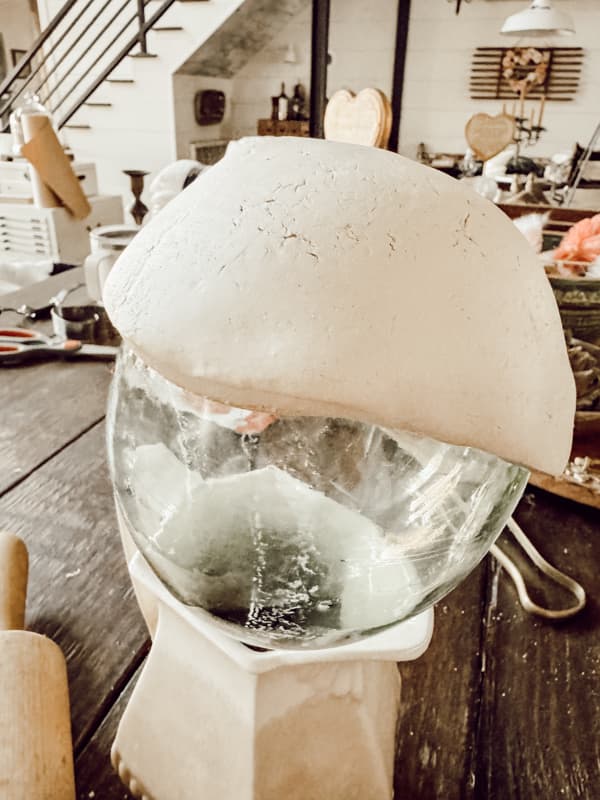
Once the designs are complete, drape the clay Easter Egg over a smooth round surface to dry.
For this project, I wanted a shallow bowl shape, so I used the side of a round bottle.
Allow the Easter Egg Dish to dry for a few hours or until the shape is set. Then place on a wire drying rack until completely dry.
How To Paint Easter Eggs
Once the air-dry clay crafts are dry, you can paint the details of the bowls using small artist brushes.
This is again your preference.
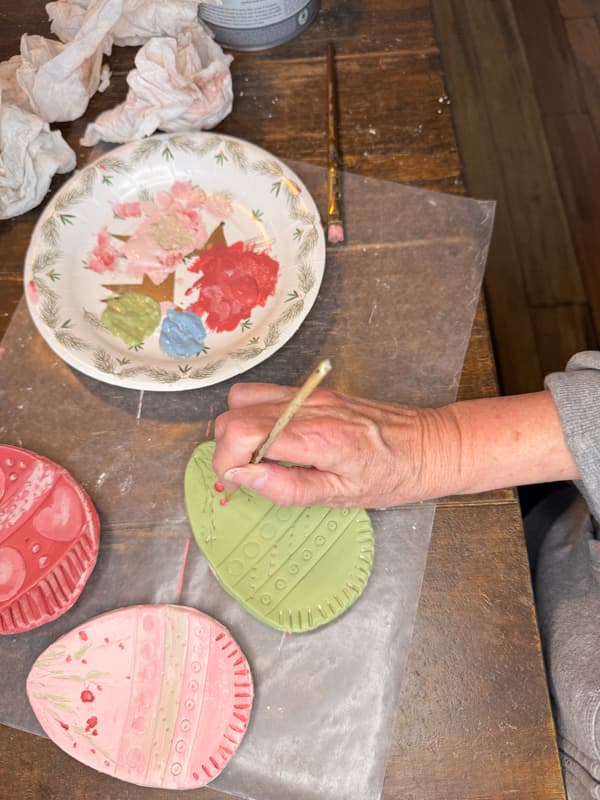
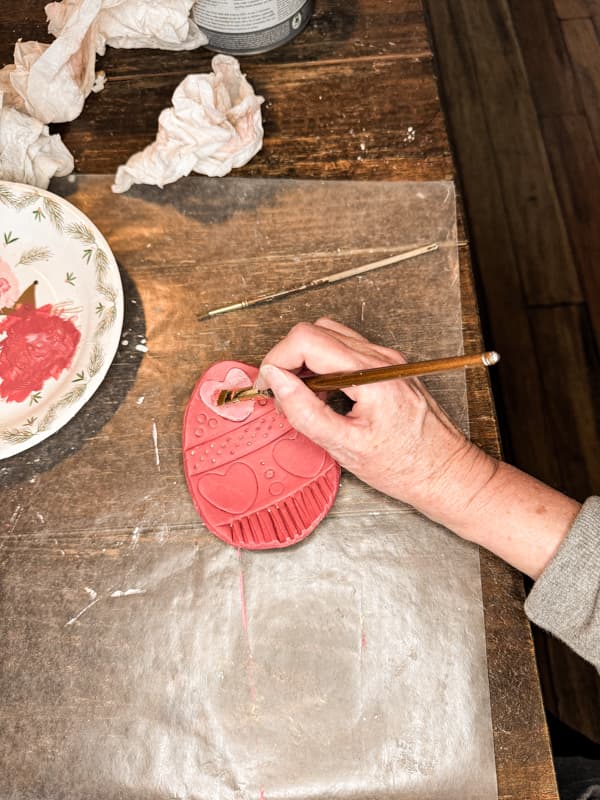
Insider Tip
To achieve a similar appearance as the Pottery Barn Dishes, I used varying shades of the same paint colors.
Try mixing colors as you go to create various shades. This will keep the soft appearance you see on the Easter Eggs.
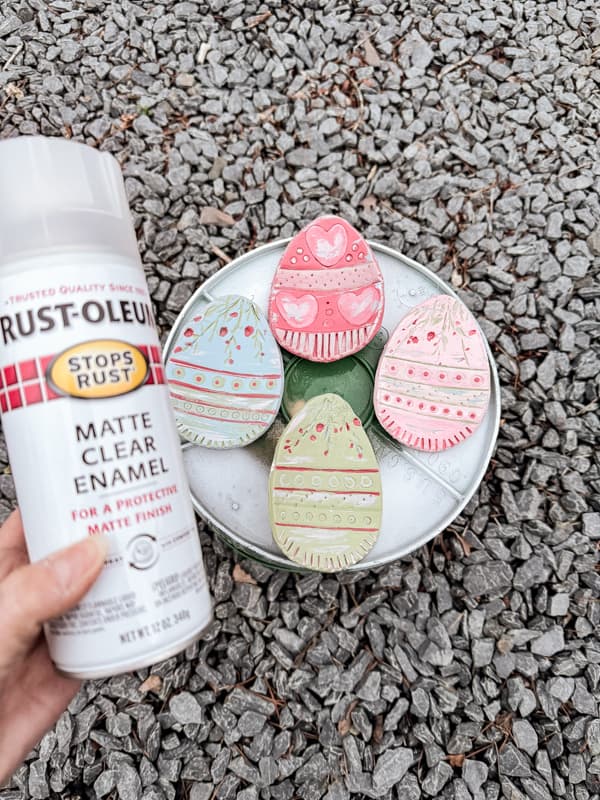
Finally, after the acrylic paint is dry, you can seal the Easter Eggs with a spray sealer. Place the craft project in a well-ventilated area and spray a light coat of sealer. Let dry for approximately 30 minutes and repeat.
How To Decorate with Pottery Barn Dupe Easter Egg Craft
Now, you can decorate your tablescapes, bathroom countertops, side tables, etc., with your creative one-of-a-kind Easter Egg Bowls.
Add one to the center of each dining plate for a sweet take-home gift at your next ladies’ brunch.
You can also scatter them on the table for Easter Egg Decorations.

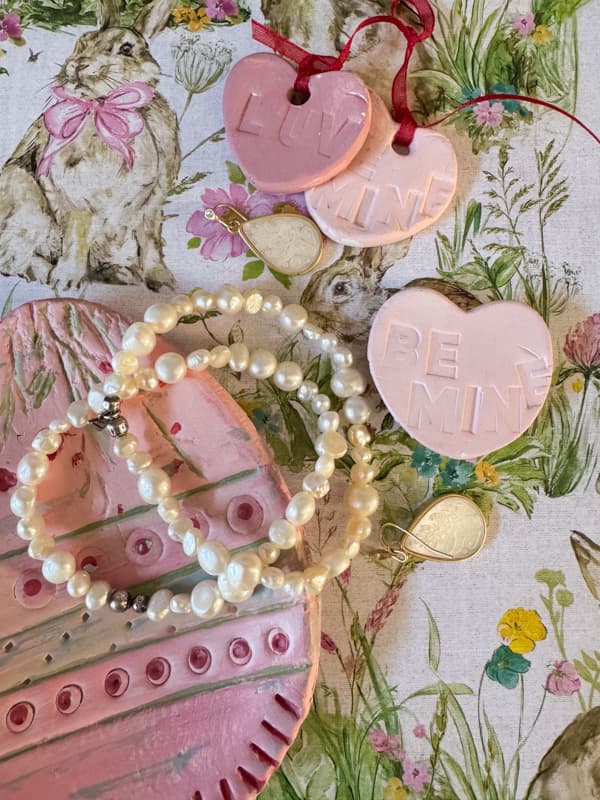
They will make adorable trinket dishes for you or your friends. They will be so impressed that you made them from air-dry clay craft.
What would you use this decorative Easter Egg Craft for?
Resources: Shop This Post
Similar DIY Craft Projects
Looking for similar projects. Check out these fun ideas.
- 12 Creative and Easy Valentine’s Gift Ideas for Under $5.00
- Air-dry clay ornaments
- Pottery Barn Inspired Leaf Napkin Rings
- Decoupage Easter Eggs with Napkins and Old Book Pages
- Easy Bunny Ear Napkin Fold
- Centerpiece for Easter Table
Thank you for stopping by today, and I look forward to sharing my next adventure with you.

Pin It To Remember It
Did you find some great ideas you’d like to save for future reference? Hover over the images you’d like to save and pin to your favorite Pinterest Boards when you see the PIN button.


Great, creative idea, Rachel! Thanks for sharing.
Cyndi,
I’m so glad you like it.
These are super cute! I would love to share them on my newsletter.
Renae,
Absolutely, Thank you!
Love, love these Rachel! Oh and by the way your’s are way cuter than Pottery Barn’s!!
JoAnn,
Aww, you are so sweet. Thank you so much.
Rachel, your air dry egg dishes are so adorable and I think much cuter than the other ones! so cute!!
Debra,
I am so glad you like them. Thanks for your sweet compliment.
Oh my golly! I was looking for a craft to do with my homegroup ladies and this is it! You always have the best ideas and they always turn out fantastic. So stinkin’ cute! Thanks for sharing this. And sharing your fabulous crafty brain! Cheers
Cindy,
You are so sweet and encouraging. I hope the ladies like it.
I just love this idea, can not wait to try it. and as a gift it is great. Thank you. I follow every day but this is the first comments I post.
Terry,
I’m so glad you like this idea. Thanks for taking the time to comment and I appreciate you for following along.
This is a fabulous dupe!! I love how you deigned yours and they came our fantastic. Thanks for sharing. Pinning since I see a DIY clay project in my future. Thanks for the inspo! XO- MaryJo
MaryJo,
Thanks for stopping by. I’m so glad you like them.
Rachel, I LOVE these! Definitely gift ideas and maybe, most probably, one for me, too!! Thank you so much for sharing!
Karolyn,
I know what you mean. LOL. Thanks for stopping by.
Rachel, these egg dishes are absolutely beautiful. I love what you can make with clay. Such a wonderful project!
Tammy,
I’m so glad you like them. Thanks for stopping by.
Oh wow, super cute, love it. I tried my hand at pottery about 40 years ago. Loved it but with our kids being tiny tots at that time, I never continued with it.
I visited you via County Road 407: Farmhouse Friday 334
My links: 54+55. We will be honored and happy if you share your links with us at SeniorSalonPitStop. Link under BLOGGING
Esme,
Thank you for stopping by. I added my link to your and I appreciate you for letting me know.
Omgoodness, these are adorable Rachel! I’m sharing them with my readers this weekend because I know they will love them! Pinned!
Cindy,
I really appreciate this. Thank you.
Very cute results, great tutorial!
Jeanne,
I’m so glad you like it.
I love these! How cute will these be as a dish for keys or other small trinkets. Thank you for sharing your post at the Senior Salon Pit Stop #296! I’m excited to be featuring you at Monday’s party. Congrats! Pinned
Hugs,
Maria @ kraftyplanner.com
Maria,
Oh, I appreciate this so much.
This could be my all-time favorite DIY you’ve ever done Rachel. I am in love with this Easter project and love the bright colors you used. Bravo my friend!
Kim,
You are so sweet. Thak you for your sweet comment.
Thank you Rachel for sharing these amazing egg dishes over at the Creatively Crafty Linky Party! I love the household items you used to make the patterns in the clay! Creatively, Beth
Beth,
Thank you for your sweet comments.
Hello cutest trinket dishes ever, Rachel! I love how these turned out and how you can easily customize them too. Thanks for all your extra tips. I always forget to spray a protectant on mine at the end. Can’t wait to try this and to share on Friday. It’s fabulous! Hugs, CoCo
CoCo,
Thank you so much. I appreciate you for sharing.
Just popping back in to say I loved this so much that I’m featuring it tomorrow on Farmhouse Friday 335! Thank you for sharing it with us and linking up. pinned again!
Cindy,
I appreciate you so much. Thank you for sharing.
You are so creative Rachel! These are even prettier than the PB ones!
Michelle,
You are so kind. Thank you for your sweet comment.
SO adorable, Rachel!! What an amazing DIY..the colors are the patterns are fantastic!
Rachel,
I’m so glad you like them. They are so easy and fun to make.