DIY Rattan Cane Upgrade: Coastal Chic Cheap Cabinet Makeover
Do you like the coastal chic look of rattan cane cabinets and chests from Pottery Barn and other high-end retailers? With this DIY cane cabinet door makeover tutorial, you can easily upgrade almost any inexpensive cabinet. This budget-friendly project can be completed in just a few hours, depending on your cabinet size.
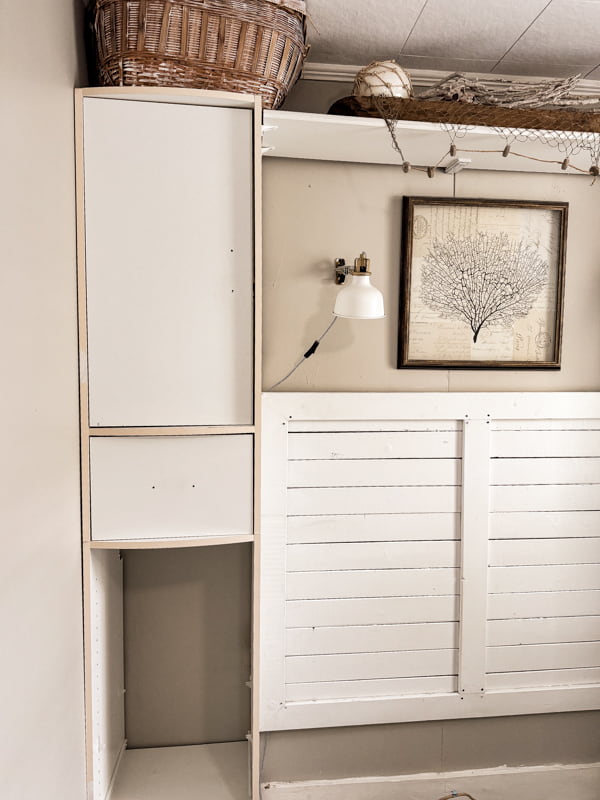
We have inexpensive laminate built-in storage cabinets in our beach cottage bedroom. They provide much-needed storage in a 460 sq. ft. tiny house. However, they were beginning to look tired, and we considered replacing them. Even if we tried to build something ourselves, the material cost was staggering.
When I saw a beautiful rattan cane chest in a high-end beach shop, I had a new idea. So here’s what we did for less than $150.00.

(Posts on The Ponds Farmhouse may contain affiliate links. As an Amazon Associate, I earn from qualifying purchases. See the full disclosure details here.)
Table of contents
Why Is Rattan Cane Furniture Considered Coastal Chic?
Rattan cane furniture is not limited to coastal decor. It mixes well with almost any style aesthetic. However, its laid-back casual design is perfect for a beachy coastal home.
Whether you decorate with rattan chairs or add small touches to a cabinet door, the natural texture adds a relaxed coastal chic vibe. Today’s tutorial will teach you how to update old furniture with this classic eco-friendly material.


DIY Cane Cabinet Makeover
Once we decided to makeover the cabinets surrounding our beach cottage bed, we needed to find our supplies.
The first step was measuring the doors and drawers to determine the amount of rattan cane we would need. Our built-in includes two long doors and four drawers. Luckily, the cane webbing we found was exactly the width we needed for these.
Next, we needed to add molding trim to frame out the webbing, so we headed over to the home improvement store. Here are the supplies we used. Your supply list may vary depending on the size and design of your existing furniture.

Cabinet Update Supplies
Here are the supplies used for our DIY cane cabinet makeover. You’ll supply needs may vary. Some supplies are optional and may not be needed if you choose to use the existing cabinet finish or hardware.
- 2 rolls of rattan cane webbing
- Hexagon Black Drawer Pulls (optional)
- Old White Chalk Paint (Annie Sloan)
- Wood Molding to trim around the cane webbing. Length and width will vary.
- Gorilla Max Strength Construction Adhesive
- Nail gun
- Cordless Ryobi Drill
- Paintable Caulk
- Windex
How To Makeover Old Cabinets
Once you have all your supplies, you are ready to begin the old cabinet makeover. First, we removed all the hardware and doors with the Ryobi Cordless Drill. Then, clean the cabinets to remove any oils or residue. I used Windex to clean these bedroom cabinets. However, if you are working on cabinets that have been exposed to grease, I recommend using a heavy-duty degreaser before painting.
Next, add painter’s tape to protect your walls, etc., and paint or stain the exposed areas of the cabinet. Depending on your project, this step is optional. You will also want to paint the edges of each door and drawer. You only need to paint the areas that will still be exposed after the cane webbing is attached.
In addition, I recommend painting your trim wood moldings before attaching them to the door. You will still need to touch up the paint after installation, but it will be much easier if they are already painted.


Prepare Rattan Cane Webbing for Project
If your rattan cane webbing comes in a roll, one of the first things you need to do is re-roll it inside out. The cane webbing is stiff, and you will need to secure the roll with tape to keep it tight. Allow the webbing to remain rolled like this overnight or for several hours before proceeding. You want it to lay flat when you apply it to the DIY cane cabinet doors.
Next, cut each piece to fit your doors and drawer fronts. I allowed a 1 1/2-inch cabinet edge around the rattan cane. Be sure to cut the webbing as straight as possible.


DIY Cane Cabinet Door Tutorial
The DIY Cane Cabinet Door is ready to be assembled. Begin by adding strong adhesive glue to the backside of the cane. You only need to add glue to random areas. I added glue to the corners and zigzagged across the center. Then, apply the cane to the door or drawer fronts, being sure it is centered.
Add something to weigh the cane down until the glue sets. If possible, try to use a quick-setting glue.


Next, using a miter saw, cut the trim pieces to fit around the rattan cane cabinet door. Angle the corners at 45 degrees to create a snug connection.
Allow the trim pieces to cover the rattan cane. Hold the trim securely in place and attach it with a nail gun. You should be securing the cane within the trim frame so that it doesn’t come loose.


Cane Webbing Cabinet Doors Trim
Now, you are ready to finish the cane webbing cabinet doors. Apply paintable caulk to any gaps and nail holes around the trim, smoothing the caulk with your finger.
Next, use a cordless drill to create the holes for the new hardware. Be sure to measure for proper alignment.


In the close-up images below, you can see how the trim and hardware enhance the new DIY Cane Cabinet Doors.


Reassemble The Built-in Cabinets
Now, you are ready to add the drawers and cane webbing cabinet doors back to the built-in cabinet. Use a small paint brush to touch up damaged areas and cover the caulk used on the trim.


Remove all the painter’s tape and enjoy the cabinet transformation.

Before And After
Wow, what a difference. The cabinet looks so modern in comparison to the original design. In addition to adding the cane webbing, we replace the shelving above the bed for a seamless look.
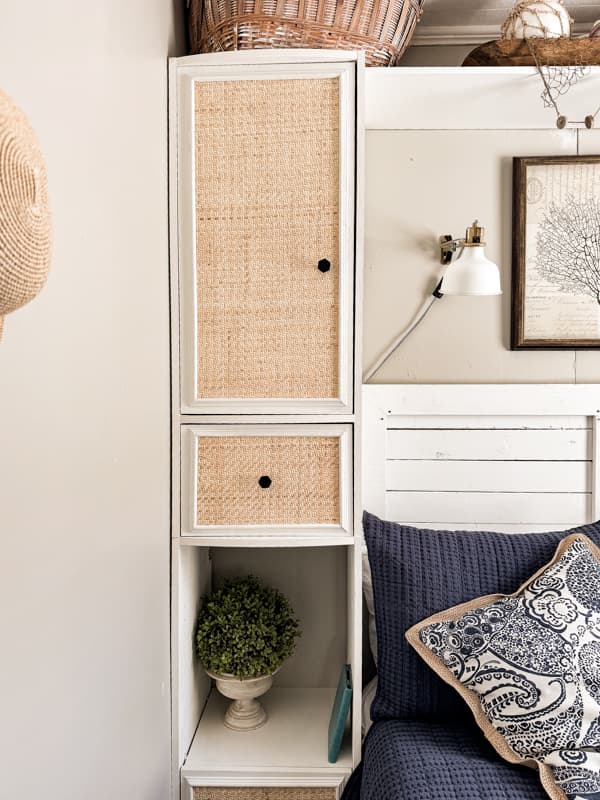
Updated Rattan Cane Cabinet
The cabinet upgrade only took Brad and me a few hours to complete. The project cost less than $150.00 and includes paint, cane webbing, a new shelf, trim moldings, and new hardware. I wasn’t sure the original built-in headboard would work with the new cabinets, but I’m okay with it for now. I’m hoping to update the lighting and bedding this summer. For now, we are extremely happy with the updated cabinets.
What do you think?

Video

Click images for resources.
Thanks for stopping by today, and I look forward to sharing my next adventure with you.

Pin It To Remember It
Did you find some great ideas you’d like to save for future reference? To save, hover over the images and pin to your favorite Pinterest Boards when you see the PIN button in the upper left-hand corner.


What a great upgrade! I love it!
Cyndi,
Oh Thank you! I”m so glad you like it.
Wow! What a difference the rattan cane makes to your painted cabinets. I really like it You and your hubby have such great DIY’s! Thanks for sharing with us, Rachel! Enjoy your weekend!
Mary-Ann,
I really appreciate your comments. We are loving the new look and I’m glad you like it too.
Rachel, what a wonderful transformation! You are so creative and I love how it looks! Congrats!
Mary,
I’m so glad you like it. We are thrilled with the update.
What cool way to give these cabinets a new lease on life, Rachel! Adding the caning was a genius move. They’re gorgeous and add just the right texture to your space. Hugs, CoCo
CoCo,
I’m so glad you like them. We are so happy with the results for the price.
Rachel what a good idea, I love it. It seemed to change the vibe of the room and added texture.
Diana,
Thank you! It was perfect solution to avoid replacing the cabinets.