Amazing Furniture Transformation – Before & After
I’m sharing my inspiration idea with instructions for an amazing furniture transformation. You will see before & after with step-by-step instructions and a complete supply list.
Y’all, I found a great deal on this thrifted chest last year. I wasn’t sure how to refinish it, so I quickly painted it with Chalk Paint and began using it as a nightstand. Recently inspiration struck, and here’s what I did.
Table of contents
The Thrift Store Chest- Before & After
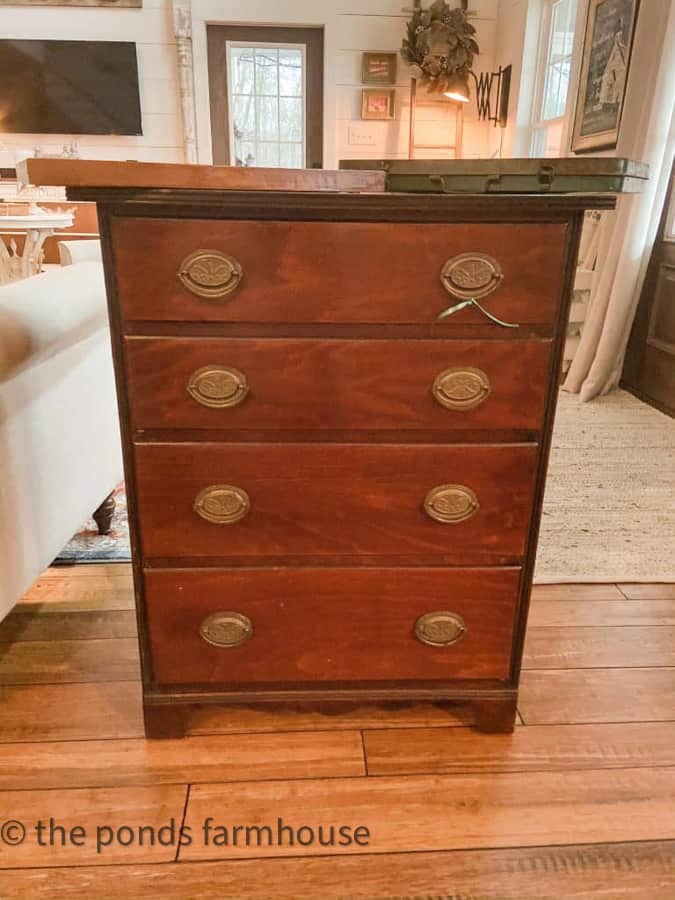
I purchased the chest for $40.00 at a thrift store last spring. It is a traditional small chest, solid wood, and in great shape. Although I was still determining what to do with it, home with me came.
(Posts on The Ponds Farmhouse may contain affiliate links. As an Amazon Associate, I earn from qualifying purchases. See the full disclosure details here.)
After Painting
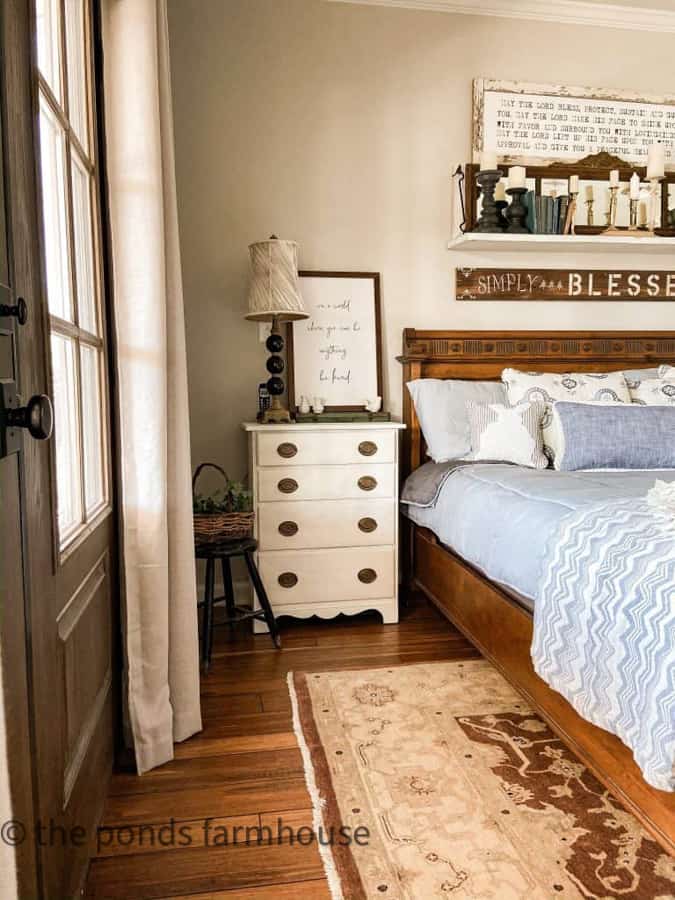
Here is what the chest looked like after an Old White Chalk Paint coat. I used the chest as a nightstand but wasn’t happy with its appearance.
I was waiting for inspiration to hit before making additional changes to the chest.
How To Determine The Design For Transformation
I saw a photo of a chippy card catalog cabinet and was finally inspired to transform this piece.
Once I had a vision for the transformation, I began to draw a plan.
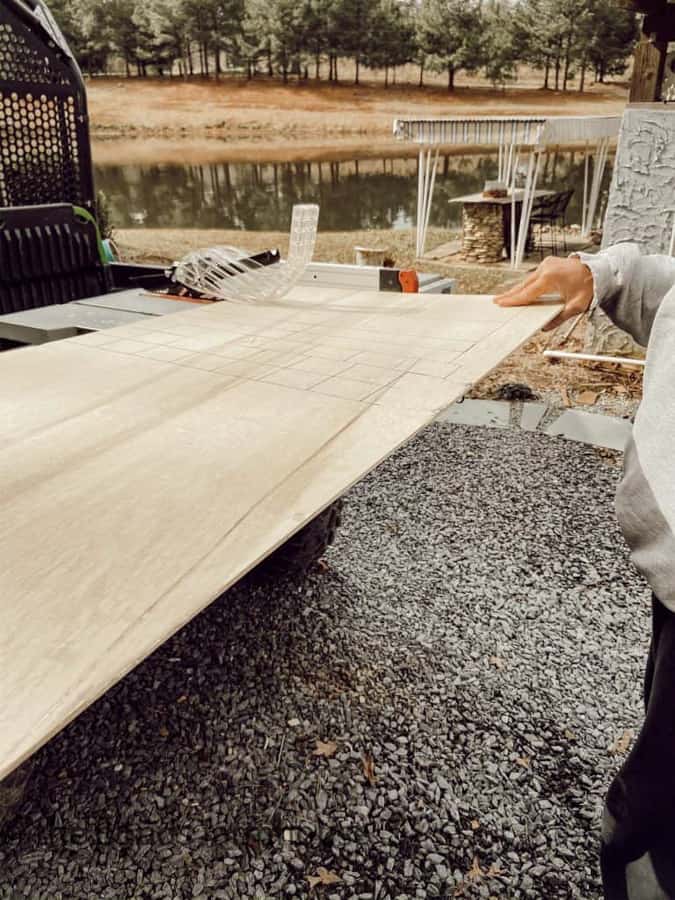
To make the chest look like a vintage card catalog cabinet, I would use wood trim and thin plywood to form faux drawers on the front of the actual drawers.
To determine the size of each piece, I used craft paper to cut patterns for the designs. This allowed me to attach the patterns to the drawer fronts as a trial run. Therefore, I knew the pieces would fit before actually cutting the wood.
Once your pattern is determined, you want to order or purchase your hardware. D. Lawless Hardware is my go-to for unique card catalogs or apothecary hardware; they are so inexpensive.
Materials & Tools Needed for Furniture Transformation
- Chest or Cabinet to be repurposed
- New Hardware (depending on your exact project)
- 2 1/2 ” Interior Pine Wood Casing Trim Wood (this project required 2- 8 ft. pieces)
- 1/4 smooth finish plywood (available in 2×4 sheet)
- Wood Screws -#4 3/4 to 1 inch
- Gel Stain – I used Walnut
- Chalk Paint
- Sand Paper
- Clear & Dark Wax
- Wood Filler Putty
- Cordless Drill
- Chop Saw
- Table saw
- Belt Sander
Let The Project Begin
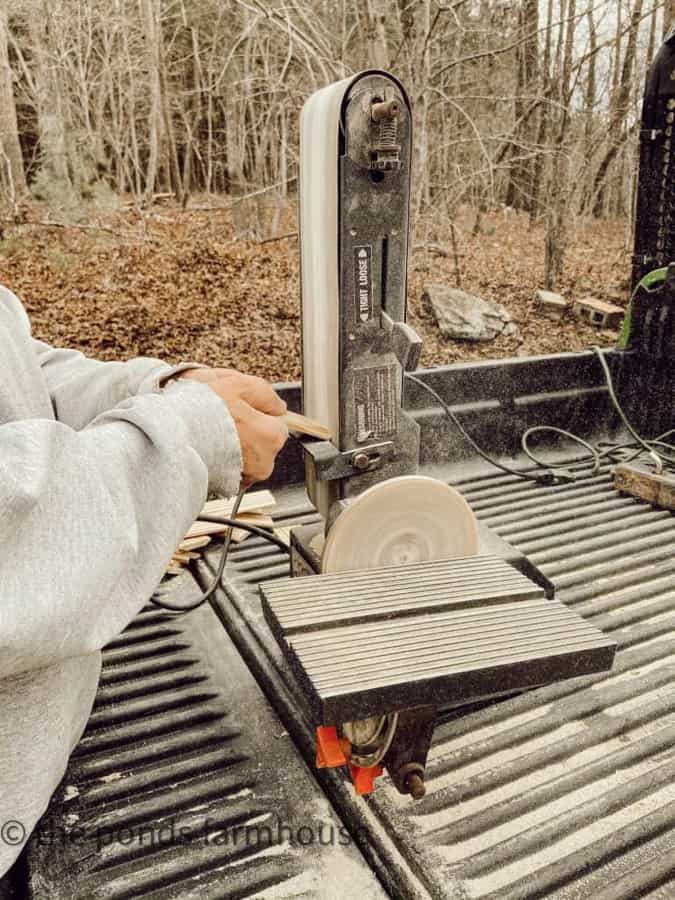
Using the patterns, you can begin by cutting each piece to be attached to the drawer fronts.
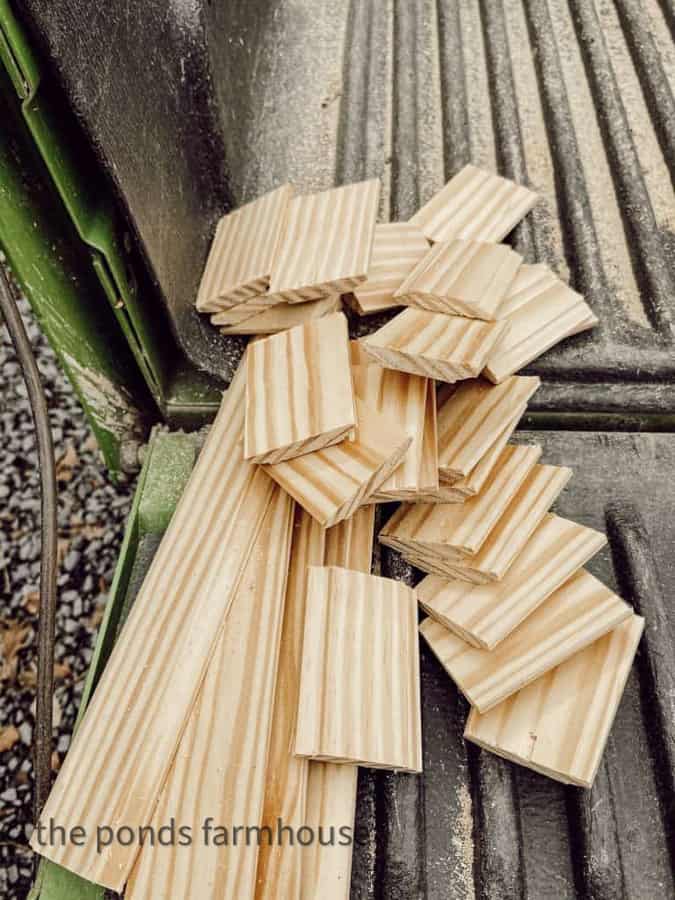
Cut each piece according to the patterns, then sand all ruff edges until smooth.
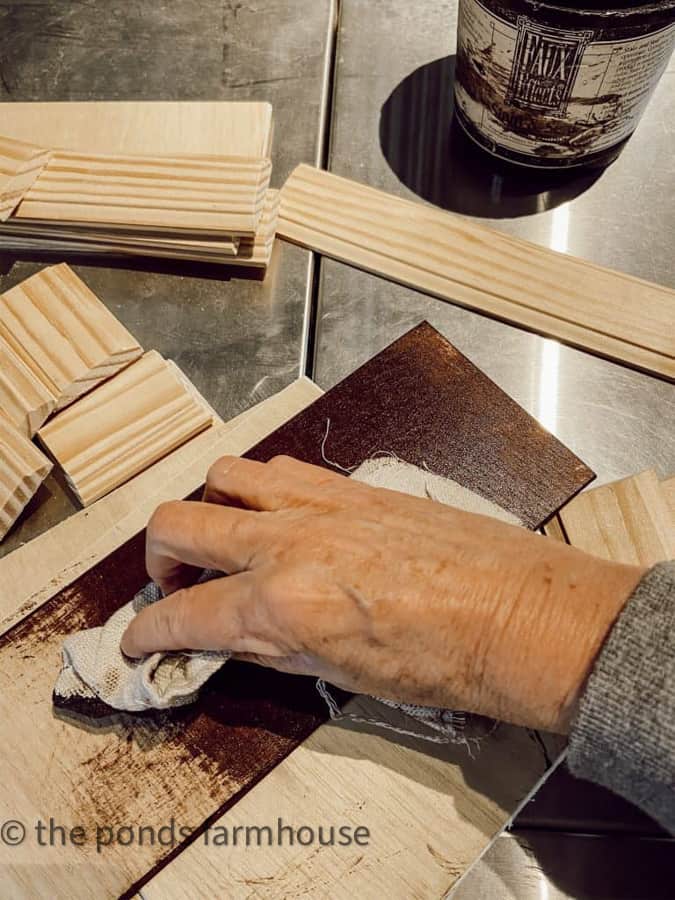
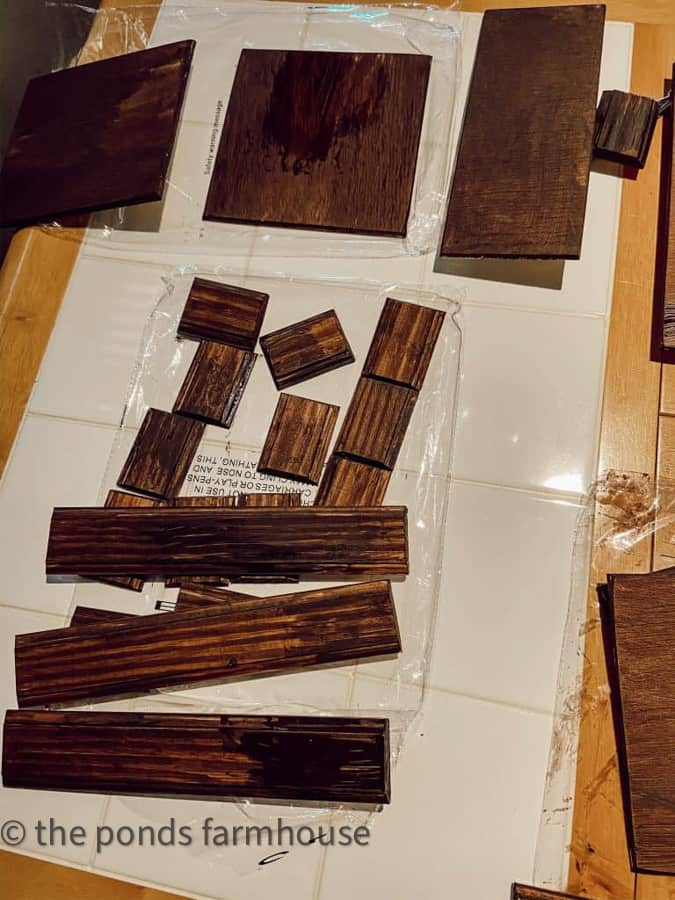
Stain New Wood
You will need to stain the new wood so that it appears to match the original stained chest. If you use a gel stain, you can rub it quickly with a rag.
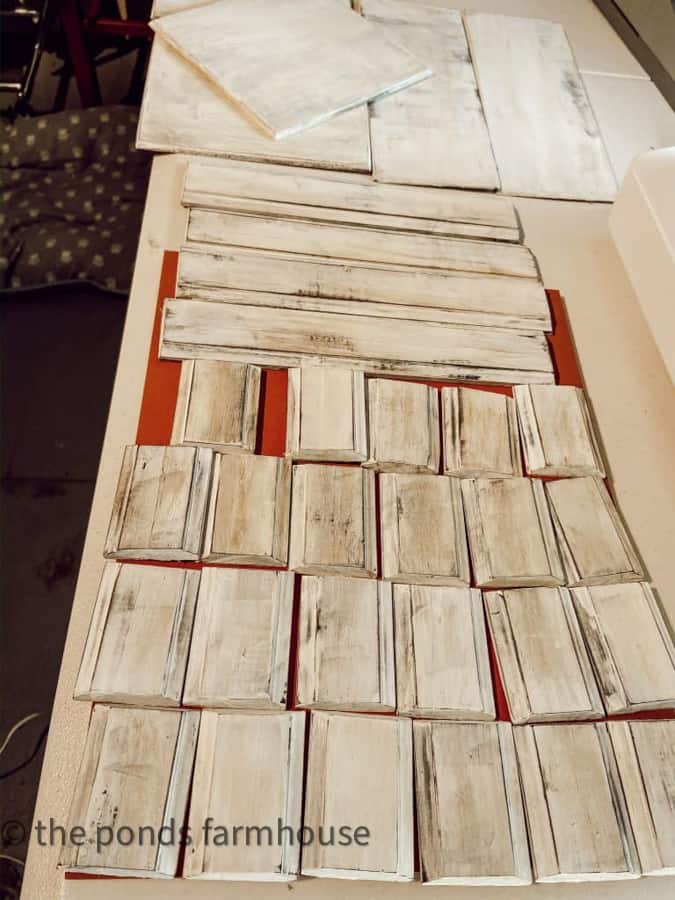
Paint and Wax
Next, you will want to paint the wood pieces and apply wax to seal and distress them. You can see How to Use Chalk Paint here.
Note: I used a heavy amount of Mineral Spirits mixed with the clear wax to achieve a heavily distressed appearance. In addition, I applied a small amount of dark wax over the buffed clear wax to darken the appearance further.
Amazing Furniture Transformation – Prepare Drawer Fronts
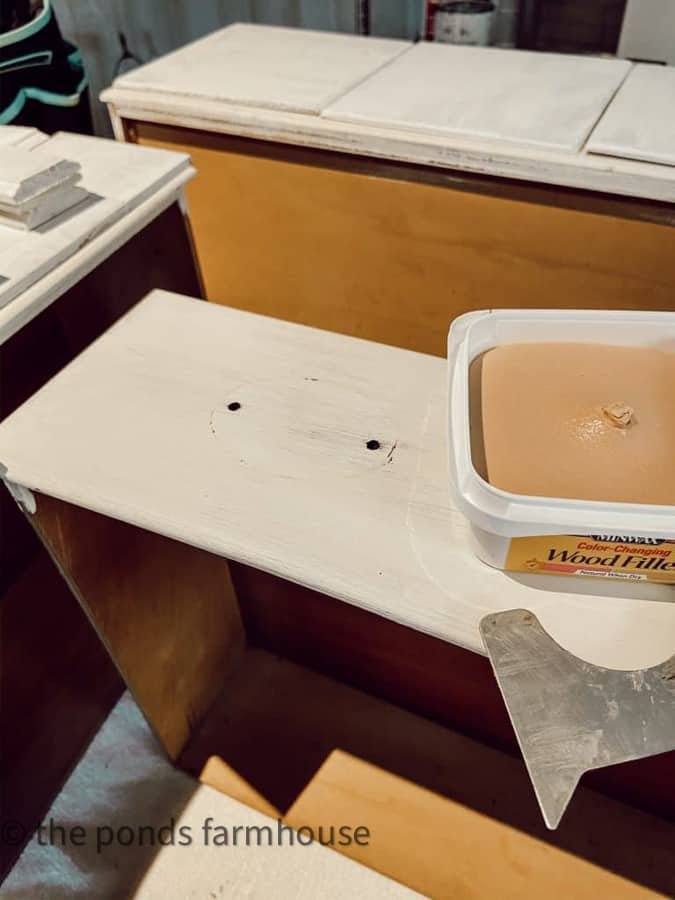
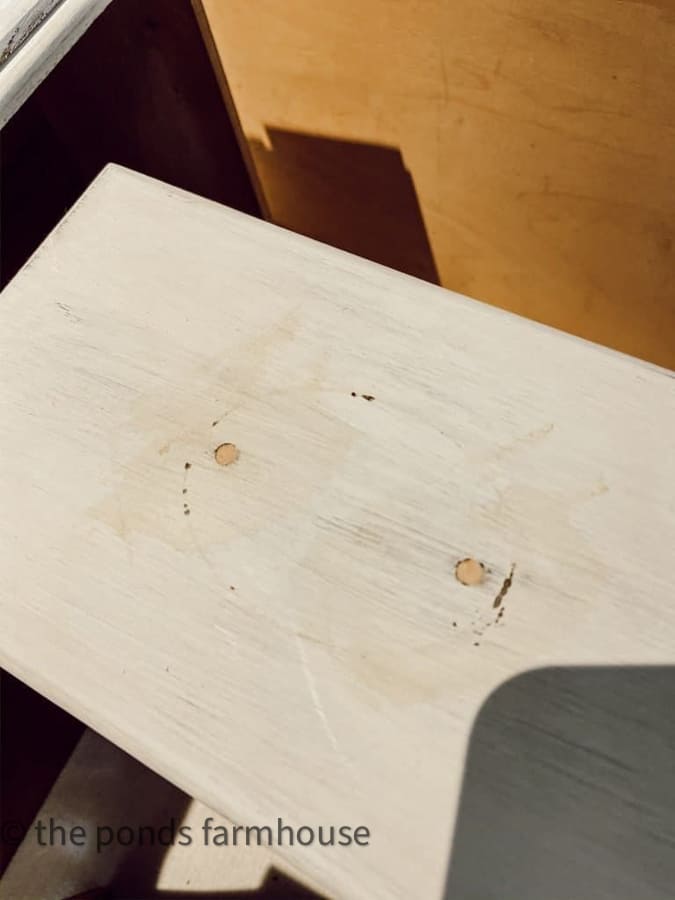
Now, you need to remove the old hardware from the drawer fronts and fill the existing holes with wood-filler putty.
Once the putty is dry, sand until smooth, then paint the chest or cabinet with two coats of Chalk Paint and seal with wax.
My chest was already painted, so I touched up the drawer fronts where the holes had been filled.
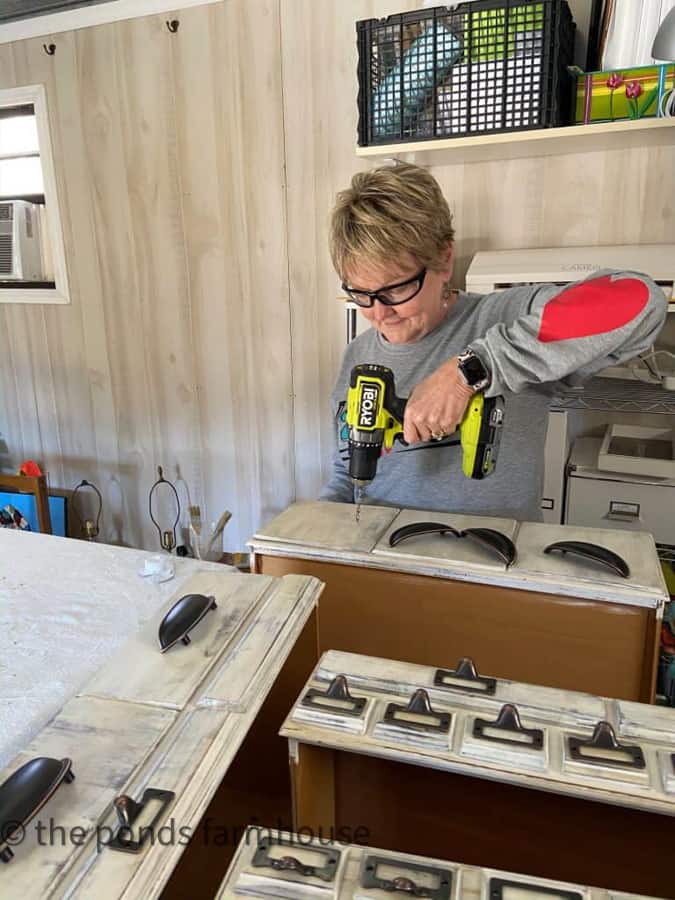
Attach Faux Wooden Drawers to Drawer Fronts
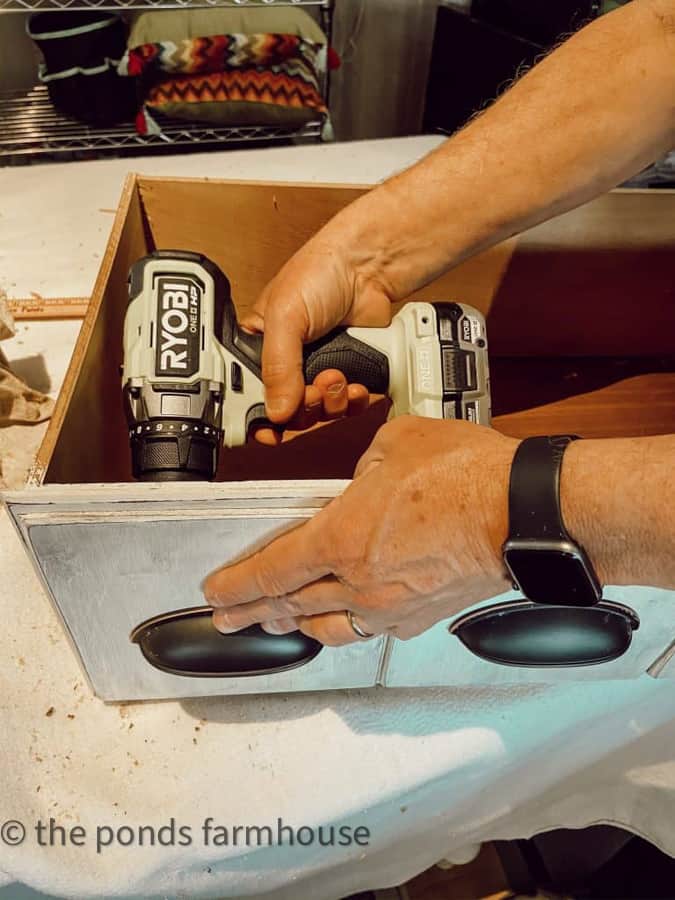
To attach the faux drawers to the actual drawer fronts, you can begin by arranging the wooden pieces evenly. You can mark the exact location with a pencil to ensure proper alignment.
Next, you will attach the new hardware to the wooden pieces while attaching them to the drawer front, all at the same time.
Drill Pilot Holes
You must drill pilot holes for all the screws to avoid splitting the wood.
Begin with the smaller pieces. Here I used D. Lawless Hardware Card File Label Holder w/Finger Pulls.
Next, carefully place the hardware in the desired position, drill the pilot hole, and then screw the hardware to the drawers. This will work best with two people working together.
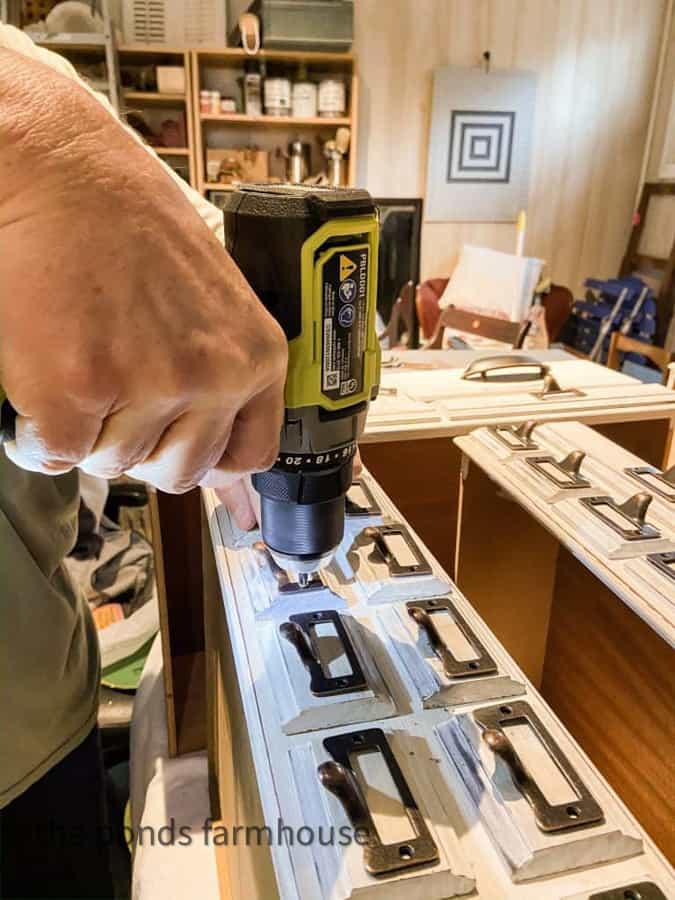
I used Bronze Cup Pulls from D. Lawless Hardware for the larger areas. These are attached by drilling a hole for the cup attachments to fit into and using the screws provided to attach from inside the drawer.
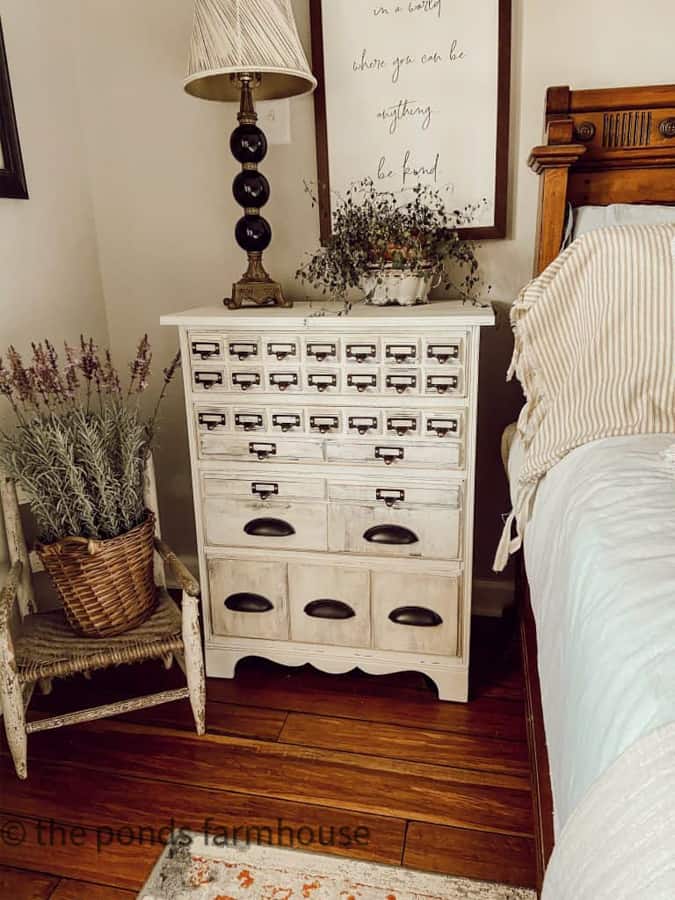
Amazing Furniture Transformation – Reveal
Don’t you love it? I’m glad I waited until the perfect idea came to mind.
When thrift store shopping, you always want to look beyond the piece. Ask yourself, can it be transformed, painted, or repaired?
An authentic vintage card catalog piece would be expensive if you are lucky enough to find one. I transformed this $40.00 find into a fun, exciting piece for an additional $40.00.
You might like to read 10 Tips for Successful Thrift Store Shopping also.
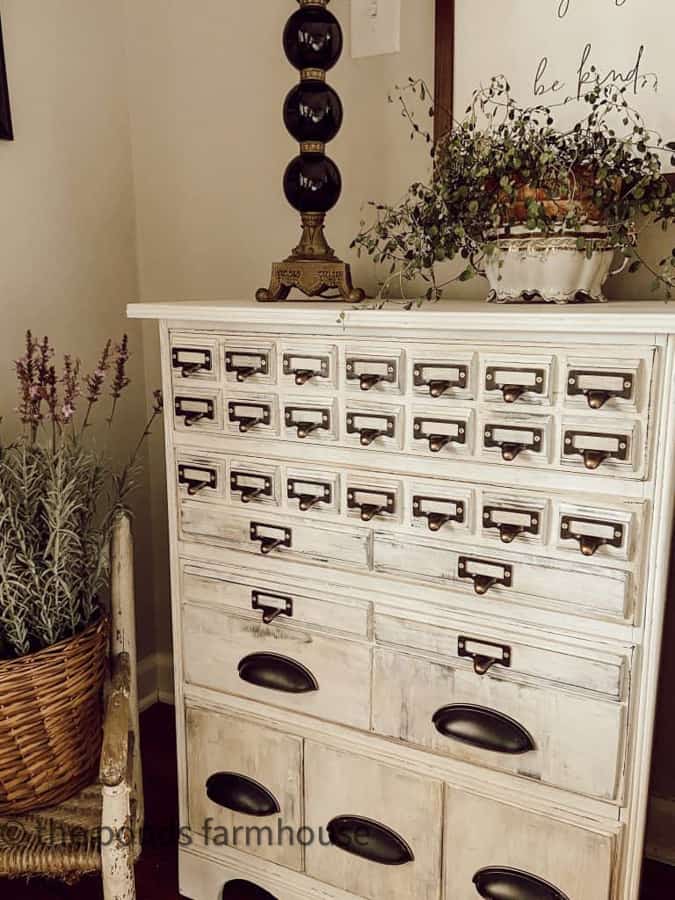
The chest now has a more industrial feel and works better within our industrial-style farmhouse.
More Furniture Transformation Ideas
- DIY Faux Apothecary Cabinet
- The Real Truth About Deconstructing a Chair
- Simple Makeover for Vintage Furniture
- 3-Step Furniture Makeover- Flea Market Flip
- How To Chalk Paint Furniture
- Easy Vintage Mid-Century Furniture Flip
Thanks for stopping by and I look forward to sharing my next adventure with you.

Pin It To Remember It
Did you find some great ideas you’d like to save for future reference? Hover over the images you’d like to save and pin to your favorite Pinterest Boards when you see the PIN button.

I love this transformation. I have a dresser I want to do something similar with.
Stacy,
Thanks! I love how it turned out.
You did good! I love it!
Margie
You are always my first comment of the day. Thank you for this support.
Rachel
PS… so glad you like it.
I love the card catalog look and have been on the search for just the right piece for quite some time now. Your transformation looks amazing! Your instructions are very easy to follow and could be achieved by anyone so very nicely done!
Shirley,
I’m so glad you like this. Thanks for the encouraging words.
Amazing! You did an awesome job!!!
What a cool transformation! I’ll be using this idea for sure!!!
Cindy,
Thanks so much. Glad you like it.
That looks amazing! Thanks, Rachel, for always being all-inspiring.
Miche,
Thank you for being so encouraging.
This is amazing! I actually love it either way, but those pulls…WOW!!!
Tammy,
Thanks so much! I appreciate your comments.
I am speechless! Amazing idea, looks amazing!! Followed by oh my gosh, I want this.
Robin,
I’m so glad you love this.
Wow, Rachel, this amazing. I’d never believe it was the same piece. You’re very creative, my friend!
I’d love for you to share this at Sundays on Silverado this weekend when it opens at midnight.
Niky @ The House on Silverado
Niky,
Thank you so much. I’m honored that you want to share.
You did such a great job Rachel! I absolutely love the change! Pinned.
Thanks so much Kim
Awesome transformation Rachel, Thanks for sharing your vision for this piece and how you brought it to life…You inspire!
Laura,
I really appreciate your encouragement.
Oh my goodness! I love it, Rachel. I have always wanted an apothecary style cabinet for all of our DVD’s, etc. Thank you for sharing your tutorial on this beautiful transformation.
Jen,
I’m so glad you like it. Thanks so much.
You are so talented…beautiful transformation! Pinned!
Kelly,
Thank you so much
That is one crazy transformation, Rachel! I wanna see the drawers open with the new fronts! So dang cool! Pinned!
Julie,
They still open like they did before. Thanks so much for your encouragement.
This has to be one of the best furniture redo’s I’ve ever seen! You are amazing! Featuring this over at the Friday Farmhouse LP! Pinned like crazy too!
Cindy,
OH my Gosh! Thanks so much.
I love how it turned out Rachel! I’ve always wanted to do something like this.
Shawn,
Thank you so much.
You are amazing! This piece is fantastic! I would have just slapped a coat of paint on it and called it done, but you went the extra ten miles and produced a piece of art. *le sigh* We had the same furniture in Army quarters 40+years ago, the matching dresser, highboy and that little piece there. Wish I had it, those were solid pieces of wood, very sturdy and I actually like the pulls. What you did with it just transformed it though.
Denise,
I appreciate your sweet compliments. Thank you so much.
Ahhh-mazing!!! Very, very cool transformation….love what you did, Rachel! But, then again, I love everything you do!! Thank you for sharing this makeover!!
Karolyn,
You are so sweet to say this. Thank you for your encouragement.
This is such a great find and the transformation is beautiful!!!! Thanks so much for sharing the process;)
Maria,
Thanks so much. I appreciate your encouragement.
No wayyyy!! This is unbelievable! I love it!
Ann,
I really appreciate your encouragement.
Wow! This IS an amazing furniture transformation. What a great idea for an old chest. When I saw your IG I thought it was a card catalog! You did an awesome job
Phyllis,
I appreciate you for stopping by and commenting. I’m so glad you thought it was authentic. Thanks for your support.
I love this idea and am thinking about trying it. Thank you for sharing. I have to say, I have NEVER seen a man bite his fingernails that badly!
Cate,
I’m so glad you like this idea.
Hand down one of my favorite pieces, Rachel! It doesn’t even look like the same dresser. Love how creative you are and how you have a vision that is so true to your farmhouse style. Everything about it is amazing. Loving and pinning as always, CoCo
CoCo,
You are so kind. I appreciate your comments so much.
I have been wanting to try this and hope to still. Yours looks amazing
Sue,
I’m so glad you liked this. Best of luck.
I was completely in love with the chest when I saw the first picture! The fact that you altered a simple one into a library drawer look is amazing!
Sidney,
I’m so glad you like this transformation. I appreciate you for stopping by.
Unbelievable transformation! It is beautiful!
Susan, I’m so glad you like this project. It’s a favorite of mine as well.
Rachel, what a fabulous transformation on this chest! I love how you turned it into a card catalog cabinet. Can’t beat that price either!-Meagan
Meagan,
I really appreciate your comment. It’s a favorite transformation. Thanks for stopping by.
Only you would come up with this great idea! I love it!
Margie,
You lift me up when I need it most. Thank you for following along with me. I appreciate you so much.
It looks so beautiful! Such a great idea!
Renae,
I appreciate this.
This transformation turned out beautiful. It was pretty how you painted it before. But the new version is absolutely amazing.
Tammy,
I appreciate you for stopping by. Thank you so much.
From ordinary to extraordinary! Bravo!
Paula,
I’m so glad you like it.
That’s amazing. I am speechless!
Mary,
Thank you for commenting and all your encouragement.
Hey Rachel…love the card catalogue transformation of the dresser!
My only concern is: are those label holders strong enough to use to pull a drawer open, as I don’t see any other means to open the drawers?
I have brutish, teenage grandsons that will be using the piece of furniture that I want to transform! LoL
Nadja,
Yes, these are very sturdy drawer pulls. Just be sure that you use quality materials and you should be good to go.