Are you tired of your plain lampshade? Are you ready to transform it and create a unique custom lamp? You can easily upcycle your boring shade with this simple lampshade decoupage guide. This DIY lampshade makeover includes a step-by-step guide to creating no-wrinkle napkin decoupage ideas. Follow along and I will have you creating a beautiful new lampshade in no time.

(Posts on The Ponds Farmhouse may contain affiliate links. As an Amazon Associate, I earn from qualifying purchases. See the full disclosure details here.)
Table of contents
Lampshade Decoupage Tutorial
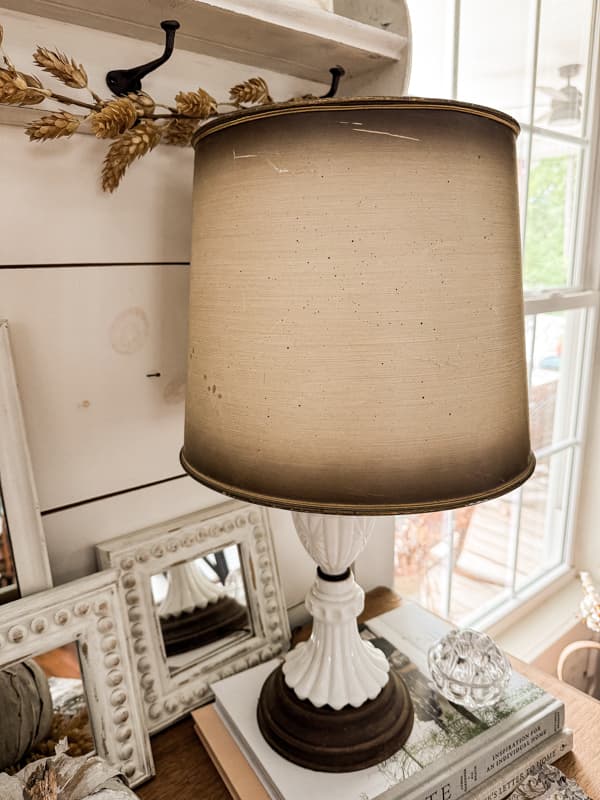
The lampshade I plan to makeover came with a vintage milk glass lamp I found in a thrift store. Although the shade was slightly scuffed, I temporarily placed it on our entry table. I thought I’d replace it with a new lampshade, but then inspiration struck. Instead of trashing the old shade, I decided on a makeover instead.
Below is the vintage lampshade that came with the milk glass lamp. It’s made of hardboard with a gold rim around the top and bottom. It’s in good shape except for a few scratches and small pin holes. The shape and materials are perfect for this repurposing project.
What Kind Of Lampshade Can You Use Napkin Decoupage On?
Not all lampshades are created equally. The vintage lampshade that came with the milk glass lamp is made of heavy cardboard, an excellent material for these napkin decoupage ideas.
You can use any smooth surface, hardback paper, cardboard, or fabric lampshade. This technique will be difficult and likely impossible on a loose fabric, pleated, or soft-back lampshade. Below are some of the shades that this technique will work on. Click the images for details.

Thrift Store Lampshades
You can look for these types of shades in thrift stores and they will much cheaper. You don’t need a perfect shade for these napkin decoupage ideas.
Supplies For DIY Lampshade Makeover
In addition to the lampshade, you will need a few more supplies to complete the DIY lampshade makeover. Here are the supplies I used.
- Cocktail Napkins that will work with your decor. Here are the ones I used.
- Mod Podge Luster
- Small Heat Press
- Rub N Buff Antique Gold
Optional Supplies—If you need to trim the top and bottom of your lampshade, here are some recommended supplies. See Resources at the end of this post for more details.
- Lampshade
- Bias Trim
- Bias Trim Maker
- Hot Glue Gun
Lampshade Decoupage Ideas
First, to make a lampshade decoupage without wrinkles, you will need to prepare the lampshade. Make sure the shade is clean. If your lampshade isn’t compatible with your napkin, you may need to add a coat of paint. Most napkins have a white background, and the decoupage may not have the desired effect if applied over a dark color. If necessary, paint the lampshade with white or lighter paint and allow it to dry completely before proceeding.
Now, you can apply a generous coat of Mod Podge on the outside of the lampshade and allow it to dry. Also, add something to the inside of the shade to prevent the paper from bending. I used a rolled-up beach towel that fits snugly inside the shade.


How To Apply Napkin To Lampshade
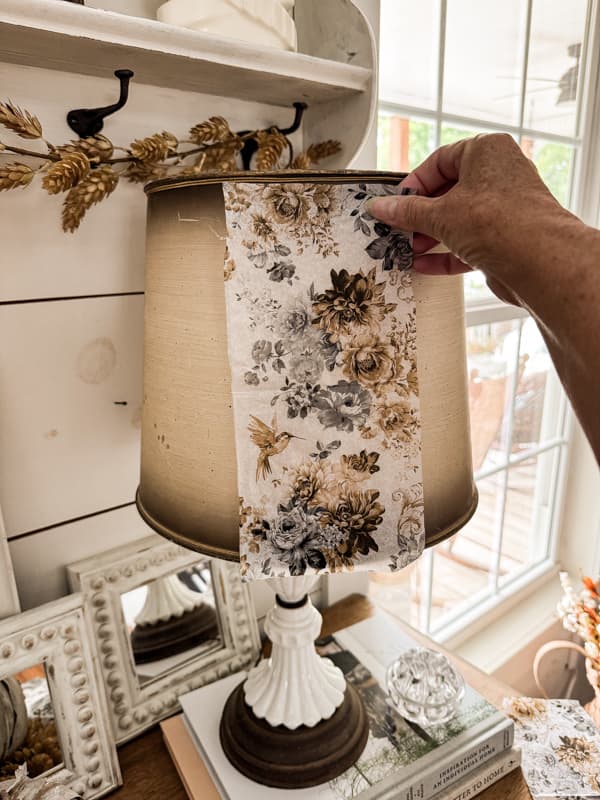
First, preheat your heat press and separate the napkin layers. I used tape to separate the layers gently. For this napkin decoupage idea, you will only need the top decorative layer.
Most cocktail napkins have a unique pattern that runs in the opposite direction when you unfold them. If that is the case, cut the napkin in half and turn the pattern in the same direction around the shade. In addition, you may need to trim the napkin to fit the shade. All napkin pieces should run vertically and straight up and down on the lampshade. You can apply without trimming if your top and bottom are the same diameter.
Hold the napkin at the top rim of your lampshade to apply it. Starting at the top, press the napkin into place, smoothing any wrinkles as you go. Work downward and from side to side until the napkin is completely adhered to the shade. The heat press will activate the dried Mod Podge, allowing you to create a wrinkle-free lampshade.
Continue to apply each piece of napkin until the entire shade is covered.

Insider Tips
I recommend cutting and applying the napkin as you go. If you trim beforehand, you risk the pattern getting off-center. A flared lampshade design will require more trim work.
Do not try to overlap the napkin. Instead, align the edges of the napkin together. The Mod Podge will not activate through the napkins, and any overlaps will be unattached.
You may see a few minor wrinkles, but that’s okay! Even with the heat press technique, the delicate nature of the napkin makes it hard to smooth 100%.

Other Napkin Decoupage Ideas
I have made several decoupage projects, and napkin decoupage ideas can be used in multiple ways to create stunning home decor. Here are a few other ways to apply a napkin for a DIY lampshade makeover.
- Paint the lampshade in a contrasting color and cut the napkin into smaller pieces to arrange the shade.
- Only apply napkin pieces to the shade’s lower rim for a decorative border.
- Create a decorative pattern in the center of the shade by creating a pattern with the napkin pieces.
How To Finish Your DIY Lampshade Makeover
The best finish for your DIY lampshade makeover will depend on the lampshade itself. My vintage lampshade has a gold rim at the top and bottom. I used an exacto knife to trim away any napkin that overlapped the rim. Next, I touched up the rim with antique gold rub-and-buff.
Just apply a small amount of the rub n buff to a paper towel and rub over the rim.


Optional Trim Methods
I recommend making a fabric trim if your lampshade has a paper or fabric rim around the top and bottom. You can purchase bias tape in a color that coordinates with your napkin or buy your fabric and make the bias trim.
You can use a bias trim maker to create your desired trim quickly. See the resource at the end for details.
It’s easy to attach a bias trim with your hot glue gun. This Pleated Fabric Lampshade Makeover tutorial explains more about applying the bias trim.
Lampshade Decoupage Makeover
The makeover was quick and easier than I thought it would be! I love the new look, which gives the space a warm and cozy feel.

The lampshade makeover took about two hours, including the Mod Podge drying time.
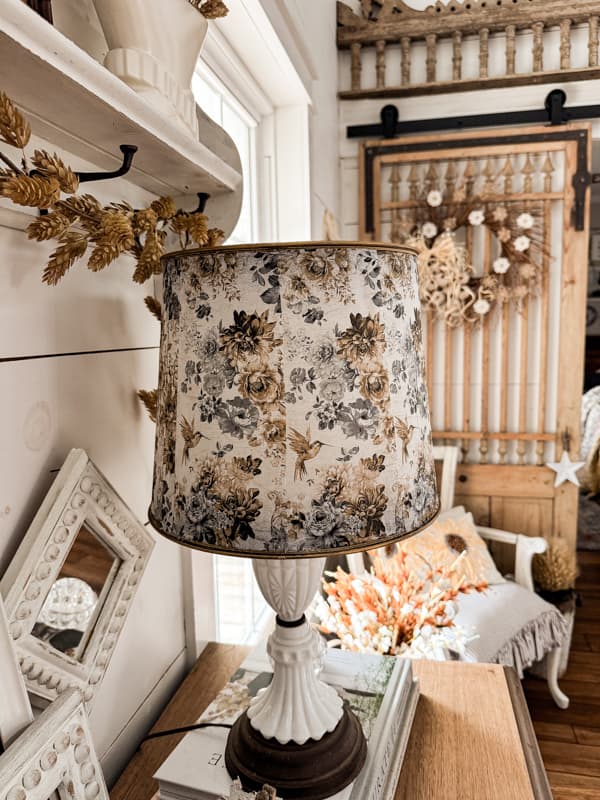
I added decorative corn husk topiaries and pumpkins to fill the entry table this fall. The napkin colors created a perfect lamp addition to this years fall decorations.

Resources
Resources for lampshade update. Click Images To Shop!


MARY-ANN (FROM CANADA)
Friday 6th of September 2024
Rachel, the lampshade is so pretty! Great instructions, too. Thanks for such a great idea! I would never have thought of remaking a lampshade like you did -- so neat!
Rachel
Thursday 12th of September 2024
Mary-Ann Thank you for your words of encouragement. I'm glad you like this idea.
Ann
Friday 6th of September 2024
Well, I think this is gorgeous!
Rachel
Thursday 12th of September 2024
Ann, I'm so happy with it and I'm glad you like it also. Thank you for stopping by.
Cindy@CountyRoad407
Friday 6th of September 2024
What a beautiful transformation. The napkins you chose make the lamp base stand out even more. Love this! pinned
Rachel
Thursday 12th of September 2024
Cindy, Thank you! When I saw the napkins, I knew they were perfect.